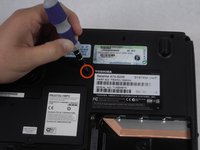
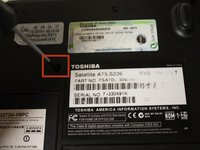
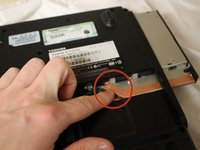
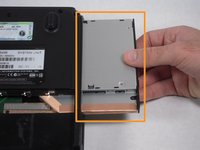
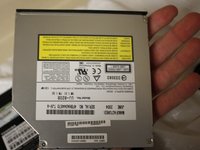
Salta al contenuto principale

Toshiba Satellite A75-S226 CD Drive Replacement

Cosa ti serve

  1. Toshiba Satellite A75-S226 CD Drive Replacement, Optical Drive: passo 1, immagine 1 di 2 Toshiba Satellite A75-S226 CD Drive Replacement, Optical Drive: passo 1, immagine 2 di 2
    • Remove the two 5.62 mm screws from the optical drive cover.

  2. Toshiba Satellite A75-S226 CD Drive Replacement: passo 2, immagine 1 di 2 Toshiba Satellite A75-S226 CD Drive Replacement: passo 2, immagine 2 di 2
    • Remove the optical drive cover.

    • A plastic opening tool or a fingernail may be helpful in lifting it from its groove.

  3. Toshiba Satellite A75-S226 CD Drive Replacement: passo 3, immagine 1 di 1
    • Using the inset divot, push the optical drive out of the laptop to remove.

  4. Toshiba Satellite A75-S226 CD Drive Replacement, CD Drive: passo 4, immagine 1 di 3 Toshiba Satellite A75-S226 CD Drive Replacement, CD Drive: passo 4, immagine 2 di 3 Toshiba Satellite A75-S226 CD Drive Replacement, CD Drive: passo 4, immagine 3 di 3
    • Remove the 8.6 mm screw.

  5. Toshiba Satellite A75-S226 CD Drive Replacement: passo 5, immagine 1 di 3 Toshiba Satellite A75-S226 CD Drive Replacement: passo 5, immagine 2 di 3 Toshiba Satellite A75-S226 CD Drive Replacement: passo 5, immagine 3 di 3
    • Push the bottom left corner of the CD Drive until the drive protrudes from the case.

    • When a good amount of the CD Drive is showing on the right side, gently pull it out completely.

Conclusione

To reassemble your device, follow these instructions in reverse order.

Un'altra persona ha completato questa guida.

Team

Cal Poly, Team 4-43, Amido Fall 2010 Membro di Cal Poly, Team 4-43, Amido Fall 2010

CPSU-AMIDO-F10S4G43

5 Membri

39 Guide realizzate

0 Commenti

Aggiungi Commento

Visualizza Statistiche:

Ultime 24 Ore: 0

Ultimi 7 Giorni: 0

Ultimi 30 Giorni: 5

Tutti i Tempi: 3,421