Questa versione può contenere modifiche errate. Passa all'ultima istantanea verificata.
Cosa ti serve
-
Questo passaggio è privo di traduzione. Aiuta a tradurlo
-
Flip the laptop over so the bottom is facing up.
-
Slide each of the three tabs on the bottom half of the assembly into the unlocked position.
-
-
Questo passaggio è privo di traduzione. Aiuta a tradurlo
-
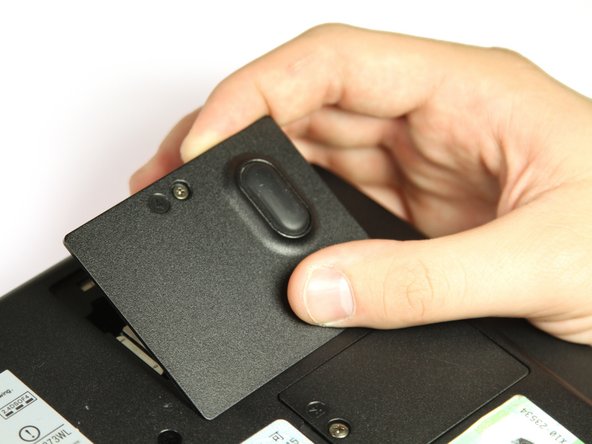
Gently lift the battery out of the computer.
-
-
Questo passaggio è privo di traduzione. Aiuta a tradurlo
-
Remove the single 3mm Phillips #00 screw that secures the wireless card cover.
-
-
Questo passaggio è privo di traduzione. Aiuta a tradurlo
-
Remove the WIFI module cover. It will pull right off.
-
-
-
Questo passaggio è privo di traduzione. Aiuta a tradurlo
-
Unplug the white and black wires from the WiFi module.
-
-
Questo passaggio è privo di traduzione. Aiuta a tradurlo
-
Remove the twelve 8mm button head Phillips #00 B8 screws.
-
Remove the two 14 mm button head Phillips #00 B14 screws.
-
Remove the two 10 mm Phillips #00 battery compartment screws.
-
Remove the two 8 mm Phillips #00 screws.
-
-
Questo passaggio è privo di traduzione. Aiuta a tradurlo
-
Remove the seven 4mm flat Phillips #00 screws.
-
Remove the seven 20mm button head Phillips #00 screws.
-
-
Questo passaggio è privo di traduzione. Aiuta a tradurlo
-
Use the plastic opening tool to pry the two halves apart.
-
-
Questo passaggio è privo di traduzione. Aiuta a tradurlo
-
Slide the optical drive out of the laptop through the opening on the left side of the bottom assembly.
-


Un commento
Or, simply remove the screw (the center one in this photo) from the bottom case that holds the bracket in and pull the drive out.