Salta al contenuto principale

Toshiba Satellite A215-S7425 Screen Replacement

Cosa ti serve

  1. Toshiba Satellite A215-S7425 Screen Replacement, Battery: passo 1, immagine 1 di 1
    • Turn off the computer.

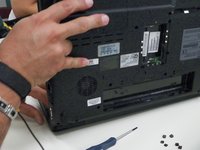
    • Disconnect the charging cable from computer.

    • Failure to unplug the cable could result in electric shock.

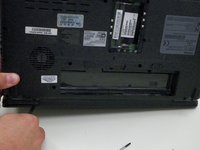
    • Flip the computer upside down.
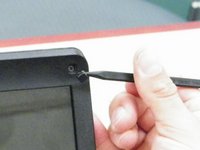
  2. Toshiba Satellite A215-S7425 Screen Replacement: passo 2, immagine 1 di 1
    • Slide latches labeled #1 and #2, located outside the battery cover, away from each other.

    • Latch #1 will click over and stay while latch #2 will have to be held for battery to release.

  3. Toshiba Satellite A215-S7425 Screen Replacement: passo 3, immagine 1 di 1
    • Gently lift and pull the battery out of the device.

  4. Toshiba Satellite A215-S7425 Screen Replacement, Screen: passo 4, immagine 1 di 2 Toshiba Satellite A215-S7425 Screen Replacement, Screen: passo 4, immagine 2 di 2
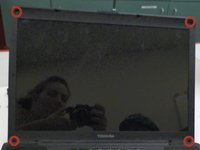
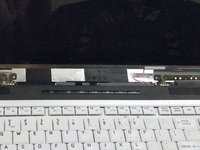
    • Use tweezers to remove rubber screw covers on 4 corners of frame around screen.

  5. Toshiba Satellite A215-S7425 Screen Replacement: passo 5, immagine 1 di 1
    • Remove 4 Phillips 5.6 mm screws.

  6. Toshiba Satellite A215-S7425 Screen Replacement: passo 6, immagine 1 di 2 Toshiba Satellite A215-S7425 Screen Replacement: passo 6, immagine 2 di 2
    • Use flat side of spudger to pry the top and sides of the frame around screen.

  7. Toshiba Satellite A215-S7425 Screen Replacement: passo 7, immagine 1 di 2 Toshiba Satellite A215-S7425 Screen Replacement: passo 7, immagine 2 di 2
    • Turn device onto its screen side to access the bottom of hinge portion of the screen and push bottom piece of frame along device hinge until it loosens.

  8. Toshiba Satellite A215-S7425 Screen Replacement: passo 8, immagine 1 di 3 Toshiba Satellite A215-S7425 Screen Replacement: passo 8, immagine 2 di 3 Toshiba Satellite A215-S7425 Screen Replacement: passo 8, immagine 3 di 3
    • Return device to upright position and gently pull frame away from screen.

  9. Toshiba Satellite A215-S7425 Screen Replacement: passo 9, immagine 1 di 1
    • Remove 2 Phillips 5.6 mm screws from below screen.

  10. Toshiba Satellite A215-S7425 Screen Replacement: passo 10, immagine 1 di 2 Toshiba Satellite A215-S7425 Screen Replacement: passo 10, immagine 2 di 2
    • Unplug pink and white monitor cable from bottom of screen.

  11. Toshiba Satellite A215-S7425 Screen Replacement: passo 11, immagine 1 di 1
    • Remove 3 Phillips 3.2 mm screws from each side of the metal case around screen.

  12. Toshiba Satellite A215-S7425 Screen Replacement: passo 12, immagine 1 di 1
    • Pull the screen forward from the top out of the metal frame enough to see the back of the screen.

  13. Toshiba Satellite A215-S7425 Screen Replacement: passo 13, immagine 1 di 3 Toshiba Satellite A215-S7425 Screen Replacement: passo 13, immagine 2 di 3 Toshiba Satellite A215-S7425 Screen Replacement: passo 13, immagine 3 di 3
    • Hold the screen with one hand and gently remove the display cable from the back side of the screen.

    • The display cable is typically glued or taped to the back of the screen. Take care to carefully lift the tape and slowly pull cable.

    • To avoid damaging screen ribbon cable, use caution and be gentle. Do not yank or remove with force. Avoid bending the ribbon cable which can cause the wires inside it to snap and break.

Conclusione

To reassemble your device, follow these instructions in reverse order.

Marianne

Membro da: 09/08/14

647 Reputazione

6 Guide realizzate

Team

Pasco Hernando, Team 5-2, Prince Fall 2014 Membro di Pasco Hernando, Team 5-2, Prince Fall 2014

PHSC-PRINCE-F14S5G2

10 Membri

18 Guide realizzate

0 Commenti

Aggiungi Commento

Visualizza Statistiche:

Ultime 24 Ore: 0

Ultimi 7 Giorni: 1

Ultimi 30 Giorni: 4

Tutti i Tempi: 422