Questa versione può contenere modifiche errate. Passa all'ultima istantanea verificata.
Cosa ti serve
-
Questo passaggio è privo di traduzione. Aiuta a tradurlo
-
Close the laptop and turn it over so that the base is facing upwards and the spine is facing away from you.
-
Find the battery compartment.
-
Slide the left slider which is just beneath the battery compartment into its leftmost position.
-
-
Questo passaggio è privo di traduzione. Aiuta a tradurlo
-
Slide and hold the right slider into its rightmost position. Lift the battery out of the compartment.
-
Do not touch the gold nodes inside the compartment.
-
-
Questo passaggio è privo di traduzione. Aiuta a tradurlo
-
Place laptop right side up on a flat and clean surface. Open the laptop.
-
Find the strip just above the keyboard and locate the gaps behind the F1, F8, and Insert keys.
-
Remove the strip by sticking your plastic opening tool into these gaps in order, and pulling up.
-
-
Questo passaggio è privo di traduzione. Aiuta a tradurlo
-
Locate the two 2.3mm Phillips #1 screws at the top of the keyboard that attaches the keyboard to the frame behind it.
-
Remove screws.
-
-
Questo passaggio è privo di traduzione. Aiuta a tradurlo
-
Find the latch above the F8 key that overlaps the keyboard.
-
-
Questo passaggio è privo di traduzione. Aiuta a tradurlo
-
Pull the keyboard out by shifting it forward towards the screen and pulling up.
-
CAUTION: Do not pull it out all the way yet. It is still attached to the laptop by a cable.
-
-
Questo passaggio è privo di traduzione. Aiuta a tradurlo
-
Find the ribbon cable that connects the keyboard to the laptop. Look for the black tabs on both sides of cable at the laptop end of the cable.
-
Using a pair of tweezers, pull the black tabs on both sides of the cable connector towards the screen until the cable can be pulled out easily.
-
Pull out the cable and completely remove the keyboard.
-
-
Questo passaggio è privo di traduzione. Aiuta a tradurlo
-
Close the lid and flip the laptop over so that the bottom side is facing you.
-
Remove nineteen 8mm Phillips #1 screws, labeled with "F8."
-
Locate and Remove two "f4" screws as well.
-
-
-
Questo passaggio è privo di traduzione. Aiuta a tradurlo
-
Locate the RAM compartment.
-
Unscrew the two Phillips #1 screws and lift the lid up.
-
-
Questo passaggio è privo di traduzione. Aiuta a tradurlo
-
Unscrew the two 8mm Phillips #1 screws inside the RAM compartment.
-
-
Questo passaggio è privo di traduzione. Aiuta a tradurlo
-
Remove the three 3mm Phillips #1 screws inside the battery compartment.
-
-
Questo passaggio è privo di traduzione. Aiuta a tradurlo
-
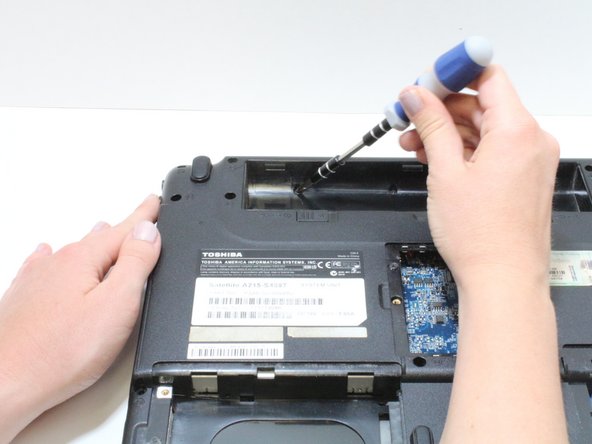
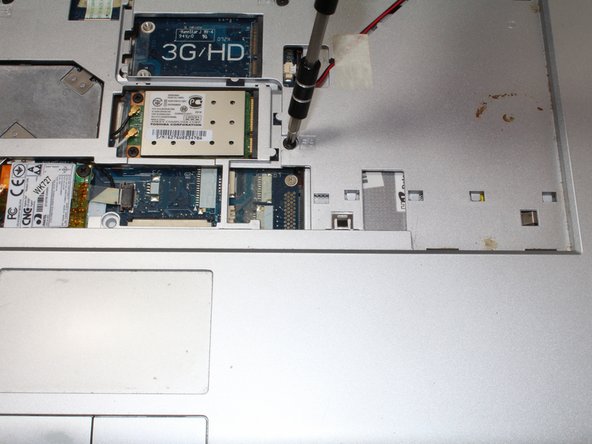
Turn computer over and open lid.
-
Remove the four 8mm Phillips #1 screws in the slot where the keyboard sat.
-
-
Questo passaggio è privo di traduzione. Aiuta a tradurlo
-
Locate the speaker cables near the top right corner.
-
Use tweezers to carefully disconnect the cable.
-
-
Questo passaggio è privo di traduzione. Aiuta a tradurlo
-
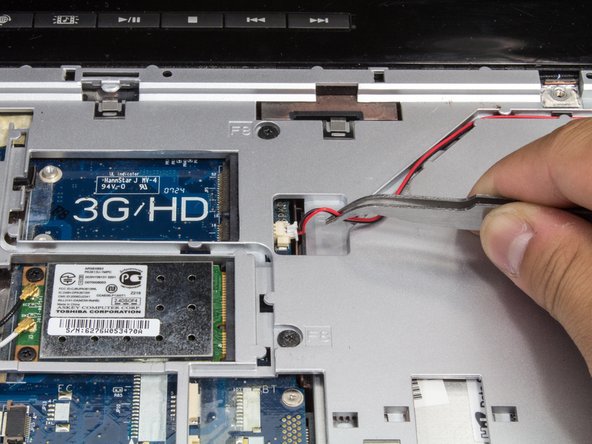
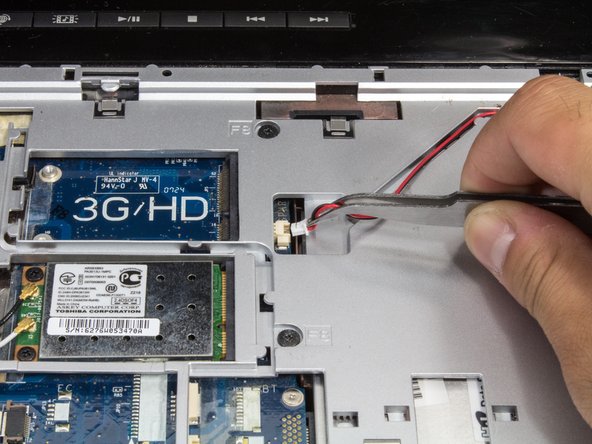
Locate the cable on the bottom left hand corner of keyboard slot.
-
Gently pull it out to the left.
-
-
Questo passaggio è privo di traduzione. Aiuta a tradurlo
-
Locate the cable at the top of the frame.
-
Using tweezers, pull tabs on either side, toward the screen, and pull the cable out of socket.
-
-
Questo passaggio è privo di traduzione. Aiuta a tradurlo
-
Locate another ribbon cable at the lower center of the keyboard slot.
-
Using tweezers, pull tabs out to the left, and pull cable out of socket.
-
-
Questo passaggio è privo di traduzione. Aiuta a tradurlo
-
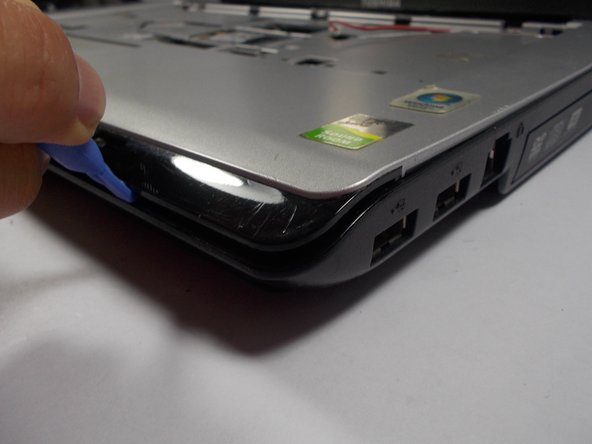
Using a plastic opening tool, insert into slit around laptop and separate the silver frame from black bottom.
-
Lift frame away from laptop.
-
-
Questo passaggio è privo di traduzione. Aiuta a tradurlo
-
Locate the fan in the top left hand corner of the inside of the laptop.
-
Remove the following screws from the fan encasement:
-
Two 12 mm Phillips #1 screws
-
Two 2.3 mm Phillips #1 screws.
-
-
Questo passaggio è privo di traduzione. Aiuta a tradurlo
-
Pull away gray flat cable from the fan so that it is no longer stuck to the fan's surface.
-
Disconnect cable by pulling the black end to the left so that it detaches from the white plastic piece.
-
-
Questo passaggio è privo di traduzione. Aiuta a tradurlo
-
Using tweezers, disconnect power cable by gently pulling white end straight away from its socket.
-
-
Questo passaggio è privo di traduzione. Aiuta a tradurlo
-
Begin by carefully removing the rubber bumper pads located at each corner of the plastic screen casing.
-
Using a Phillips screwdriver you may unscrew and remove the screws located directly under the the rubber bumper pads. Remember to keep track of the removed screws!
-
-
Questo passaggio è privo di traduzione. Aiuta a tradurlo
-
Once the screws are removed using a plastic opening tool gently pry the plastic screen casing apart.
-
Next, carefully pry the screen casing from the monitor's hinge to remove the plastic casing.
-
Last, locate the (6) six screws located on either side of the compuet screen and remove.
-
-
Questo passaggio è privo di traduzione. Aiuta a tradurlo
-
Gently place screen face down on laptops hardware
-
Detach tape that is over the screens connection to the laptop, and detach connection with tweezers by pulling back
-
Disconnect blue wire near the base of the screen with tweezers, by pulling it straight out
-


Annulla: non ho completato questa guida.
Altre 2 persone hanno completato questa guida.
Team

University of Maryland, Team 5-1, Cichon Spring 2014 Membro di University of Maryland, Team 5-1, Cichon Spring 2014
UMD-CICHON-S14S5G1
3 Membri
9 Guide realizzate