Questa versione può contenere modifiche errate. Passa all'ultima istantanea verificata.
Cosa ti serve
-
Questo passaggio è privo di traduzione. Aiuta a tradurlo
-
Close the laptop and turn it over so that the base is facing upwards and the spine is facing away from you.
-
Find the battery compartment.
-
Slide the left slider which is just beneath the battery compartment into its leftmost position.
-
-
Questo passaggio è privo di traduzione. Aiuta a tradurlo
-
Slide and hold the right slider into its rightmost position. Lift the battery out of the compartment.
-
Do not touch the gold nodes inside the compartment.
-
-
Questo passaggio è privo di traduzione. Aiuta a tradurlo
-
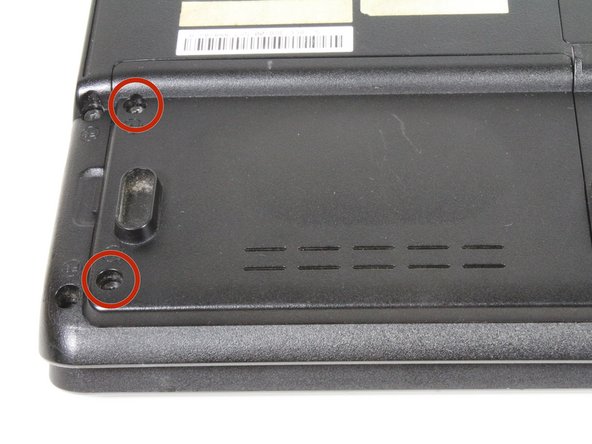
Locate the hard drive in the left hand corner, and remove the two 4mm Phillips #1 screws.
-
-
-
Questo passaggio è privo di traduzione. Aiuta a tradurlo
-
Using a plastic opening tool, open the compartment and remove the compartment cover.
-
-
Questo passaggio è privo di traduzione. Aiuta a tradurlo
-
Use a pair of metal tweezers to grab the plastic pull-tab that is tucked in underneath the hard drive.
-
-
Questo passaggio è privo di traduzione. Aiuta a tradurlo
-
Using the plastic pull-tab, carefully pull the hard drive to the left to detach it from its connector.
-
Remove the hard drive assembly from the device.
-
-
Questo passaggio è privo di traduzione. Aiuta a tradurlo
-
Flip over the hard drive assembly and remove two 4mm Phillips #1 screws at the top left and right side of the hard drive housing.
-
-
Questo passaggio è privo di traduzione. Aiuta a tradurlo
-
Carefully separate the actual hard drive from the hard drive assembly.
-
Annulla: non ho completato questa guida.
Altre 14 persone hanno completato questa guida.
2 Commenti
What if I don't have the metal housing
I bought the laptop from someone and it didn't have the metal housing and the laptop just keeps going from startup screen to loading back and fourth can someone help


