Salta al contenuto principale

Toshiba NB205 N330PK Speaker Removal

Cosa ti serve

  1. Toshiba NB205 N330PK Speaker Removal, Power Button: passo 1, immagine 1 di 2 Toshiba NB205 N330PK Speaker Removal, Power Button: passo 1, immagine 2 di 2
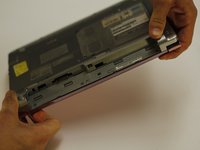
    • Start by first removing the battery.

    • Move the first release switch to the right position.

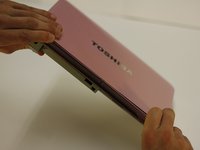
    • Move the second release switch to the right position while pulling the battery towards the top of the netbook.

  2. Toshiba NB205 N330PK Speaker Removal: passo 2, immagine 1 di 2 Toshiba NB205 N330PK Speaker Removal: passo 2, immagine 2 di 2
    • Using the bit driver and a Phillips #0 bit, remove the three circled screws, 5 mm in length.

    • Using the bit driver and a Phillips #0 Bit, remove the two circled screws labelled F6. (These hold the keyboard) one screw may be under a rubber stopper

  3. Toshiba NB205 N330PK Speaker Removal: passo 3, immagine 1 di 2 Toshiba NB205 N330PK Speaker Removal: passo 3, immagine 2 di 2
    • While holding the top of the netbook, flip the netbook over.

  4. Toshiba NB205 N330PK Speaker Removal: passo 4, immagine 1 di 2 Toshiba NB205 N330PK Speaker Removal: passo 4, immagine 2 di 2
    • Carefully lift off the power bar assembly for access to the button and receiver.

  5. Toshiba NB205 N330PK Speaker Removal, Speaker: passo 5, immagine 1 di 3 Toshiba NB205 N330PK Speaker Removal, Speaker: passo 5, immagine 2 di 3 Toshiba NB205 N330PK Speaker Removal, Speaker: passo 5, immagine 3 di 3
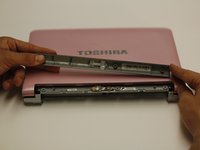
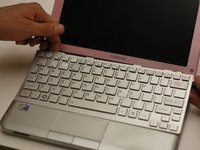
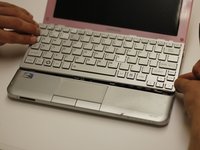
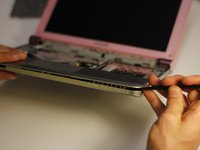
    • Use the spudger to gently pry around the seam of the keyboard. This will release the keyboard assembly from the body.

  6. Toshiba NB205 N330PK Speaker Removal: passo 6, immagine 1 di 2 Toshiba NB205 N330PK Speaker Removal: passo 6, immagine 2 di 2
    • Reach under the keyboard and disconnect the electrical connection.

    • Lift the keyboard assembly out and away from the netbook.

  7. Toshiba NB205 N330PK Speaker Removal: passo 7, immagine 1 di 2 Toshiba NB205 N330PK Speaker Removal: passo 7, immagine 2 di 2
    • Remove the two noted screws, 5 mm in length, with a bit driver and Phillips 3/16" tool.

  8. Toshiba NB205 N330PK Speaker Removal: passo 8, immagine 1 di 2 Toshiba NB205 N330PK Speaker Removal: passo 8, immagine 2 di 2
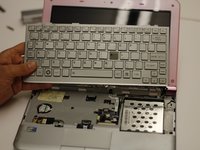
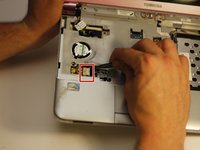
    • Pull the cable away from the connector in the same direction as the individual wires using your hands or tweezers.

    • Pull evenly on the full width of the cable so that no individual wires are overly strained.

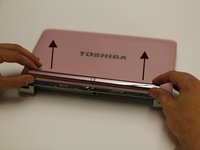
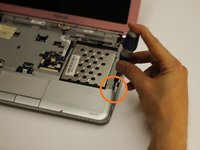
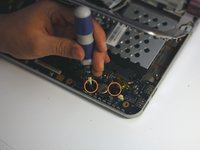
    • Use a spudger to gently pry the bezel from retaining clips.

    • This will allow the keyboard bezel to lift off of the body.

  9. Toshiba NB205 N330PK Speaker Removal: passo 9, immagine 1 di 1
    • Use the pointed tip of a spudger to carefully push on each side of the speaker connector to release it. Alternating from one side to the other, gently “walk” the connector out of its socket.

    • Always pull cables by their connectors and not the wires themselves.

  10. Toshiba NB205 N330PK Speaker Removal: passo 10, immagine 1 di 2 Toshiba NB205 N330PK Speaker Removal: passo 10, immagine 2 di 2
    • Use Phillips #0 screwdriver to remove the two retaining screws on the speaker assembly.

    • Lift out the old speaker assembly.

Conclusione

To reassemble your device, follow these instructions in reverse order.

Mason McCaskill

Membro da: 10/18/13

1.000 Reputazione

9 Guide realizzate

Team

Clemson, Team 14-2, Benson Fall 2013 Membro di Clemson, Team 14-2, Benson Fall 2013

CLEM-BENSON-F13S14G2

3 Membri

27 Guide realizzate

0 Commenti

Aggiungi Commento

Visualizza Statistiche:

Ultime 24 Ore: 0

Ultimi 7 Giorni: 0

Ultimi 30 Giorni: 5

Tutti i Tempi: 553