Salta al contenuto principale

Toshiba Excite 10 AT300 Front-Facing Camera Replacement

Cosa ti serve

  1. Toshiba Excite 10 AT300 Front-Facing Camera Replacement, Remove SD Card: passo 1, immagine 1 di 1
    • Remove the SD card from the SD card slot.

  2. Toshiba Excite 10 AT300 Front-Facing Camera Replacement, Open the Tablet: passo 2, immagine 1 di 3 Toshiba Excite 10 AT300 Front-Facing Camera Replacement, Open the Tablet: passo 2, immagine 2 di 3 Toshiba Excite 10 AT300 Front-Facing Camera Replacement, Open the Tablet: passo 2, immagine 3 di 3
    • Use the opening tool to separate the front and rear panels by slipping the tool underneath the screen edge and sliding it around the entire device.

    • Make sure you unclip all of the clips on the back panel, or pulling it off will be difficult and may damage the tablet.

  3. Toshiba Excite 10 AT300 Front-Facing Camera Replacement, Disconnect Speaker Wires: passo 3, immagine 1 di 3 Toshiba Excite 10 AT300 Front-Facing Camera Replacement, Disconnect Speaker Wires: passo 3, immagine 2 di 3 Toshiba Excite 10 AT300 Front-Facing Camera Replacement, Disconnect Speaker Wires: passo 3, immagine 3 di 3
    • Remove the speaker cable from its socket by gripping both sides of the white connector piece with tweezers and pulling straight out.

    • Be careful not to rip the wires out of the white connector piece.

  4. Toshiba Excite 10 AT300 Front-Facing Camera Replacement, Remove Screws: passo 4, immagine 1 di 2 Toshiba Excite 10 AT300 Front-Facing Camera Replacement, Remove Screws: passo 4, immagine 2 di 2
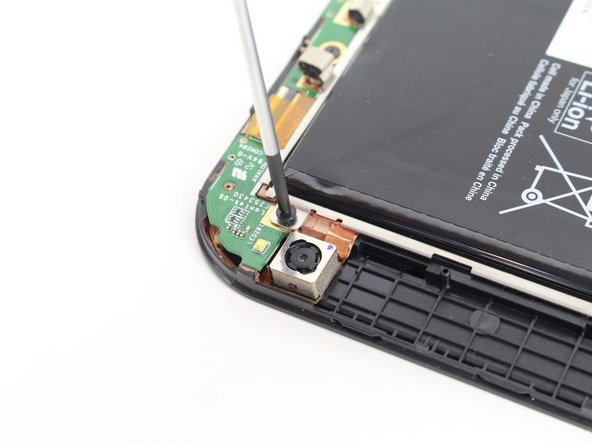
    • Using a #00 Phillips screwdriver, remove the following screws:

    • Five 3mm Phillips #00 screws

  5. Toshiba Excite 10 AT300 Front-Facing Camera Replacement, Remove Battery Cable: passo 5, immagine 1 di 3 Toshiba Excite 10 AT300 Front-Facing Camera Replacement, Remove Battery Cable: passo 5, immagine 2 di 3 Toshiba Excite 10 AT300 Front-Facing Camera Replacement, Remove Battery Cable: passo 5, immagine 3 di 3
    • Gently lift the battery, pulling away from the tab holding it in place at the bottom.

    • While holding the battery up, use a pair of tweezers to remove the battery cable from its connector.

  6. Toshiba Excite 10 AT300 Front-Facing Camera Replacement, Remove the foil wire: passo 6, immagine 1 di 2 Toshiba Excite 10 AT300 Front-Facing Camera Replacement, Remove the foil wire: passo 6, immagine 2 di 2
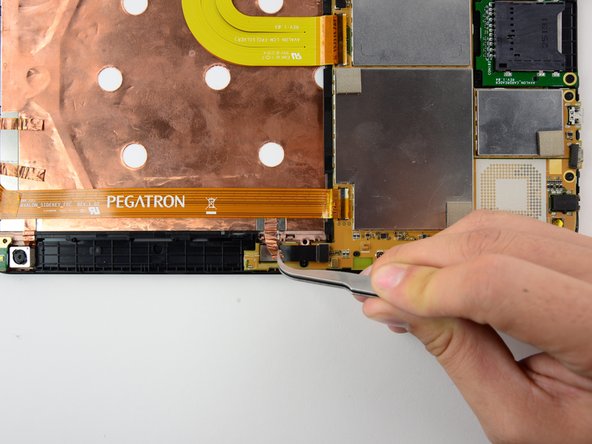
    • Using tweezers, pull the copper foil up from the back of the camera. It should peel up easily.

    • Warning: Be careful to avoid ripping the foil.

  7. Toshiba Excite 10 AT300 Front-Facing Camera Replacement, Remove the ribbon cable: passo 7, immagine 1 di 1
    • Carefully remove the ribbon cable from the housing by pulling gently upwards on the sides of the cable housing. The cable should come straight up off of its housing.

Conclusione

To reassemble your device, follow these instructions in reverse order.

Gus Holz

Membro da: 10/09/14

297 Reputazione

2 Guide realizzate

Team

Cal Poly, Team 14-26, Maness Fall 2014 Membro di Cal Poly, Team 14-26, Maness Fall 2014

CPSU-MANESS-F14S14G26

4 Membri

12 Guide realizzate

0 Commenti

Aggiungi Commento

Visualizza Statistiche:

Ultime 24 Ore: 0

Ultimi 7 Giorni: 2

Ultimi 30 Giorni: 3

Tutti i Tempi: 656