Questa versione può contenere modifiche errate. Passa all'ultima istantanea verificata.
Cosa ti serve
-
Questo passaggio è privo di traduzione. Aiuta a tradurlo
-
Remove the 2 rubber foot pads from the bottom (opposite the hinge) with the small Plastic Opening tool.
-
-
Questo passaggio è privo di traduzione. Aiuta a tradurlo
-
Remove the 10 7.1 mm screws using Phillips #1 screwdriver.
-
-
Questo passaggio è privo di traduzione. Aiuta a tradurlo
-
Loosen the back cover by using a plastic opening tool all the way around the device.
-
-
Questo passaggio è privo di traduzione. Aiuta a tradurlo
-
Remove the back cover by gently lifting up on one side of the device.
-
-
-
Questo passaggio è privo di traduzione. Aiuta a tradurlo
-
Remove the tape holding the speaker wire to the battery on both sides using a small opening tool.
-
-
Questo passaggio è privo di traduzione. Aiuta a tradurlo
-
Remove the 4 Phillips 3.2 mm screws holding the battery in place, with the Phillips #1 screwdriver.
-
-
Questo passaggio è privo di traduzione. Aiuta a tradurlo
-
To disconnect the wire from the mother board, gently press down with the flat end of Spudger and pull on the wire.
-
-
Questo passaggio è privo di traduzione. Aiuta a tradurlo
-
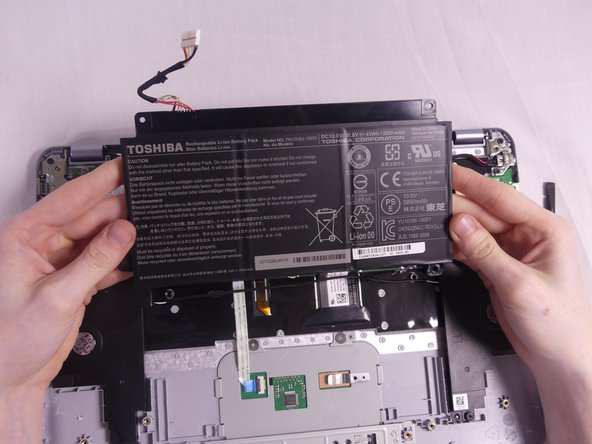
Remove the battery by gently pulling on the bottom corners.
-
-
Questo passaggio è privo di traduzione. Aiuta a tradurlo
-
Remove the Phillips 3.6 mm screw using a Phillips #1 screwdriver.
-
-
Questo passaggio è privo di traduzione. Aiuta a tradurlo
-
Remove the yellow tape by slowly peeling it away at the bottom on the SSD.
-
-
Questo passaggio è privo di traduzione. Aiuta a tradurlo
-
Remove the SSD card from the motherboard by gently pulling up on the side where the screw originally was and out in the same direction.
-


Annulla: non ho completato questa guida.
Un'altra persona ha completato questa guida.
Team

USF Tampa, Team S1-G121, Cagle Fall 2017 Membro di USF Tampa, Team S1-G121, Cagle Fall 2017
USFT-CAGLE-F17S1G121
3 Membri
14 Guide realizzate