Salta al contenuto principale

Tomado Rechargeable Vacuum Cleaner Disassembly

Cosa ti serve

  1. Tomado Rechargeable Vacuum Cleaner Disassembly, Tomado Rechargeable Vacuum Cleaner Disassembly: passo 1, immagine 1 di 1
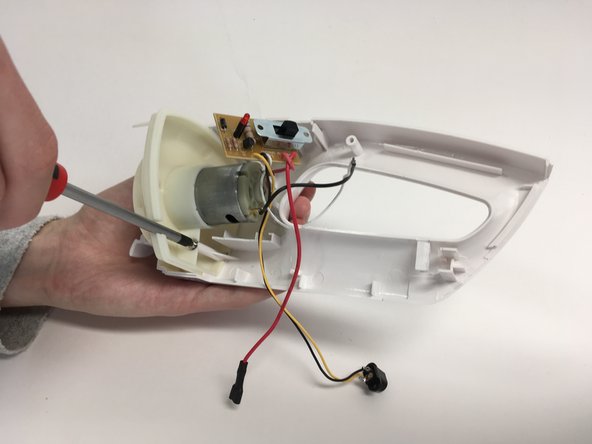
    • The full product in its original state.

  2. Tomado Rechargeable Vacuum Cleaner Disassembly: passo 2, immagine 1 di 2 Tomado Rechargeable Vacuum Cleaner Disassembly: passo 2, immagine 2 di 2
    • Remove the nozzle by pressing the white button on the top of the product just under the name of the brand.

  3. Tomado Rechargeable Vacuum Cleaner Disassembly: passo 3, immagine 1 di 1
    • Remove the big parts that are inside of the nozzle. These parts consist of a plastic structure with a filter.

  4. Tomado Rechargeable Vacuum Cleaner Disassembly: passo 4, immagine 1 di 2 Tomado Rechargeable Vacuum Cleaner Disassembly: passo 4, immagine 2 di 2
    • Remove the rubber fitting from the inside of the nozzle by pulling it from the metal pieces.

    • Remove the blue switchbutton from the upper part of the nozzle by putting a momentum on the edge. After you have this signature move you can remove the brush. You can see the video for the signature move.

  5. Tomado Rechargeable Vacuum Cleaner Disassembly: passo 6, immagine 1 di 3 Tomado Rechargeable Vacuum Cleaner Disassembly: passo 6, immagine 2 di 3 Tomado Rechargeable Vacuum Cleaner Disassembly: passo 6, immagine 3 di 3
    • Remove the blue switchbutton from the upper part of the nozzle by putting a momentum on the edge. After you have done this signature move you can remove the brush.

  6. Tomado Rechargeable Vacuum Cleaner Disassembly: passo 7, immagine 1 di 1
    • Right now the whole nozzle is disassembled, except for two small steel rings. These will break if you try to remove them.

  7. Tomado Rechargeable Vacuum Cleaner Disassembly: passo 8, immagine 1 di 1
    • Now the nozzle is disassembled we can start with the body.

  8. Tomado Rechargeable Vacuum Cleaner Disassembly: passo 9, immagine 1 di 2 Tomado Rechargeable Vacuum Cleaner Disassembly: passo 9, immagine 2 di 2
    • Remove 4 screws on the side and 1 screw on the bottom. You'll do this by crosshead screwdriver size number 1.

  9. Tomado Rechargeable Vacuum Cleaner Disassembly: passo 10, immagine 1 di 2 Tomado Rechargeable Vacuum Cleaner Disassembly: passo 10, immagine 2 di 2
    • Remove the black clip from the inner top side of the body.

  10. Tomado Rechargeable Vacuum Cleaner Disassembly: passo 11, immagine 1 di 2 Tomado Rechargeable Vacuum Cleaner Disassembly: passo 11, immagine 2 di 2
    • Remove the lid from the battery lid by sliding it and after pull it out.

  11. Tomado Rechargeable Vacuum Cleaner Disassembly: passo 12, immagine 1 di 1
    • Remove the screw after removing the lid above the battery.

  12. Tomado Rechargeable Vacuum Cleaner Disassembly: passo 13, immagine 1 di 3 Tomado Rechargeable Vacuum Cleaner Disassembly: passo 13, immagine 2 di 3 Tomado Rechargeable Vacuum Cleaner Disassembly: passo 13, immagine 3 di 3
    • Seperate the two body parts.

  13. Tomado Rechargeable Vacuum Cleaner Disassembly: passo 14, immagine 1 di 2 Tomado Rechargeable Vacuum Cleaner Disassembly: passo 14, immagine 2 di 2
    • Remove the turbine protector in front of the turbine.

  14. Tomado Rechargeable Vacuum Cleaner Disassembly: passo 15, immagine 1 di 2 Tomado Rechargeable Vacuum Cleaner Disassembly: passo 15, immagine 2 di 2
    • Pull the battery out. It still has some wires attached to it.

  15. Tomado Rechargeable Vacuum Cleaner Disassembly: passo 16, immagine 1 di 2 Tomado Rechargeable Vacuum Cleaner Disassembly: passo 16, immagine 2 di 2
    • Use the pliers to remove the wires from the battery.

  16. Tomado Rechargeable Vacuum Cleaner Disassembly: passo 17, immagine 1 di 1
    • Pull the charge socket out of the plastic cover.

  17. Tomado Rechargeable Vacuum Cleaner Disassembly: passo 18, immagine 1 di 2 Tomado Rechargeable Vacuum Cleaner Disassembly: passo 18, immagine 2 di 2
    • Remove the button from the body.

  18. Tomado Rechargeable Vacuum Cleaner Disassembly: passo 19, immagine 1 di 2 Tomado Rechargeable Vacuum Cleaner Disassembly: passo 19, immagine 2 di 2
    • Pull the button off the switch.

  19. Tomado Rechargeable Vacuum Cleaner Disassembly: passo 20, immagine 1 di 1
    • Remove the last screw with a number 1 screwdriver, next to the electro motor to release the motor + turbine.

  20. Tomado Rechargeable Vacuum Cleaner Disassembly: passo 21, immagine 1 di 1
    • The remaining part consists of moving pieces that cannot be disassembled.

Conclusione

To reassemble your device, follow these instructions in reverse order.

0 Commenti

Aggiungi Commento

Visualizza Statistiche:

Ultime 24 Ore: 0

Ultimi 7 Giorni: 0

Ultimi 30 Giorni: 3

Tutti i Tempi: 352