Questa versione può contenere modifiche errate. Passa all'ultima istantanea verificata.
Cosa ti serve
-
Questo passaggio è privo di traduzione. Aiuta a tradurlo
-
Flip the calculator over and remove the 4 main 10mm screws with a PH1 screwdriver.
-
-
Questo passaggio è privo di traduzione. Aiuta a tradurlo
-
Remove the top cover.
-
Gently pull up on the power cord to remove it from the back cover.
-
-
Questo passaggio è privo di traduzione. Aiuta a tradurlo
-
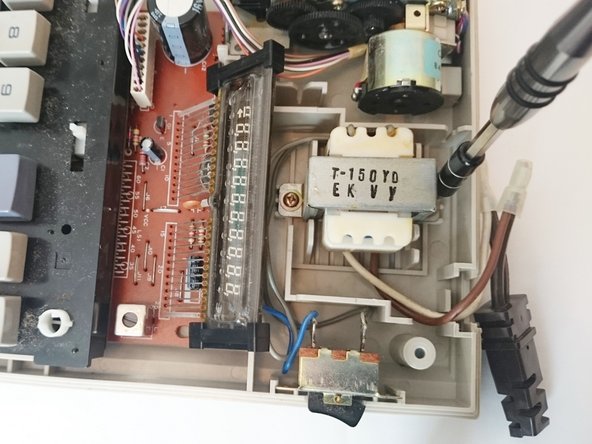
Using a PH1 screwdriver remove the two 10mm screws that hold down the transformer.
-
Gently remove the transformer.
-
-
-
Questo passaggio è privo di traduzione. Aiuta a tradurlo
-
Use a wire cutter to cut off the white cap and expose the wires. Try to cut close to the tip of the white cap - to leave as much wire as possible.
-
-
Questo passaggio è privo di traduzione. Aiuta a tradurlo
-
Use a wire stripper to remove 1/2” of the protective covering on each of the wires.
-
-
Questo passaggio è privo di traduzione. Aiuta a tradurlo
-
Twist the exposed section of the 2 wires together.
-
Twist a new cap over the exposed wires. Make sure that the cap covers all of the exposed wire.
-
Repeat steps 4-6 for the second set of wires.
-
-
Questo passaggio è privo di traduzione. Aiuta a tradurlo
-
Replace the transformer and ensure that the new wire caps fit in the space shown.
-
Plug in the new power cord and test the calculator before replacing the top cover.
-
Annulla: non ho completato questa guida.
Un'altra persona ha completato questa guida.


