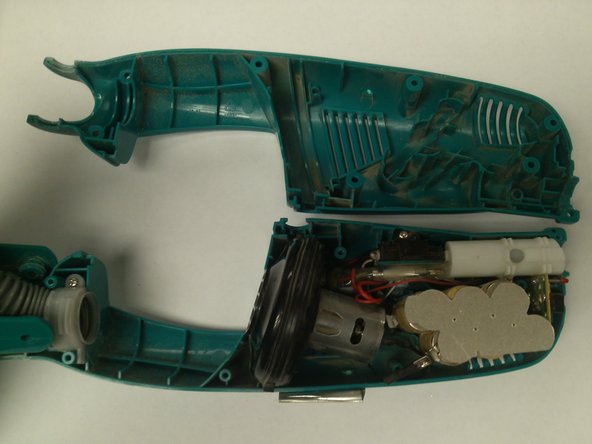
Salta al contenuto principale

Swiffer SweeperVac Battery Replacement (PG3000)

Cosa ti serve

  1. Swiffer SweeperVac Battery Replacement (PG3000), Battery: passo 1, immagine 1 di 2 Swiffer SweeperVac Battery Replacement (PG3000), Battery: passo 1, immagine 2 di 2
    • Unscrew seven 17.95 mm screws on the side of the device.

    • Unscrew the 13.87 mm screw.

  2. Swiffer SweeperVac Battery Replacement (PG3000): passo 2, immagine 1 di 1
    • Find the sticker on the back of the device. It may have already been removed.

    • If there is a sticker, peel it back from either half of the device.

  3. Swiffer SweeperVac Battery Replacement (PG3000): passo 3, immagine 1 di 2 Swiffer SweeperVac Battery Replacement (PG3000): passo 3, immagine 2 di 2
    • Firmly, but carefully grip each half of the case and split it open.

  4. Swiffer SweeperVac Battery Replacement (PG3000): passo 4, immagine 1 di 1
    • Remove the silver-colored battery cap from the top of the battery.

  5. Swiffer SweeperVac Battery Replacement (PG3000): passo 5, immagine 1 di 1
    • Lift the attached battery from the device and place it on the surface.

    • Remove the second silver-colored battery cap from the bottom of the interior of the device.

  6. Swiffer SweeperVac Battery Replacement (PG3000): passo 6, immagine 1 di 1
    • Using the spudger, apply pressure to the lock on the black wire attachment.

    • While pressure is being applied to the lock, pull the black wire away from the battery.

  7. Swiffer SweeperVac Battery Replacement (PG3000): passo 7, immagine 1 di 2 Swiffer SweeperVac Battery Replacement (PG3000): passo 7, immagine 2 di 2
    • Using the spudger, apply pressure to the lock on the red wire attachment.

    • While pressure is being applied to the lock, pull the red wire away from the battery.

    • When installing the new battery, you do not need to press down on the locks. Simply plug the wires into the appropriate sockets on the new battery.

Conclusione

To reassemble your device, follow these instructions in reverse order.

Altre 15 persone hanno completato questa guida.

Team

USF Tampa, Team 10-3, Brown Fall 2014 Membro di USF Tampa, Team 10-3, Brown Fall 2014

USFT-BROWN-F14S10G3

3 Membri

9 Guide realizzate

10 Commenti

This seems very easy. Will try amd make an update

eli3danimator - Replica

This was helpful but my swiffer vacuum had a plastic chassis for the battery and I had to remove the circuit board as well to route the wires on my replacement battery as they were not is the same places as the factory battery.

lillysilbert - Replica

Where do you purchase the batteries

deniseward640 - Replica

Where do you purchase the batteries?

deniseward640 - Replica

One place you can get the battery pack as shown is here; https://sweeperbattery.com/. The latest model (easier to install) battery in a case (6 cell - 7.2 volt) is also available from amazon.

Dwight Cooper - Replica

Aggiungi Commento

Visualizza Statistiche:

Ultime 24 Ore: 10

Ultimi 7 Giorni: 58

Ultimi 30 Giorni: 333

Tutti i Tempi: 62,433