Cosa ti serve
Panoramica Video
-
-
Rimuovi le 10 viti seguenti che fissano il coperchio inferiore al case superiore:
-
Due viti Pentalobe P5 da 2,3 mm
-
Otto viti Pentalobe P5 da 3,0 mm
-
-
-
Infila le tue dita tra il case superiore e quello inferiore.
-
Con delicatezza, tira il coperchio inferiore per staccarlo da quello superiore.
To reattach bottom case I found it helpful to line fingers up with clips under case should snap easily
If your old battery has swollen, the lower case may “pop” open. Don’t lose your screws!
-
-
I took my pointer and thumb (which are luckily long enough) to feel where the studs are on the back panel, and then as I put the back panel back on, I pushed in the spot I had marked with my fingers to ensure I was applying pressure only on this part.
If you’re doing an iFixIt battery replacement, the replacement battery has two rubber nubs which are right where the clips are that receive these studs. Folks have been saying it’s hard to get the studs to clip back in after replacement, and I had the same issue. I trimmed the top of these rubber nubs, which are a bit bigger than those on the original battery, with some side cutters. That made the fit much better.
-
A plastic foam cover also covers plug and socket and the whole battery. It is easy to remove it from the right side to the trackpad wire that the battery plug is free like shown in the picture. I kept it to use it again later.
I have done tons of these battery replacements.
You don’t need to do anything on the list after you disconnect the battery, apart from carefully moving the speakers out of the way, and then prise up the battery modules. I just very carefully, and with little even motions, use a large slot screwdriver. Being careful to keep it flat, to not puncture the battery.
Easy peasy. I have never had an issue after dozens of the tasks…
Dear Sir,
as you seem to be very much experienced with battery replacements you might perhaps give me a hint why after having removed the battery pack successfilly, the keyboard doesn't work anymore after booting the system. The Touchpad works, the keyboard backlight works but typing does not function at all.
I only disconnected the battery connector and touched nothing else. I am quite desperate …
I agree with Dave la Rose, provided you use heat rather than solvent to remove the old battery (or possibly floss, haven’t done that). Please see my comment further down this thread on how to use an iOpener for correctly heating the glue joint
After removing battery contact board plastic. My screwdriver accidentally fell and touched the battery board. And it short circuited. Now my battery doesn't charge. My laptop doesn't work without charger now. shuts after a few minutes of use. Can i fix it without sending it for repairs?
Is replacing the battery necessary?
-
-
Usa l'estremità piatta di uno spudger per sollevare il connettore della batteria in verticale dal suo zoccolino sulla scheda logica.
I have a friends MacBook Pro that has some water damage that caused the MacBook not to be able to use battery power, but still work when plugged into A/C. Upon further inspection I can see visible corrosion on a few of the 9 cables going from the battery connector to that small circuit board. Is it possible to just replace that circuit board?
Sometimes it can be enough to just clean the contacts without having to replace the entire board. Dosent work for complicated IC's like plcc type, where corrosion is underneath the chip. Here you will have to reheat and reapply the IC.
When placing the battery connector back into the socket on the logic board, check that every part of connector is pressed down. You should hear a soft click when it's back in place.
+1
I thought I made sure it was connected but when running the computer it only detected the battery but couldn’t power it. I had to run with power adapter. Also it didn’t charge. I guess some pins were connected but not all. To verify that all were connected I removed the plastic cover, placed it carefully completely flat, and then reattached the plastic cover. After that it worked!
Lift from the long, flat side, not the shorter side. In this picture, you should lift from the NORTH part of the connector, not the WEST side like they are doing. This is because you can spread the pressure from lifting the connector across more area, as compared to the side. I accidentally broke off part of my battery connector lifting it up the way shown, but was able to do it the way I described without problem. Make sure to lift from the wide part so you don’t have my same trouble!
The connector is no more than 1mm thick… the socket is 3-to-4mm deep so make sure you’re trying to remove the connector itself, and not pulling at the socket.
You can do it from the side like the picture, but i would recommend twisting almost like a screw driver once you have leverage under the overhanging part of the left side like in the picture. Twist the tool so that it starts to put pressure on the top, until you’ll hear it click out. You can be somewhat forceful but it shouldn’t require a lot of strength. Guiding the tool with one hand and twisting with the other is a good way to attempt this.
After I put the battery back I found out at this step that the new battery connector was off by 2 mm (because I installed my battery slightly off). Since the connector is rigid, I removed it’s plastic cover (just like we all did in Step 4) to free the cable, which allowed me to bent it enough to properly plug the connector.
Simple question: why we need to do this, I mean, disconnect battery from main board?
Well, I’m reading this step in the battery replacement repair guide, so it’s pretty critical to disconnect the battery from the main board. I’m guessing these steps are reused in other guides where disconnecting the battery might not be such an obvious need.
surf -
Also wondering the same. I came here from a link to replace the fan. Is it necessary to disconnect the battery inorder to replace the fan?
The connector wires from the battery to the connector are long
You'll have to bend them downward and into the small cove that exists so the connector can fit in place.
So use the a plastic card or flat end of the spudger to bend them downward and folded a bit back so the connector will fit in place.
Use your old battery as a guide for how they should be bent.Hi All ,
I followed the instructions step by step and changed the board successfully and reconnected everything back. When I powered it back on I can see it is charging again however it just displays a black screen and no display. Keyboard light comes on as well and the apple logo light on the back lid also turns on. Not sure what is wrong ? It has been charging for more than 15 minutes and still no joy. Anyone able to help solve or identify the issue .
Thanks
The connector cover is slightly wider and longer than the socket (<1mm) so there is a small "lip" around the top that can be used to lift it.
If your are not familiar with those repairs, and as with most of those connections, I recommend to take the time to observe your computer and the pictures from the tutorial, reading instructions and comments before starting each step. This battery connector needs both a bit of force and of precision. For a battery repair the connection of the new battery is a bit more tricky, you need to have your battery in the right position and to force it a bit the connector
-
-
If you miss or let this step for later like I did, the power left in the battery even though the computer is completely shut down, will screw up the I/O board cable like I did. I noticed this after I put all the pieces back, turn the computer on and surprise, no wifi hardware is detected. -.-
@sebasgaes, shoot, I'm only part way through the process, but I skipped this step thinking it wasn't necessary. I'm only through step 12 right now, but is there a fix if my machine doesn't recognize the wifi hardware after I've put it all back together? I don't see reference to the "I/O board cable" anywhere else in the instructions, so I'm confused about your mention of that...
UPDATE: I completed the job, rebooted, and all is well, wifi and all. Thanks anyway; gotta love iFixIt!!
jiclark -
-
-
Rimuovi le due viti Torx T5 da 2,1 mm che fissano la staffa del cavo della scheda I/O dalla parte della scheda logica.
At this point it's a good idea to take sheet of printer paper, like A4, and press each screw into the paper roughly in the position it was removed from. When it comes time to reassemble it, you wont get the different lengths mixed up.
After this step I continued from step 13, the steps in between were not really necessary in my opinion ( I succeeded the replacement without them). Just be careful not to touch these connectors during replacement.
While it may not be necessary to remove the left and right speakers, doing so will make it much easier to get at (and under) the end batteries and their adhesive pads. Also, by removing the speakers, you also get them out of harm’s way while you wrestle with loosening the batteries’ adhesives.
I recommend removing the speakers and their connectors as described in the iFixit instructions.
I did this step when replacing both my L and R speakers on my MBP mid-2014 13” so it would be easier to access the speaker connector
I agree that moving the speakers out of the way makes battery removal easier but I didn’t disconnect the right speaker, just removed the screws and folded it back out of the way. I disconnected and removed the left speaker as instructed below.
I have done tons of these battery replacements.
You don’t need to do anything on the list after you disconnect the battery, apart from carefully moving the speakers out of the way, and then prise up the battery modules. I just very carefully, and with little even motions, use a large slot screwdriver. Being careful to keep it flat, to not puncture the battery.
Easy peasy. I have never had an issue after dozens of the tasks…
I am not sure why I was even bothering with touching the speakers at all. Since April I have done at least another dozen 13” battery replacements. You simply do not need to touch the speakers for any reason, and, in fact, touching introduces unnecessary risk.
This whole procedure of replacing the battery may easily be done in about 20 minutes.
davelarose keeps saying not to remove the speakers, but he is using hot air method. If you are trying to remove the battery using adhesive remover you won’t be able to get the right angle with the spudger if you leave the speakers in, without risking damaging them. I didn’t remove any of the speaker connectors however and just undid the speaker screws and moved the speakers up out of the way temporarily, this worked well.
i had a random philips screw wedged between the IO connector and the battery? i dont know if this was a manufacture mistake or what. i didnt put the screw back in because i felt like it was there by mistake.
I used the rice-filled sock method for warming up the adhesive (see step 23 - thanks barak) but still needed to pry up the cells. As Ashley Mills said, I needed to remove the speakers to get under the battery and lift it from the front, rather than from the logic board side. It was easy to loosen the speakers, but be careful on the left side as the cable runs under a screw post for the bottom cover (the left side in normal use position - it might be turned around for this).
Reading the comments before starting a battery repair, I decided to use the heat method instead of the solvent and skipped steps 8-9-10-11-12. It was still necessary to remove the speakers, but you can let them connected, provided they are "bent" out of the way when you work to remove the battery. For the IO connector you may want to remove it if you need to use a card in this area to remove the battery and you are afraid to damage it. It was not necessary in may case. The solvent was still useful to remove traces of glue.
-
-
-
Afferra con un paio di pinzette la staffa del cavo della scheda I/O e rimuovila dal MacBook.
Totally unnecessary step…
Why did I have to do this step?
Good question… I don’t understand it.
I also did not remove this connector for a successful battery repair using the heat method
-
-
-
Usa l'estremità piatta di uno spudger per sollevare il connettore della scheda in verticale dal suo zoccolino sulla scheda logica.
This step is not required.
This step was not necessary for a successful battery repair using the heat method in my case
-
-
-
Solleva in alto il terminale dal lato della scheda logica del cavo della scheda I/O; quindi ripiegalo in una posizione che non dia fastidio.
I removed I/O Board cable completely on both ends using a flat end plastic spudger tool. I did not feel comfortable “bending” it as shown in Pic. Be careful to not damage sockets on either end when removing battery. Extra care to not get any adhesive debris in exposed sockets. I have used the solvent with syringe and that can get rather messy and risk getting liquid onto keyboard/screen/motherboard components etc/. This time I used a plastic “Disposable Putty Knife” from Ace hardware. Speakers where easily removed in subsequent steps. Started pushing in from edges with plastic putty knife and battery cells separated surprisingly easy. This method is clean & much easier than the dental floss struggle!! I used Googone with QTips to remove adhesive remnants.
What is the strip sticking out from behind the battery at the top right middle?? How do I reconnect that?? I think that's why my battery isn't working. I was going to get to the Trac pad until I realized how big a job it is. Just want to fix this connection and put it back the way it was :(
Besser: Das Kabel kann leicht an beiden Enden gelöst und dann herausgenommen werden. Dann ist es nicht im Weg.
Don’t perform this step. I have zero idea why it is in this guide…
This step was not necessary for my successful battery repair using the heat method. My guess to include this step is that you may damage the IO connector at a later stage if you need to use a card in this area to remove the center battery cells. These were very well glued in my case, so it is true you need to work a lot with 2 cards, but I was able to unglue them from the sides
-
-
-
Infila con delicatezza la punta di uno spudger sotto il cavo dell'altoparlante destro vicino al suo connettore e sollevano dal suo zoccolino sulla scheda logica.
Same as my comment on Step 7: This step was not necessary for me to remove the battery. Perhaps it's a safety precaution? Regardless, I skipped the speaker cable removal (Steps 11, 12) and didn't have any problems replacing the battery. Same as my comment on Step 11: This step was not necessary for me to remove the battery. Perhaps it's a safety precaution? Regardless, I skipped the speaker cable removal (Steps 11, 12) and didn't have any problems replacing the battery. ( FYI - I used a heat path method, vs the solvent)
WARNING TO ANYONE WHO DOES THIS STEP! Be very careful to distinguish the cable end from the socket! I just managed to break the entire socket off of the logic board. I may try to solder it back on, but I may not, since it’s only for the speaker… Very disappointing anyway. The instructions should make it more clear just how delicate the socket itself is, especially right where the photo shows you inserting the spudger under the cable end to start dislodging it. It’s really hard to distinguish the cable end from the socket on this side!
I used the flat end of the spudger and tried to match the width of the connector, while applying gentle upward pressure to pop it off.
The key to accomplishing this step easily and without danger to the socket… is to follow the instruction (and the picture) PRECISELY by placing the spudger flat end under the CABLE (not the connector). Lifting the CABLE easily removes the connector from the socket without getting anywhere near the socket.
Seconding barak’s comment, no need to disconnect the speaker cables, keep them attached and just swing the brackets out of the way.
Barak is absolutely correct.
DO NOT DO THIS STEP…
I thought I was prying the cable connector, but was prying the socket that was attached to the circuit board. It bent the connector a bit, but I was able to push it back into place. If you do this step, lift at the cable, not the connector. Better yet, just unscrew the speakers and leave the cable connected.
This step was not necessary for a battery repair using the heat method. You can keep the connectors attached, just unscrew the speakers and put them aside by bending slightly the connectors. Just be careful when working to remove the glue with a card, you may need to apply a bit of force, so make sure not to damage the speakers wires
-
-
-
Stacca con delicatezza il cavo dell'altoparlante destro dal case superiore.
Why? Why does this step exist?
Fiddling with these small cables is a poor idea if not required…
For a battery repair with the heat method, as indicated in other comments on prior steps, you may skip this step, just unscrew the speaker and put it away when working on the battery
-
-
-
Rimuovi le viti seguenti, che fissano l'altoparlante destro al case superiore:
-
Una vite Torx T5 da 5,7 mm
-
Una vite Torx T5 da 6,5 mm
-
Una vite Torx T5 da 3,8 mm
Important to keep track here of which screw is which, for reassembly. The longest screw belongs in the middle socket. The shortest goes in the socket at the bottom of the picture.
No. Just no! Another unneeded step…
In my opinion it made it easier to move these out of the way when removing the batteries, though not strictly necessary. Definitely don't need to disconnect the speakers. Also be careful on reassembly that where the battery adheres doesn't interfere with the space needed to put these back.
-
-
-
Solleva l'altoparlante destro dal lato del terminale del cavo e allontanalo dal case.
Very clear step by step tutorial as usual. I removed both of my MBP 2013 speakers and it was just fine. My laptop sounds like the first day now (with genuine used speakers) Thanks?
Unless you are replacing the speakers, DO NOT do this step, you are risking damage without reason…
grazie e' stata una guida utilissima
fatto tutto ok
funzionano nuovamente bene i due altoparlanti.
-
-
-
Inserisci la punta di uno spudger sotto il cavo dell'altoparlante sinistro vicino al suo connettore e sollevalo dal suo zoccolino sulla scheda logica.
Same as my comment on Step 11: This step was not necessary for me to remove the battery. Perhaps it's a safety precaution? Regardless, I skipped the speaker cable removal (Steps 11, 12) and didn't have any problems replacing the battery. ( FYI - I used a heat path method, vs the solvent).
Yes, no need to unplug the speakers cable. I used the solent, just put speakers on the motherboard.
slight touch of glue secures speaker cable to MB. Use steady light presuure with spudger edge to unglue and then disconnect cable from MB
I picked up my steps back here when replacing both my L and R speakers on my MBP mid-2014 13”. I used the flat part of the spudger and gently, carefully applied a fulcrum upward pressure to the base of the speaker connector to help pop it off.
I, too, found it unnecessary to unplug this speaker. It was easy, and not stressful to the speaker cable, to fold the speaker upwards and rest it on the motherboard.
When removing the left speaker as shown in the image in the photo, the left-most fixing part (protrusion) is broken. Will there be any problems using it?
Ugh. I agree with Barak; why is touching the speakers in these guides? On both the 13” and 15” you can easily replace the batteries WITHOUT even vaguely touching the batteries…
Parts of this guide are used for other guides, such as replacing the top case. But also, the speakers can be damaged by solvents, so it’s not a bad idea if the method you’re using has the possibility of getting solvent on them. It’s easy enough to just remove the screws and move the speakers out of the way without disconnecting them.
Removing the speakers is very important if you use solvent — solvent will damage the speakers and can lead to a horrible buzzing. I failed to understand this and skipped removing the speakers when dissolving the glue and paid the price: speakers that are essentially unusable.
That said, unplugged is not necessary, merely removing the speakers (Step 16).
For a battery repair with the heat method, as indicated in other comments on prior steps, you may skip this step, just unscrew the speaker and put it away when working on the battery. For this specific left speaker - on the right during the repair - you need to be careful with the protruding bit from the frame when moving the cable. Just guide the cable above or below as needed during the repair, to prevent to damage the cable with this protruding part.
Speakers aren't working now... perhaps because I connected and disconnected then while the battery was still on. Even headphones don't work... Hmm...
Its absolutely true, this is not neccessary. It works greate without removing the speakers
-
-
-
Rimuovi le viti seguenti, che fissano l'altoparlante sinistro al case superiore:
-
Una vite Torx T5 da 5,7 mm
-
Una vite Torx T5 da 6,5 mm
-
Una vite Torx T5 da 3,8 mm
Same note as above: Important to keep track here of which screw is which, for reassembly. The longest screw belongs in the middle socket. The shortest goes in the socket at the bottom of the picture.
Where can I get these 3 sizes of t5 torx screw drivers?
Greg, the T5 Torx screw driver is one size. The different sizes listed above are the *lengths* of the screws, not the diameter of the screw head. Hope that helps.
My Torx screws are so locked i can not take it out. The Torx 5 screw driver slips. What can i do? Can i also get new screws later to put in?
Hi,
If the T5 slips you may have not the correct size ? I have done may speaker, no screw was ever that tight. All 3 screws the same problem ?
Where can I replace these screws?
One 5.7 mm T5 Torx screw
One 6.5 mm T5 Torx screw
One 3.8 mm T5 Torx screw
Did you ever find the replacement screws? If so, where…I need them also!
Once again.
NO NEED NO NEED NO NEED
Muchas gracias amigo, cambié las bocinas sin problema. :)
-
-
-
Solleva l'angolo dell'altoparlante destro e fallo scorrere attorno alla batteria per rimuoverlo dal case superiore.
If I have a case assembly with battery and trackpad, the above instructions say to skip steps 18 - 44. So, how do the battery and trackpad disconnect otherwise since I need everything else to reassemble. Am I missing something?
after step 9 what??? i cannot see the next steps….
Why does this step exist?
Unneeded…
Removing the speakers is very important if you use solvent — it will damage the speakers and can lead to a horrible buzzing. I failed to understand this and skipped removing the speakers when dissolving the glue and paid the price: speakers that are essentially unusable. (See comment on Step 14).
For a battery repair with the heat method, I needed to remove the speakers, but not the connectors, just unscrew the speaker and put them away when working on the battery
-
-
-
-
Disponi l'iOpener al centro del tuo forno a microonde.
I didn't find this to be as hard as I had built it up in my mind to be; HOWEVER, saying that I need to say years ago I was the local Nokia service center in my town. But many years ago right after they got rid of analog times. Yeah. A classic installer/repairer mistake when starting something they haven't fixed or installed before is picking up the instructions, flipping through them; maybe even reading a section that is new-then tossing the instructions over the shoulder. "I got this." This usually comes right before something major gets broke. And I can tell you when you try to do it yourself and then mess it up horribly then take it to the repair shop. Well we called that "I can do it myself" syndrome and charged extra to put back together what they brought in in the box. Now knowing all this - I can't stress this enough because I am stupid, stupid, stupid. COVER YOUR SCREEN IN CLEAR BOXING TAPE AND READ ALL THE INSTRUCTION BELOW THROUGH TO THE END BEFORE EVEN ATTEMPTING THIS FIX. Take my advise.
I didn't have an iOpener, so I used a wheat type heat bag. If you do this though, make sure you put a layer of plastic between your Mac and the bag, or you'll get condensation in places you don't want it.
I started out using the iOpener but switched to my wife's hairdryer. A heat gun or hair dryer proved to be much more convenient and is a time saviour. You can heat more and the glue becomes more fluid make the next steps with the opening picks much easier
I know this is obvious, but backup your iPad with iTunes before you start. I'd also turn off your passcode if you have one.
Ther first time you heat up the iOpener for this repair when its room temperature I had to heat it up for more than 30 seconds. I remember I had to heat it up for around 45 seconds. However, after that when you need to reheat it again during the repair 30 seconds will be enough.
I used the wheat bag in a sensor microwave heating up to 65-70 deg C (155 def F).
Get yourself a cherry pit bean bag the size of your iPad. Heat it, put the iPad on it for 3 to 5 minutes or so, reheat the cherry pit bean bag, again put your iPad on it. Then heat the iOpener and start working. The cherry pit bean bag will have to be reheated several times, but it will soften the adhesive so you have less problems with the iOpener
The heating can be done very effectively (and quickly) with 3d printer heated bed. Make sure the bed is clean. Set the temperature to 60c, (130f ) and put the ipad face down for +/- 10 minutes. Repeat as needed throughout the “gentle prying” stages.
The iOpener did not work at all for me.
I had to use a heat gun and bring the edges of the case up to ~200 degrees (used an infrared thermometer to measure) before the glue would weaken. This obviously superheated the metal frame, so I also had to wear gloves to handle the phone while prying the back off with the included picks.
The iOpener, in my opinion, is of no help. Many warnings to say “don’t warm it too much”, but the glue doesn’t melt if not warm enough. As a result, a complete waste of time and energy. In addition, too much liquid in it, so it doesn’t lay on the device on a sufficient surface. I took a hairdryer and it worked much much better.
I used an immersion bath to heat this to 180F and applied it to the device until the outside temperature of the opener read 150F with an IR thermometer. Removing the screen took very little force with this method.
My experience. I was replacing the screen which had been cracked and a little shattered in some places. The iopener is pretty much useless, so was the suction cup. The suction cup would probably be more useful if I was doing something besides the screen. Also you probably want the clean the screen before using it so it can get good suction. I used a hair dryer on high for a couple of minutes at a time (someone on this tread suggested that). I used my exacto knife and a razor blade to get into the adhesive. First the exacto to get the initial cut, then the razor blade to go a little deeper. Could have probably just used the razor blade, but the exacto has a little more finesse. I got the razor blade in and a little under the glass then I used the picks to wedge in. I didn’t want to risk anything using the razor blade too much. Used tape to keep the shattered glass together.
My experience pt2
Fortunately the shattering was mostly on the edges and most of it had adhesive on the back so it stuck together. Just take your time and work your way around following the guide to get the screen off. Have some goof off or goo be gone to clean the frame when putting the new glass on or putting the existing one back. (someone suggested that also, very good idea). Be careful of the LCD (you should know that). The cable on my LCD was pretty tight, so I propped it up while taking the cable cover off and when I put it back on I did the same thing. I just put a bottle on the battery and leaned the back of the LCD on that while attaching the cables and putting the screws back on the cover. Also be careful with the home button and the bracket on the back of it. I had enough old adhesive on left on the bracket that it stuck back to the new glass fine. So far only 12 hours in, so we will see how that holds up when the kids get at it.
Another alternative if you do not have the iopener is to use a bed time hotwater bottle. Do not over fill it though. Just put enough hot water in to support the phone while you work around the adhesive.
I use both the hot water bottle and iopener together on Samsung's. It makes life easier
I followed the directions and heated my iOpener for 30 seconds in a 1000 watt microwave, and it came out at 160 degrees F, as verified by a infrared thermometer. This allowed me to separate the last bit of the back of my Samsung S8, which was already coming off due to a swollen battery (hence the reason for the repair).
If you follow these instructions, you will crack your screen like I did. Heating the iOpener for 30 seconds, using it to melt glue, then waiting 10 minutes to reheat is useless. The iOpener can be used to maybe warm the glue on whatever side you aren’t working on. You need a hairdryer and/or a heat gun to melt the glue and separate the glass from the iPad.
Anyone want to buy an old iPad with broken glass and a dead battery?
Not everybody has a microwave. You should provide a target temperature for the iOpener and instructions for a conventional oven, or pot of warm water, or whatever. Although I will probably use a heat gun …
I support the comments about the iOpener. Everyone has a hair drier, FHS, so get a cheap IR thermometer (£18) and blow heat until the area is 60+ deg C. Still takes w while, and getting the screen off is v scary, but just add more heat if you feel resistance.
The rest of the kit is good, esp the magnetic screwdrivers.
No, everyone does not have a hairdryer. Some of us don’t even have hair. Thank goodness I already had an IR thermometer, though.
nin10doh -
#### WARNUNG WENN MINIMALSTER SPRUNG IM DISPLAY IST FUNKTIONERT DAS NICHT!!! ######
Hatte einen winzigen, minimalen Sprung im Display. Ich dachte es könnte gehen, weil der Sprung “abgeschlossen” war. Er hat in einer Ecke ein winzige Glasteil rausgeschnitten. NEIN! Geht nicht. Habe alles mit viel Geduld dem iOpener und einem Föhn erhitzt. Es ist trotzdem sofort über das komplette Display zersprungen…
I’ve started with iOpener but changed very quickly to a heatgun. That was more efficient.
I could not get the iOpener hot enough to melt the glue on my ipad 6. I heated for 45 seconds once and it was boiling and it still never worked. Thank goodness contributors mentioned using a hair dryer. Using an 1700w hair dryer on high did the trick to get the screen off. Still took some time and the case got pretty hot but be patient. It took twice as long and a lot more patience to get the battery out.
I have an Ipad with touch screen issue, if i replace this part it should be Ok?
WARNING - DO NOT MICROWAVE ON A METAL MICROWAVE RACK
The metal microwave rack can heat up and melt through the iOpener cover letting the contents leak out.
Not a big issue for me as I have a heat gun and used that instead.
I opened my iPad with the iOpener. Be patient! It may take quite a bit longer to it the iOpener in the microwave than it says in the guide. My microwave can only do 800W and I had to put the iOpener in several times (maybe a total of 90-120 seconds). I recommend that you have the transparent side up an watch the bag carefully. As long a the bag doesn't bloat up and the liquid doesn't start bubbling you should be fine. But I recommend to take the iO out from time to time to check it. (More comments in Step 6.)
iPad mini gen5. I used the iOpener. My microwave is 1200w with carousel. 30 sec got the iOpener to 155ºF. For the 2nd heating, after 10 minutes sitting, the temp was still around 125º so I only cooked it for 15 sec. Not enough increase so +5 sec more which me to 165-170ºF. This should be considered ballpark info because who knows the real output of the various microwaves and the quality of the IR tool used to determine temp.
To successfully open my iPad mini I applied the iOpener twice to the left edge and twice to bottom. & once to R edge. Using the suction cup was difficult for me (I'm in my 70's so my hands don't work too well anymore). I had trouble holding the guitar pick and slipping them in (at an downward angle). In the end, sliding my thumbnail along the edge opened it very slightly and allowed the pick to get into the gap. I marked the ends of all my picks with a sharpie pen for the recommended 2mm insertion to avoid going in too deep. To get the screen open it took me approx 1 hour.
A hairdryer or heat gun works, if heating is kept around 100 deg C (212 deg F - boiling point of water). But… heating this way is cumbersome. Using a hotplate, set to 100 deg C, measured carefully with a fairly inexpensive IR gun, is simpler and easier, if you can afford the hotplate (I used an old pancake griddle with a thermostat knob). It works great for phones, setting them face down for 2 minutes, then picking them up with insulated gloves - cheap, wool gloves work fine. This may require repeated reheating to continue the display removal, but its much simpler.
Because its almost impossible to repeatedly lay an iPad/tablet on the hot plate, I propose an alternative.
Initially lay the larger iPad/tablet, face down, for 2 min, to heat all of the adhesive surrounding the display. Lift and begin the picking process describe in your removal steps. Then lay an iOpener on the hotplate for 2 min (already set to the exact, desired temp) to bring it to working temp for the remaining operations.
For iPads in particular, it makes sense to construct a simple, aluminum window frame, laid on a hotplate (see my comment above) that only touches the edges of the display, heating only the adhesive underneath. This prevents general heating of the entire device. Four strips of aluminum, placed together as a frame, would be the simplest and allow variations for all devices - envision it as a pinwheel of strips, radiating outward. Use it for any size device.
-
-
-
Riscalda l'iOpener per 30 secondi.
-
Se durante la riparazione l'iOpener si raffredda, scaldalo di nuovo nel microonde per altri 30 secondi.
DO NOT USE IN NON ROTATING MICROWAVE! It will pop a hole. I had it in for 45 seconds the first time. It wasn't very hot inside and I saw it started to leak on the paper towel I put under it. Just a fair bit of advice. I think I will just stick with the heat gun. Loud but useful.
I heated mine up for 30 seconds, tested, then again for 30 seconds. It felt adequately hot. Leaving it on the left side, per the instruction, for a minute did not loosen the adhesive. I ended up pulling the suction cup hard enough to shadder the old screen. Moral of the story, I don't think it gets hot enough safely to have an affect.
There is a clear problem here with the heating part using the iopener things....no details are given. Whoever is testing them needs to make it clear - What temperature does it need to be? And for which phone models, because they differ in what's needed. It's only £10-15 for a laser guided temp sensor unit, and the designers/repairers should have one of those already for doing these kinds of repairs. Explaining half a repair, is worse than not explaining at all :-(
All phones/devices differ it’s unrealistic and unsafe to put a exact time/temperature needed to soften the adhesive. It’s really quite simple you warm the device evenly and in a controlled manner just enough to enable pry tools and picks to begin separating. Best tool in my opinion but again this is because I have experience is a hot plate and heat gun both of which are used at nearly the lowest settings and I can handle flat palming the plate for almost 10 seconds I leave the device to conduct heat until approx it’s about 110 at most 120 ish this will be plenty to soften all the adhesive if any problem areas I use heat gun while prying. Again you need go slowly and learn with a throw away phone
If I may suggest include your microwave wattage so people can get an idea on time for there own
I agree with this.
I ended up using a hair dryer. That iOpener thing took forever.
30 seconds sure isn’t cutting it… 45 didn’t get the screen of my iPad air 2 to budge either… even after resting on the ipad for 4 minutes.
60 seconds in the microwave, the iOpener burst.
I’ll get a new one and try once more with heating it 45 seconds and repeat that for 30 minutes like others have said here. If that doesn’t work it’ll have to be the heat gun.
K
I can’t recommend the microwave. If the the iOpener becomes too hot, it bursts. Better put the opener in cooking water. Dry it and use it. Instead of an iOpener you can use hot/cool packs as well.
Great idea with using the heat packs. I will try that next time. Thank you
Collins -
Trust the directions! I forgot and left it in the Microwave too long and after 1 minute I had Mt Vesuvius - the iOpener burst and spewed the goodies out. The problem is, the Digitizer can be damaged by a hot air gun, so I had to tough out and remove the glue the hard way. I made it … with lots of patience! Tough lesson.
I also used a hairdryer. I used it on the low setting and I cut a piece of carboard to protect the rest of the screen. The iFixit tool and method is vert tedious and very time consuming in comparison. With the hairdryer method you can literally have the display apart in a few minutes. Using your other hand nearby the area you are heating it should be very hot but not enough to burn your hand. You only have to heat metal part of case near glass edge. If you have a cellular model then you need to be very careful because the black antenna area is plastic. So less heat and work your way up in adding heat just enough to separate around the area but not so much you melt the plastic!
iOpener was the worst part of the kit. Followed directions for :30 in microwave and took 4 trips to the microwave to loosen adhesive on left side of home button. I thought I was figuring it out and it was working well… even set a timer to wait 10 minutes between heating it up. Was on the right side and was on my 12th heat up when it exploded in the microwave. My only tip is that if you set it clear side up, as soon as you see any bubbles or boiling in the liquid, STOP! If you put a pot holder over the iOpener and press slightly to make good surface contact, that seemed to help. I finished heating with a “Corn Sack” that held heat better than the provided iOpener.
Mon iopener n'a pas tenu une réparation. Je ne vous conseille pas ce produit
Bonjour,
Nous sommes désolés que votre réparation ne se soit pas déroulée comme prévu. Il se peut que le produit était défectueux. Veuillez contacter notre service client support@ifixit.com (boutique américaine) ou eustore@ifixit.com (boutique européenne) en décrivant ce qui s’est passé.
Readers looking for temperature advice might check the comments of the previous instruction, as there are more there. I used an immersion bath to heat this to 180F and applied it to the device until the outside temperature of the opener read 150F with an IR thermometer. Removing the screen took very little force with this method.
Thank you for posting some actual temperatures. I have a heat gun with a very fine self-temperature regulation setting capability.
I will set it for 150-180 F, and use that to soften the adhesive.
Get a heat gun.
I followed the directions and heated my iOpener for 30 seconds in a 1000 watt microwave, and it came out at 160 degrees F, as verified by a infrared thermometer. A second heating about 15 minutes later in the micro and it came out at 190 degrees F. Plenty hot enough to soften the adhesive for removing the back on my S8. Based on the comments above I think people just need to use more patience.
I used various time settings. It got very hot. It would soften the glue but not a whole lot. If my screen had been intact and I was replacing something that was not a digitizer, it may have worked. A broken screen makes the process significantly more difficult. I ended up breaking the home button cable. Good bye TouchID…
It appeared 30 seconds were not enough, so I heated it more, by 5 seconds at a time until I got the right temperature about 70 degrees Celsius (measured with infrared pistol) to get the screen heated up to 60 C, the best for softening the glue. But the heat was quickly dissipating by the big aluminum back cover, so the best I got in 2 minutes of applying iOpener was around 45 C, which made the procedure difficult and having risk of breaking the screen. So I eventually abandoned iOpener and user a hot air gun with precise temperature setup. I set it to 90 C, which allowed me to open my iPad quickly and safely.
I, too, ended up using a hot air gun. I’ve done earlier versions of iPad before but the adhesive used on this IPad 5 A1822 was particularly difficult to remove.
Also, while the suction cup worked great when the glass is in tact, any cracks in the glass make the suction cup useless.
You need to remember here are different sizes of microwaves. I had the same issue.
Heating on a smaller unit I used 45-60 seconds. That worked but was time comsuming
Yeah, the iOpener didn't work for me either.... ended up using a hair dryer and that worked. The iOpener was too warm to soften the glue in my case.
-
-
-
Rimuovi l'iOpener dal forno a microonde, afferrandolo per una delle due estremità piatte per evitare il contatto con la parte centrale calda.
I did this repair. I used a hair dryer, I think it works better: gets very hot fast.
I did too, you get far more control and no expense on fancy equipment.
Readers looking for temperature advice might check the comments of the previous instruction, as there are more there. I used an immersion bath to heat this to 180F and applied it to the device until the outside temperature of the opener read 150F with an IR thermometer. Removing the screen took very little force with this method. I don’t know how much microwaves vary in heating consistency with these pads, but knowing how inconsistent the temperature of a bowl of plain rice gets in my microwave, I wasn’t interested in even trying to use it for this.
I vote for the hair dryer. The other methods work too but if you aren’t having any luck, switch to the hair dryer. While holding the iPad in my hand, I found that I am aiming the dryer at my finger at the same time and it gauges how hot it is. I stop when my finger can’t take it - maybe five seconds up close. Repeat as needed like I did.
If the maximum temperature for this iOpener is lower than the gadget glue minimum temperature, this device does not make sense.
I think the maximum temperature for this iOpener is below 100⁰C and most gadget glue minimum temperature is higher than 100⁰C. So the iOpener is useless for many opening steps in repair guides. But who knows because temperature range is not specified for this iOpener. -
-
-
Riempi una pentola o una padella con abbastanza acqua per immergerci un iOpener.
-
Scalda l'acqua finché non bolle. Spegni il fuoco.
-
Posiziona l'iOpener nell'acqua calda per 2-3 minuti. Assicurati che l'iOpener sia completamente immerso nell'acqua.
-
Usa delle pinze per estrarre l'iOpener scaldato dall'acqua calda.
-
Asciuga accuratamente l'iOpener con un asciugamano.
-
Il tuo iOpener è pronto all'uso! Se devi scaldare di nuovo l'iOpener, scalda l'acqua fino all'ebollizione, spegni il fuoco e immergi l'iOpener in acqua per 2-3 minuti.
What do I do if I don’t have a iopener?
Use a hair dryer
2 or 3 cups Rice in a sock, heat for about 2 minutes. But, I recommend the iopener.
When boiling in water you can put the iopener in a ziplock to keep it dry.
Even if you don't put in a ziplock bag, I found that the surface is mostly hydrophobic so drying it is very easy. I also didn't have tongs, but the bag is denser than water, so it sank and I attached clothes pins to the ends and was able to remove it with those.
2-3 minutes in near boiling water, then 2-3 minutes on my s10+ and it was super easy to cut the glue off.
I have a question, if I have a pan, and I have water, and a mean to boil the water, won't it be easier and cheaper to just use that.
Have you tried it? Water limits your temperature to 100℃, whereas 'pan on the stove' can easily get up to twice that. If your pan is even slightly warped, you'll have a few hot spots of direct conduction with convection everywhere else, heating things unevenly. Assuming you get the device up to temperature, how will you get it out without scratching it or burning yourself? After you're finished, do you really want to prepare food in the pan you warmed up adhesives and trace manufacturing substances in?
.
Boiling something form fitting to heat your device with is a lot more foolproof, and not being foolish is easier and cheaper. Direct pan heating can work, but you are leaving yourself open to a lot more problems than just taking the safe route.
-
-
-
Rimuovi le cinque viti Torx T5 da 3,7 mm che fissano la batteria al case superiore.
In my macbook pro retina, these are some kind of plastic screws. I cannot remove them.
Question - when putting the new battery back into the case, do we need to remove old glue/add new glue, use no glue at all, or place the battery in and then reheat to melt the old glue so that it will adhere to the new battery? Thanks!
My adhesive didn't have enough tack to hold the battery in. I just reassembled without it and can't hear the batteries moving, but I have the rubber grommets and not screws as MarkB mentioned. Fo future repairers, I'd recommend buying some nonpermanent two sided tape just so you have the option to fasten it in.
I wish they would find another way of securing the battery, this is ridiculous.
On each 'corner' of the frame that surrounds the two centre batteries, rather than 'plastic screws' mentioned by adriendavernas there are 'domed' rubber grommets. These presumably rest against the inside of the bottom cover when it is fitted thus supporting the batteries. As there were no screws underneath in these 4 positions, there is no need to remove these grommets. Agree with alex re: removing the extra T5 screw on the power board.
After destroying the adhesive which secures the batteries (bad technique or lack of patience in my effort) what is recommended to secure the batteries when reassembling?
The iFixit Battery had adhesive pre-applied. plenty of 3M Tissue Tape
My replacement A1582 battery actually had holes for the screws, though my original A1582 battery only had the 'domed' rubber grommets. Anyways, putting in the OEM A1582 battery without anything in the holes worked ok.
I wanted to put the rubber grommets on the new battery, so I used tweezers to get them back through the holes on the new battery
My battery replacement came with 4 rubber grommets pre-installed, so perhaps this is no longer necessary
3,7 mm is the lengh I gues. How thick are they?
Wanna know how I can search for replacement screws cause I lost the originales.
My model (late 2013 MacBook Pro Retina), did not have any screws in these locations. They were rubber “feet” in the same locations. They are not attached in any way to the computer. They simply lift up with the plastic battery frame. My replacement batter kit came with the plastic frame - and these rubber “feet” - already installed. No need to save the old ones.
I echo the others who found that there was only one screw (on the upper right). The remainder were rubber-like “feet”. I removed them, but they don’t seem to fasten anything, so this wasn’t necessary. As Ralph pointed out, the ifixit replacement battery comes with new “feet” installed.
some models have one screw on the upper right corner of the battery cells (battery circuit board), the rest are rubber feet that doesn’t hold anything. no need to replace them if your replacement battery doesn’t come with them.
-
-
-
Per proteggere il display, disponi un foglio di stagnola tra il display e la tastiera e lascialo in questa posizione mentre lavori.
-
-
-
In alternativa, se stai usando il metodo dell'iOpener caldo, salta i seguenti tre passi.
-
Indossa occhiali protettivi quando maneggi e applichi l'antiadesivo (gli occhiali protettivi sono inclusi nel tuo kit).
-
Non indossare lenti a contatto senza gli occhiali protettivi.
-
Anche i guanti protettivi sono inclusi nel tuo kit. Se ti preoccupa un'eventuale irritazione alla pelle, mettiti subito i guanti.
I warmed the battery with a hair dryer, and it worked like a charm. It softens the glue, and I was able to use the card to pry under each section of the batteries.
Yes. This. Exactly this. So much simpler and safer than dealing with the solvent.
-
-
-
Tira via il cappuccio nero di gomma dalla tua bottiglia di antiadesivo.
-
Usa delle forbici per tagliare la punta ancora sigillata dell'applicatore.
@aadeshina - That’s an excellent suggestion. I took your advice, and tried it with a can of MG Chemicals “403C Super Cold Spray”, which I had on hand for other electronics work. It worked very well — it froze the adhesive to the point where it was quite easy to work the plastic iFixit cards under the batteries, and pry them loose.
I like this freeze technique much better than the volatile, flammable, risky solvent approach for removing the batteries. I did however find the solvent useful for softening and removing the residual adhesive remaining in the case after the old batteries were removed.
There are many brands of aerosol freeze sprays available on Amazon, DigiKey, Mouser, etc.
As above, Another solution to remove the batteries, (Maybe not environmentally friendly): I removed the Logic board and related components to protect them and took a can of compressed air (the kind you buy at office stores for cleaning printers and such) Invert it and use the included straw to direct the propellant (which is extremely cold under the batteries. The adhesive holding the batteries in becomes brittle and u can just pop them out with medium force using a wide putty knife. Took me 3 min to do.
Before proceeding with the solvent, I suggest considering using dental floss to slice through the old adhesive. (See next step 22 below for more details.) Because the solvent is so dangerous (flammable and caustic), I felt the “dry” use of floss would be better. I assumed that I could revert to the solvent if necessary after trying the floss.
-
-
-
Applica uniformemente delle piccole gocce di antiadesivo sotto il bordo in rilievo della cella della batteria più a destra.
-
Prima di procedere con il passo successivo, aspetta 2-3 minuti per dare tempo all'antiadesivo di penetrare sotto la cella della batteria.
I managed to remove the battery without the adhesive by using the thread technique. More info in this video: https://www.youtube.com/watch?v=fupkPz55... . Just make sure you have someone to help you and hold the laptop in place for you.
Thank you very much! This is an absolute win technique
I agree that this worked much better. A few suggestions for others:
- one type of thread that works very well is fishing line. While you can use monofilament (the clear plastic), if you can get the braided fishing line you will find it is extremely thin and super strong and works very well for this
- string pulled tightly can cut more than just the adhesive, so be careful what you allow the string to rub against while you are pulling it. I can easily cut into another cable or the battery
- I found that gloves (not latex, big gardening or construction gloves) helped me use string without needing to go “ow” every few seconds from your hand hurting. I have some gloves with nice grip and good hand protection, I would get the string positioned, put on the gloves, and start pulling. It worked fantastically
I was able to remove the battery easily with the string method, and i did not remove the speakers to do so. However, when I went to seat the new battery I chose to remove the speakers to make it easier to place
Thanks for the awesome suggestion!
Tony Le -
For easier removal I used a combination of heat from a hot water bottle and solvent.
I used waxed dental floss (not sure whether the ‘waxed’ is important), which worked like a charm. I cuts through the tape much easier than seen in the linked YouTube video linked above. Each battery cell was loosened within 5-10 seconds. It worked amazingly well, and taking out the old batteries proved to be no challenge at all.
+1 for dental floss - used it too and managed to cut without any effort.
JX Low -
Just finished a fix using floss to remove the battery. It works really well.
Because I preferred to avoid using the flammable adhesive remover, I tried using the dental floss method. I assumed I could always revert to adhesive remover if the floss didn’t work. The dental floss method worked beautifully. I used a slow, methodical “sawing” motion with the floss, rather than brute force. Although it took some strength, it worked well, and I didn’t need to use the remover.
Rather than using the plastic cards (though I think they would have worked fine), I used a plastic putty knife (standard, available in any hardware or paint store); this gave me a sturdy handle with which to grip and maneuver the blade. This, too, worked well.
I used the threading technique as well. I had a spool of pretty tough sewing thread. But it kept breaking, so I tripled it up. Still kept breaking but eventually got through it.
For the 2 middle cells I had to thread the thread behind the plastic frame thing and both cells, but passed the thread in between the side of the frame and the cell. This was really tough and I broke the thread a few times.
After I was finished I just cleaned everything up with acetone (aka. the adhesive remove/nail polish).
This is the hardest part of the whole process, if you don’t have any of ifixit tools you can use a hair dryer. Apply heat on the cell (make sur you don’t apply too much heat), flip the laptop apply heat for 20 to 30s on the aluminum side just near the trackpad( depending on which cell you wanna pry open) and use a credit cart gently. this will do.
I used dental floss, but fishing line might be better. The floss kept breaking. I wound the floss around the special screwdrivers which helped with pulling it through. I used Goof Off to remove solvent AFTER I got the batteries out. It worked well. You can get Goof Off at any hardware type store.
I used thin nylon string (~1/16th inch), since dental floss cut into my fingers too much, putting some solvent on the string too, once in position around cell corners, so they worked together. (Applying solvent for 1 minute along edges 1st, as suggested).
like most people this is definitely the most difficult part. i purchased the kit and thought the adhesive remover + cards were worth the price. i was scared to overuse the remover but i found myself using it more and more the more frustrated i got trying to remove it.
i did a combination of heating with the hairdryer to lift the batteries a bit, then putting adhesive remover on the plastic card and shoving it under the battery - repeating this step. It was working really well.
-
-
-
Usa l'iOpener caldo per coprire metà delle celle della batteria più a destra.
-
Dopo circa un minuto riscalda di nuovo l'iOpener e disponilo in modo da coprire l'altra metà delle celle della batteria più a destra.
I did not have an iOpener. I did not fancy using a heat gun on the batteries either so I used two flat metal spudgers to prise them off the body of the mac book. I hit the spudgers with a small hammer.
I used a sock filled with rice and it worked exactly the same. Microwaved it for 2 minutes (hot enough to barely hold) and set it on the batteries as above for 2 minutes.
Then I reheated it for a minute and opened up the laptop, and slide my DYI iOpener under so it was directly under the batteries (across the trackpad portion of the laptop). This worked great because the heat went straight thru the aluminum and softened the adhesive. I ended up letting the screen hang over the edge of the table while I pried the batteries out.
I used this method and it worked, but I guess even dry rice can have some moisture in it. The sock was steaming when it came out of the microwave, and there was some condensation on the case when I flipped it back over.
I used this method and it worked, but I guess even dry rice has some moisture. The sock was steaming when it came out of the microwave, and there was condensation on the case when I flipped it back over.
What Richard K-W said about the sock is true. Basically, the microwave is tuned to vibrate water molecutes to create heat, so unfortunately, that’s the reason the rice sock heating pad works. Not the worst thing really, because the condensation technically should be distilled and therefore a poor conductor, but we can’t really know for sure that the condensing surfaces are clean of salts and other contaminants that will make the condensation conductive. Still, it’s good as a last resort and it’s safer than deforming a battery.
Scott S -
This heating with the iOpener took me forever. I tried my fair share of heating followed by nudging slowly with a credit card 1 mm at a time. Finally pried it off after 30 mins.
I really don’t understand why it is suggested to heat this side of the battery! I used an iOpener on the aluminium case, on the side the battery is actually glued to. You have to open the screen and place the laptop upside down on the edge of a table with the screen hanging down over the edge. This way the heat gets directly to the glued joint between the case and the battery. Worked a treat no solvent needed
You and one other guy here, who also made a DIY iOpener with rice and a sock (MacGuyver hack) make a great point here. I remove a lot of Macbook batteries from all models 2013 - 2019 and use these plastic spudgers https://www.aliexpress.com/item/32824615... I just wet the edge of the tool with some ISO and work it under the battery until all the adhesive is freed from battery to case. Usually get them out in around 5 mins
I used barak's rice-filled sock method, and it worked, but I guess even dry rice has some moisture. The sock was steaming when it came out of the microwave, and there was condensation on the case when I flipped it back over.
Yeah, given how well the chassis is going to conduct heat, I’d recommend going about heating it from the top (keyboard) side, although I’d be more cautious about condensation on the keyboard side since there are arguably more hard-to-dry places on that side. Maybe put the hot bag/sock inside a ziplock bag if you don’t have an iopener or two
-
-
-
Spingi una scheda di plastica tra la cella più a destra della batteria e il case superiore, tagliando l'adesivo che li tiene insieme.
-
Usando il metodo dell'iOpener caldo, se incontri un'eccessiva resistenza dello staccare la batteria, fermati e usa di nuovo l'iOpener per riscaldare la sezione su cui stai lavorando.
In addition to using the wheat bag/iOpener to loosen the batteries, I found it useful each time I inserted the plastic card under the batteries to give the card a 'wipe' with isopropyl alcohol to ensure that it didn't stick to the adhesive holding the batteries down. it also presumably eases the glue away from the batteries somewhat.
Yes, these steps work with any glued in Macbook battery from 2013 up until the present day. Well in regard to the actual cutting of the adhesive that is. Obviously different models have different physical layouts in regard to where is best to insert the cutting card, battery disconnection etc. Best to always refer to the ifixit guide if possible for the details.
Excessive heat can be dangerous, but the iOpener is designed to never get hot enough to cause permanent damage. Using a heat gun or hot plate could be dangerous, but the iOpener method is the safest one we know of =)
I found it helpful to use some dental floss to help loosen each cell and then pry the rest off with the card
Is there a substitute for the plastic cards? have all the other supplies I need. Would like to avoid ordering the whole kit for those cards?
A couple old credit cards should work fine.
My successful alternative to the plastic cards was to use a plastic putty knife, an inexpensive purchase from any pint or hardware store. This tool gave me a strong, grippable handle with which to carefully “work” the plastic blade under the battery cells.
I have found that different techniques are needed for different parts of the job. The outermost two batteries on both sides can be removed by softening the adhesive as shown with the fluid. The batteries are in a shallow dish so there is less chance of the fluid running everywhere. Just apply sparingly. As Christopher Girke suggested, the middle two are best removed by applying the solvent to the edge of the card. Multiple applications are necessary but this avoids the fluid getting where it should not go. Also it is easier to push in from the sides, not the front as shown in the photo to avoid a lip on the underside of the trackpad.
-
-
-
Ripeti questa procedura con la cella della batteria adiacente:
-
Applica una modesta quantità di antiadesivo sotto la cella della batteria e aspetta 2-3 minuti per lasciarlo penetrare e ammorbidire l'adesivo.
-
In alternativa, scalda di nuovo questa sezione con il tuo iOpener se necessario.
-
Spingi una scheda di plastica per circa 2,5 cm tra la cella della batteria e il case superiore; fai leva sulla cella per staccare tutto l'adesivo.
-
-
-
Ripeti la procedura descritta in precedenza per separare dal case superiore le due celle della batteria più a sinistra.
-
Ricordati di applicare una modesta quantità di antiadesivo per ognuna delle celle della batteria e di aspettare 2-3 minuti per lasciarlo penetrare e ammorbidire l'adesivo.
-
Usa una seconda scheda di plastica per separare le due celle più a sinistra dal case superiore.
-
-
-
Per staccare l'adesivo che fissa le due celle centrali rimaste, applica qualche altra goccia di antiadesivo liquido sotto ogni cella (oppure usa l'iOpener).
-
Può essere utile sollevare di qualche centimetro un lato del tuo MacBook Pro per far affluire l'antiadesivo nella direzione corretta, sotto le celle della batteria. Puoi usare un grosso libro o un blocco di è sparso per tenere sollevato un lato del tuo MacBook Pro mentre lavori.
-
Spingi una scheda di plastica per circa 2,5 cm tra la cella centrale sinistra della batteria e il case superiore per separare la cella.
My laptop had a strip over these center batteries. I had to remove that before getting the center batteries off.
My plastic cards were hitting a black trackpad backing. I thought this was the adhesive not coming off. I also didn’t want to harm the battery and didn’t bring the card up enough.
I found out by going through one of the side batteries, but could have just raised the tip of the card very slightly.
I recommend you do not use the liquid adhesive remover for the middle battery pods. These do not rest nicely in their own “tray” like the two parts on the left and right. Consequently, it is very easy to apply too much liquid, allowing the excess to run into your trackpad and logic board. Even though the liquid dries quickly, it does leave behind a little residue. The result from my experience was a slightly faulty connection for my screen, causing random pixel flickers in dark spaces on my screen. Use the floss method found elsewhere online. It is much more difficult to get out but does not risk damaging your computer.
To remove the center batteries carefully, you can add some of the liquid on the tip of the remover card. Put the card at the adhesive and simply wait. It works fine and you wont use too much liquid!
I bent the silver plate between the trackpad and the middle battery cells while removing the middle cells, resulting in a sunken trackpad when looking from top. Clicking the trackpad also does not work anymore.
Be careful here when you slide any tool under the central cells to pry them open, you could slide it under a sliver plate covering the trackpad electronics, maker sure that your tool is really sliding between the cells and this silver plate, I almost torn this apart, luckily id did not damage the trackpad, dome people reported that it did really damage the trackpad.
1. flatten the battery before you begin the dismantling
2. remove the 4 side cells completely by cutting the cables with sharp pliers
3. Apply adhesive remover around the middle batteries, one side at a time
4. Use the cards to cut the adhesive from around one side at a time , adding more adhesive remover . Do NOT lift the batteries
5. profit
Middle batteries have black glue strips strong as welding. lifting the batteries without dissolving these will damage the touch pad back plate it's a thin metal plate
I used the floss method without solvent. It came apart relatively easily.
My cards were hitting the trackpad plate as well. When I started on the left side, I slid in from the left side (using the card left under the battery in step 29) I pushed the card in from the side enough to work the card into the front side (lifting the plastic bar enough to slide under it.) Also for this entire procedure, applying the solvent to the card itself was the best way to go. Apply to the card, slide it in, let it sit for 2 to 3 minutes, push in a bit, pull out, reapply... rinse repeat.
Watch out for the trackpad plate under the battery cells. When i put my card underneath the battery cells i was hitting the plate instead of the adhesive. Just angle your card a bit lower to make sure the other end of the card goes above the plate. I suggest wedging a corner of the card in the middle of the two cells. There is a small gap that you should be able to feel. Once the card is in there, just add some adhesive remover onto the card and let it run down the card and under the cells. Spread it a little so it touches the adhesive of both batteries. Then wait and pry. Worked very well for me. Thank you to the comments that came before that got me the idea!
When I tried pushing the card under the left battery I could feel I was striking something metallic. Tried under right battery and felt the same. Was worried about prying the trackpad plate as opposed to the centre batteries but could not see the plate under the batteries. However if you lift the 2 left or right batteries you can then see the trackpad plate allowing you to slide the card in from either side. Very glad I read previous comments here! I also replaced the speakers using this procedure. After reassembly held my breath and plugged in to recharge. Now typing this listening to nice music on my renewed speakers and battery! Thanks to ifixit and everyone else for their comments. I have never attempted anything like this so was very apprehensive. I would definitely remove the speakers since I used the liquid to remove the batteries.
For a battery repair with the heat method, you can start to unglue the center battery cells from the sides, you can see the darker metal plate protecting the trackpad and will not mistake it for the glue. This is safer if you are afraid to damage the trackpad by hitting them with the cards, especially if you operate from "below", ie bottom side of computer during the repair
-
-
-
Fai leva sotto le due celle centrali per staccare l'ultimo adesivo rimasto e solleva la batteria dal dispositivo.
I found that gentle application from a heat gun works well enough to soften the adhesive. Use a plastic card to help as you go. Use caution not to over heat anything.
Just like the recommended adhesive remover method, the dental floss method also left some strips of dry adhesive inside the laptop. I used the flat spudger to peel it off. Have patience; it will peel.
I used GooGone adhesive remover (non-flammable, non-toxic) to loosen remaining adhesive. It worked well, applied with a paper towel. It took several applications to thoroughly clean the computer case. Allow it to dry thoroughly before adhering the replacement battery.
I just used the remaining iFixit provided glue dissolver and a cotton swab to clean up the remaining glue. It worked just as well as GooGone.
my advice is not be worried about putting some pressure and ripping that thing out. it as easier to clean up the adhesive after the battery was gone. the kit came with a paper towel and i just dripped the remover all over the case and scrubbed it off with the paper towel.
That last step in #32.
It would have helped if I read it correctly and attempted to remove from the edge instead of mid case.
About freaked out when a noticed a disconnected cable just above left-center battery. Analyzed how to secure it and it could be pulled into the connection with a tab. Whew! Everything works now. I guess the cable is secure and where it needs to be.
I recommend IFixIt.com to so many people. Hands down the best support documents. Also some pretty spiffy tools and sets. Love it!
-
-
-
Rimuovi la batteria.
-
Con un po' di fortuna, dovresti riuscire un po' alla volta a staccare ogni striscia di adesivo con le dita.
-
In caso contrario, bagna ogni striscia di adesivo con un po' di antiadesivo per 2-3 minuti e poi grattala via con uno strumento di plastica. Può essere richiesto abbastanza lavoro, quindi cerca di avere pazienza.
-
Elimina ogni traccia dell'adesivo rimanente e lascia asciugare all'aria il tuo MacBook Pro per qualche minuto.
-
Calibra la nuova batteria appena installata: carica al 100% e tieni in carica almeno altre 2 ore. Stacca il cavo e usa il laptop per farlo scaricare. All'avviso di batteria in esaurimento, salva il lavoro corrente e tieni acceso il MacBook finché non si iberna perché scarico. Aspetta almeno altre 5 ore, poi carica senza interruzioni fino al 100%.
RECOMMENDATION: The battery connector and associated screw are critical when considering battery alignment. Also don’t forget the left and right speaker assemblies when aligning the two small outer cells. I didn’t consider these and had issues.
Also, keep the transparent top film on the battery to keep the cells aligned with respect to each other, and always support all the cells if handling upside down.
I agree, if you don’t reinstall the speaker assemblies before installing the battery, they may be impossible to put back in after the battery has adhered
Anyone reconcile the different instructions for batter calibration? Inside battery package is a business card that says drain below 10% then charge uninterrupted to 100%. That is completely different then above: “Calibrate your newly installed battery: charge it to 100%, and keep charging it for at least 2 more hours. Unplug and use it normally to drain the battery. When you see the low battery warning, save your work, and keep your laptop on until it goes to sleep due to low battery. Wait at least 5 hours, then charge your laptop uninterrupted to 100%.”
The longer calibration method detailed in the guide is correct. I believe the printed cards are due for an update.
My replacement battery came with a clear plastic protective cover stuck across the top. This protective cover helps keep the four battery cells and their frame aligned properly for fitting into the space. Remove the protective cover (it peels off easily), however, before closing up your computer.
I agree that test-mounting the new battery, including re-attaching both speakers, BEFORE removing the adhesive covers, is essential for perfect alignment of the batteries… and especially important for alignment of the battery connector and its solo screw.
Pay attention to how the new battery sits in place before removing the adhesive strips. Although I did this, I didn’t notice that the rubber “feet” on the plastic frame around the middle batteries were very slightly out of alignment. The result was that the case could not be closed tight enough for the screws to fasten properly seal the case. It took a lot of poking around and attention to minor detail in order to get the case to fasten back in place.
I followed the tutorial and everything went pretty smooth, started the calibration and got to the step of recharging after waiting 5 hours and my mac wont turn on. the magsafe charger is glowing red/orange but the mac itself is showing no signs of power or charging. Any tips? thanks in advance
Removing the adhesive strips of the original battery was relatively easy - compared to removing the strips of the iFixit battery… what took me 1.5 hours. All because the first battery delivered was defective so I had to repeat the replacement. Thanks for the free and quick replacement battery - fair attitude, but that did not saved my time…
Always amazing when it all works at the end. Combined the battery repair with the fan replacement. Looks like the battery I got from the Bay is an OEM from SMC. All went well. Now I just need to remove the display gate anti-glare with some Listerine or the W5 towelettes from LIDL (if in Europe) and the machine is like new. ;-) Thanks fixit and everyone who contributed and shared their comments.
If you have only 1 screw and the 4 rubber grommets, be care about the plastic trim piece on the battery be sure it can be seated properly before removing the adhesive. When you do permanently seat the battery be sure the two bottom holes (where the grommets or screws should be) are properly within the case or you won’t be able to seal the back. I had a bit of an issue but it was easily solved by forcing the plastic opening piece into the case with a screw driver tip. I left the battery without the 4 rubber grommets as they seemed impossible to seat into the holes on the plastic piece of the battery. So far, so good.
After finishing and installing the new battery, i’ve started charging ……but the fan is very loud and running fast, and no light indication on my charger saying if it’s charging or not…..(?!). I’ve follow every step and checked twice every manipulation.
any tips ? Thank you
Hey Buddha23, I’m having the exact same problem right now. Did you find a way to fix the problem ?
Thank you for the very detailed step-by-step as well work arounds. The replacement process went smooth- the more time consuming ones were: (1) removing the battery. I found that inserting the plastic card as far as I could initially , then dropping the acetone there made it for easier detachment. (2) a lot of time to clean the gooey stuff , I used the acetone with a small tooth brush and my nails to scrape as indicated.
Anyway, I am glad I found this site/ provider. My MacBook Pro, 2013 model is working like new . I just arrived from the USA in London - and was considering purchasing a new laptop ( which would be even more costly for me). Big thanks.
I am also glad I purchased the tools kit , without which, I would not have been able to accomplish the task. I used a brush to clean the dust after I removed the cover. in my case, as I never had done it, had considerable amount of dirty stuff. Needless to say the tool will be used for additional cleaning for this extended life.
Also had difficulty with the rubber “feet” and the plastic frame around the middle batteries, close to the front edge, since the right one was slightly out of alignment. Had to use a little force to push it toward the MLB and then down. The rubber grommets also wouldn’t fit in the much smaller holes under them. I just removed them since they don’t really serve much purpose (I doubt it will rattle w/o them). Plugging the battery back in also was more difficult than it should be, due to alignment.
The adhesive on the battery is inadequate in my experience. You may need to purchase double sided spongey tape to add additional adhesion otherwise you will feel and hear the battery flapping in the enclosure. It’s easily enough to slide in the additional tape section afterwards, but worth keeping in mind.
When my battery came out, there was a thin metal sheet under only the two center cells that came out with it.
I was going to check to see if the new battery had that sheet pre-installed. If not, I would remove it and slip it under the new one.
A week passed between when I removed the dead battery and when I installed the new one. Consequently, I forgot to check for the sheet. My recollection of the cells feeling floppy indicates it probably did not have the sheet, and I should have removed and reinstalled it with the new battery. Can anyone confirm or deny? I can't tell from the image above if it is present in the empty battery bay or not.
If I have in fact failed to install a needed metal sheet, what are the consequences of it not being there? What is it? A heat shield? The battery is behaving as expected so far, and the track pad seems to be completely normal as well. So, not sure if I made a mistake or if I need to go back in to fix it or not.
FWIW, I went back to look at the photos at the page above to order the battery. The metal sheet is not there. So it looks like it stuck to my battery coming out instead of sticking to the case, and I should have swapped it. How much trouble am I in?
I can't see how to add a photo directly. It is also not letting me add a link, for some reason. Not sure if this will work or even is allowed, but this is a photo of the sheet I am talking about on the old battery:
Tim -
Two days later and I have not noticed any ill effects, yet.
Tim -
this is what i did.
1. put the battery in and try to screw it all together before pulling the clear cover on the back of the new battery. i removed the top clear sheet because it was easier to work with. but get a feel for how it fits before adhering it to the case.
2. i also removed the little rubber grommets out of the 4 eyelets. i couldnt make it work with them there. also i wedged the eyelets in between the battery and the case. this was the most annoying thing. the case wouldnt close unless the were in place.
3. make sure you connect the battery and screw it in as well before pulling the self adhesive on the battery.
4. i also had to take off the protective cover from step 4 on the new battery and then re-applied it after i was done.
5. the battery connector was off by like 1/2 in for me. it was easier to plug that in and screw in the board first. then place the battery.
6. i removed the speakers and put them in last. it easier to do after. i tried doing it before like folks said but no luck for me.
RECAP OF THIS JOB (January 2023)
Don't fret, it's pretty easy in my opinion. I purchased the iFixit kit and followed the instructions.
Follow the instructions, with the exception of removing the speaker cables. Just carefully set the speakers aside, but you don't have to disconnect their cables. I didn't really use the cards, I just kept using the spudger to lift up the batteries as their adhesive became weaker from the provided isopropyl alcohol.
Hope this helps!The best tool I have ever used to get out 13" and 15" glued in MB batteries is a 1.5"x 6" plastic puddy knife. I don't use any adhesive remover and it is just sharp enough and long enough to go work well with Apple PIA batteries glued in. The designer of these glued in batteries should be fired and the designer of the one with the holes predrilled for the battery should be hired back to the design team. MAB batteries are a dream compared to these beasts and there is no need for glued in batteries.
I used some nylon dental floss as an additional aid in breaking the glue connection behind all the battery modules. Also, I have no idea what the tiny rubber covers over various screws inside do. I saw no instructions anywhere on the web regarding these little buggers...I did not replace them...we shall see if they do anything important. My MB Pro 2013 just sits on a desk forever-does not travel anywhere. Finally, there are many great bits of advice above.
Everything went fine. I left those rubber feet and just crushed them I guess when closing the covewr as they were bigger than the screw holes. I calibrated and all seemed fine but now the battery drains to zero with the lid closed and the machine not being used.
Check the battery alignment and battery connector before removing the adhesive covers. Although mine went back together ok the connector is on a slight twist and there is a gap between the cover and the chassis near the rhs battery.
-
-
-
Appoggia un iOpener scaldato sulla copertura del trackpad per ammorbidire l'adesivo che lo fissa al case superiore.
-
-
-
Usa uno strumento di apertura in plastica per fare leva attentamente sulla copertura del trackpad per separarla dal case superiore.
This adhesive was extremely strong for me and took quite a while to soften up (longer than batteries). I ended up using my wife's blow dryer after the heat pad struggled with it. Just take your time.
-
-
-
Usa la punta di uno spudger per ruotare verso l'alto l'aletta di bloccaggio sul connettore ZIF.
Qualifier: I have not actually been inside my laptop case yet to do this but judging from the photo in the next step (43) where the cable is being pulled out and the “release position” of the lock is flipped up in that photo…..I’d suggest the two photos in this step (42) should be reversed if one reads from left to right and assumes the photo on the left and what it represents is a step preceding the photo after it. It appears the first photo (left photo) shows the unlocked position with the locking mechanism “flipped into the UP position”. The second photo shows the cable holder in the locked position. Trying to remove (pull) the cable with the lock flipped down may result in a bad ending.
Timothy - The pictures are correct and in the correct order.
Step 41 is lifting the tape covering the latch that’s part of the ribbon cable, Step 42 is lifting the latch from down __ to up | on the logic board connector, Step 43 is now the removal of the ribbon cable from the left from the connector slot (look again the latch is still up).
Dan -
-
-
-
Sfila il cavo del trackpad dalla sua presa sulla scheda madre.
Point of clarification. The cable stays flat and is pulled towards the trackpad. Don’t pull it upwards toward you.
-
-
-
Svita le seguenti viti che fissano le staffe del trackpad al trackpad stesso e al case superiore.
-
Quattro viti Torx T5 da 2,2 mm
-
Quattro viti Torx T5 da 1,7 mm
It’s not necessary to remove the 2.2mm screws.
No it’s not required, it all depends on the alignment needed with the new unit.
Dan -
-
-
-
Tira delicatamente via il trackpad dal case superiore, stando attento a non strappare il cavo a nastro.
Regarding the re-assembly once the trackpad is back in place, be careful when re-fitting the batteries; the adhesive which takes so long to separate may not hold the batteries to the chassis upon re-fitting. It may be necessary to use thin double-sided foam tape to ensure that the batteries are held firmly in place once again so that vibration does not cause the connections between the batteries to fail.
If your new trackpad won't fit into place, loosen the screw at the bottom, center of the case (you can see it in the step 36 pic). Don't forget to tighten it back up. This screw affects the amount of play and click in the mouse, so fine tune it until the pad clicks to your liking.
Make sure you have a good fettle with the trackpad before sticking the battery back in, the brackets in 42 and 43 can move slightly and affect the position and function of the trackpad. Ensure you are happy with it all and fasten it in place before you think about the battery. Took me a while to get it sitting just right and true.
Where are the rest of the steps? How do I screw the new keyboard in? Please add the missing steps.
On the most part just follow the steps in the reverse order. Unless there is something special that’s were we leave you.
This guide is for replacing the TouchPad not the keyboard, you also don’t need to take the keyboard out for this task.
Dan -
It’s not keyboard replacement lol
-


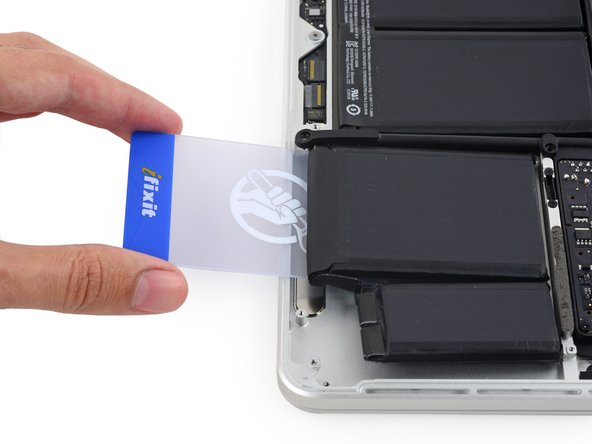


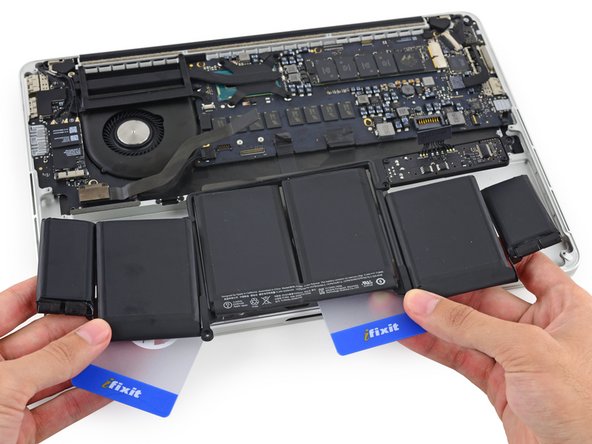


Per rimontare il tuo dispositivo, segui le istruzioni in ordine inverso.
Per rimontare il tuo dispositivo, segui le istruzioni in ordine inverso.
Annulla: non ho completato questa guida.
Altre 28 persone hanno completato questa guida.
Un ringraziamento speciale a questi traduttori:
100%
Daniele Carminati ci sta aiutando ad aggiustare il mondo! Vuoi partecipare?
Inizia a tradurre ›

Team

15 Commenti
Кроме видео, см. инструкцию по Upper Case.
1. Сложно снять аккумулятор. Я не грел, а просовывал кусочки астролона (лавсановая плёнка) толщиной 0,5 мм. Осторожно - я чуть не порвал черное защитное покрытие аккумов с нижней стороны, поэтому острые края инструмента притупите наждачной бумагой. И не используйте пленку на всю ширину - подлезть под одну половинку аккума гораздо легче, чем под весь.
2. Делайте, как на видео. Но! Не забудьте кроме клавы купить саморезы для крепления новой клавы и такие же кусачки, как на видео.
извлечь остаток заклепки непросто. пока научился, загубил десяток из 102. хорошо, что догадался дёргать в разных местах, поэтому клавиатура держится . для успешного извлечения:
2.1. беритесь под самый корень.
2.2. у меня получилось дергать только передней частью кусачек - но попробуйте сами.
2.3. нужно чуть стиснуть заклепку - чтобы кусачки её чуть "надкусили".
2.4. дергайте как на видео. так как даже с устойчивым навыком выдернутся не все заклепки, старайтесь дергать в разных местах.
Keyboard replacement on any retina macbook pro is a bit involved. You must take everything down to the bearbone, You can check this video out for detailed explanation on how it’s done https://youtu.be/_yfRgs1VXKo
Thank you for the help on this one. The rivets were a pain. But I was able to buy screws to take the place of them. Very tedious repair for sure. But so worth it!
Where do you guys buy your replacement keyboards? Any recommendations?
You can get replacement keyboards from Beetstech or Louis Rossmann’s store. I’d recommend one of the two because they both consistently provide quality parts. I’ve bought keyboards from random ebay sellers and almost every time I’ve received keyboards with keys that sit crooked. Never have that problem with Beetstech or Rossmann.
Louis doesn’t sell the keyboards with backlights or the necessary replacement screws, but Beetstech does, so I usually buy those. You don’t have to replace the backlight, but for the slight price increase I just figure why not?
Do you have the remaining steps for keyboard replacement? The title indicates it’s for a keyboard replacement but it appears to be for a Trackpad replacement.
Looks like a major project. My KB is gone, but battery and trackpad OK; what do I use for re-attaching them?
Just completed this using the video. It took a looooong time.
Be particularly careful with the rivets on the four corners and try to pull them out whole when you are pulling out the old keyboard. There is very little room to get a pair of pliers or flush dikes in there to get them out if you just snap off the head of the rivet. Had to drill out a couple of them.
Nicely documented, but thgis is not about exchanging the keyboard (much! mor work involved) but only the trackpad. Header should be changes…
Dan, it says “MacBook Pro 13" Retina Display Late 2013 Keyboard Replacement” in the title. Lol
For all the screws you use the P5 pentalobe screwdriver?
Carlos - Replica
Pentalobe is only for the screws on the bottom cover. The Torx screw driver is for the remainder.
Fredrik -
I never, ever, ever considered using anything but the correct tool on the Pentalobe screws. Too easy to strip and void your warranty (if still in effect), as well as make it almost impossible to get inside later for another upgrade or repair. The Wiha P5 Pentalobe screwdriver fits like a glove and costs only about $11 (a fraction of your drive's price)at Amazon.com. Get it!
marketing - Replica
I followed this exactly and was able to replace my broken trackpad. I did not have to replace the ribbon OR the battery. However I would suggest getting the ribbon since it’s fairly cheap, as for the batteries I was able to do it with a card only. I didn’t use any heat or the liquid but it takes some time. You really have to work the card in there to release the glue. Also you must be very careful not to bend the batteries or damage them, if you do you must replace with new. This took me about 1.5hrs and my computer works like new. Apple cost for this job was around $450, I did it for $120. Big ups to ifixit for this awesome tutorial, tool set and parts!
On a side note, only use quality tools, the cheap ones will break or strip the screws.
Dustin Steward - Replica
Note that the eight 3mm screws have a shoulder under the head, while the two 2.3mm screws are “full thread”, i.e., there is no shoulder under their heads. It’s important to put the two screws with no shoulder at the hinge of the cover.
All ten screws require a P5 Pentalobe screwdriver, preferably with a magnetized tip to help hold and position the screw.
All of the screws have blue “Loctite” thread locker compound on their threads. This is to help prevent the screws from working loose and falling out. Don’t attempt to clean the Loctite from the screws — leave it in place, and it will continue to help prevent the re-inserted screws from working loose.
When replacing the bottom cover, it is a good technique to insert and BEGIN tightening all ten screws BEFORE fully tightening any one screw. After all the screws have been started, then go around and finish tightening all of them. By doing this, you make it easier to feel that each screw has been started properly, and is not “cross-threaded”.
doubleclutch - Replica
This is what I found on my MBP mid-2014 13” Retina. All 10 used the same screwdriver. I didn’t see the blue “loctite” but I also got my computer refurbished.
Evan Shulman -
A good technique for starting to thread the screws when replacing them is to position and align the screw, and with the driver, gently turn the screw in the REMOVAL direction until you feel and hear a slight click. This click happens when the leading thread of the screw drops off of the leading edge of the thread in the hole — this is the point at which the threads are properly positioned for engagement. You can now turn the driver and screw in the TIGHTENING direction. This technique will help prevent accidental “cross-threading” of the screw, which will damage the threads permanently.
Note that this is a useful technique when installing ANY threaded fastener.
doubleclutch - Replica
Hi peeps,
I have a wifi problem on this MBP 13” early 2015 and was pleasently surprised to find your guide to changing the airport card.
However upon closer inspection it seems that on my MBP (purchased new or so I thought) the 3 antennae seem so have been soldered together at the point where they are clamped to the chassis. I have photos but cannot post here. Can anyone conform that where the 3 antennae wires are held to the chssis by the 2 scew metal support (just before disappearing into the screen hinge), the support is not meant to short the 3 wires together. This makes no sense for 3 seperate antennae wires.
Any advice /close up photos is welcome here.
dom
colonel mustard - Replica
Tip: Use post-it notes to keep track of screws
1. Pack of post it notes
2. Stick screws to the sticky part of the post it note
3. Write on the post it note which step and what kind of screw it is
ibash - Replica
Hi, in order to drain the battery I am running:
yes > /dev/null
in 4 terminals, so the CPU maxes out at almost 99%.
I hope this speeds up the battery draining process.
And the backlight is at maximum brightness :-)
You can see the cpu load in Activity Monitor.
Its draining at 20% per 15 minutes.
Any concerns about draining the battery in this way?
Andre van der Ham - Replica
Something I’ve been curious about, is it possible to upgrade a late 2013 Retina model MacBook Pro, with the improved 16gb ram and i7 processor logic board from the 2015 retina model? I’d be interested to try but not ready to shell out the $500+ to be the first lol
Chat Dawgie - Replica
Without rehashing what others have said, I would highly recommend reading through the steps *and* the comments for each before tackling your replacement for tips. Highlights for me were: only disconnecting what actually needed to be disconnected, rotating the spudger to release the track pad cable, a hair dryer worked perfectly fine, and the pencil outline of the battery before you remove. You got this!
N DesRochers - Replica
Installation of replacement AirPort card was easier than I had expected thanks to this guide. Thank you.
chaslaw - Replica
I use replaced SSD and it was super easy and working great. I can finally upgrade Mac OS with plenty of room to spare and no more low memory alerts. Well worth investment and didn’t have to buy new laptop
Pete James - Replica
It's interesting that this tutorial is rated Moderate even though you need to remove the battery. The battery removal tutorial which is basically the same but with fewer steps is rated Difficult.
Marv Ruona - Replica
when i pulled the screws out i arranged them in the same way they were in. the top 2 middle screws appeared to be shorter than the rest. in order to keep them in place i got a square of packing tape sticky side up, taped both sides down with 2 other pieces of tape. and then put the screws head down in the order i pulled them.
Jason Wade - Replica
Excellent instructions although checking battery and speakers aligned before fixing batteries into place is essential. MacBook good as new!
John Foreman - Replica
I find it helpful to spread a soft, slightly fuzzy cloth (like flannel) over my workspace before doing something with small parts. It keeps screws and things from rolling or bouncing away. A towel might be too plush, though, as a screw might get lost in it.
Richard KeslerWest - Replica
I cannot get the two screws (that are different than the other ones) out and now they’re stripped. Any idea what to do without using a drill?
Honeybee94 - Replica
DO NOT REMOVE SPEAKER CABLES!! The connectors are fragile. Just remove speakers and bend attached cable away from battery. Same for trackpad cable connector at front side. This cable crosses the middle of the battery. Just remove the one connector on the back side - leave front side connector attached and fold cable toward front of computer out of way of battery.
Paul Lebow - Replica