Introduzione
In questa guida troverai un controller DualShock 4 che aveva un problema di drifting ad entrambi gli stick analogici. La sostituzione, molto semplice, degli stick ha risolto il problema.
Cosa ti serve
-
-
Aiutandoti con un giravite Phillips #00, rimuovi le quattro viti da 6.0 mm che fissano la scocca posteriore al controller
-
-
-
Comincia con l'impugnatura sinistra:
-
Per cominciare, afferra l'impugnatura sinistra del controller.
-
Inserisci uno strumento di apertura in plastica all'interno della fuga, e scivola sino agli sticks.
-
Fai leva sullo strumento per continuare a aprire il dispositivo.
-
Ripeti questi passi per l'impugnatura destra.
-
-
-
Inserisci uno strumento di apertura in plastica all'interno della fuga, e separa le due scocche in un punto nei pressi di questi bottoni:
-
Tasto Share
-
Tasto Options
-
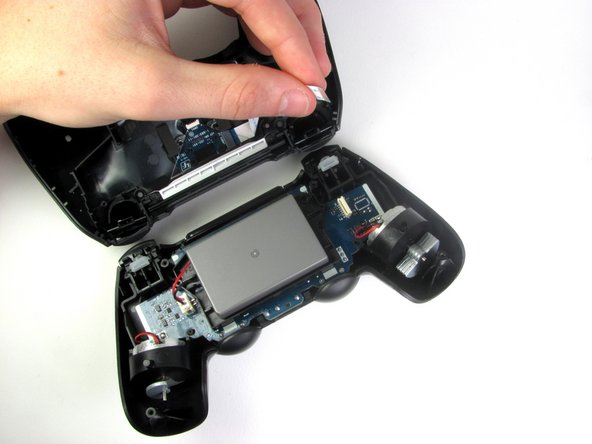
Adesso separa i due pezzi che compongono la scocca del controller, tenendo sempre presente che saranno ancora collegate tramite un nastrino da circuito.
-
2 Molle dei Trigger
-
1 Estensione di colore Grigio del Tasto Reset
-
-
-
Stacca il nastrino della scheda madre che connette entrambi le parti della scocca del controller afferrandolo e tirando con le dita.
-
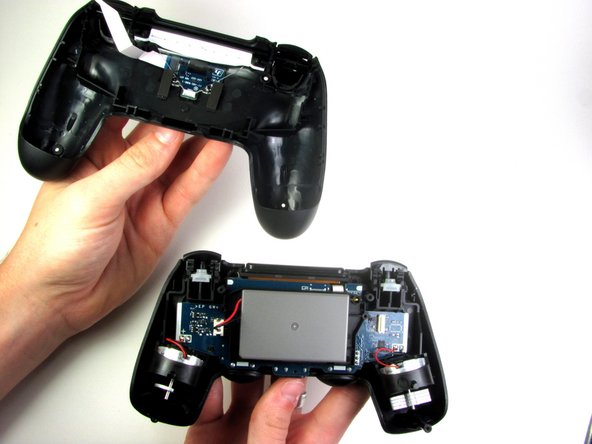
Non appena avrai separato le due metà della scocca, metti pure da parte quella superiore.
-
-
-
-
Rimuovi l'unica vite da 6.0 mm Phillips che si trova proprio sotto l'alloggio della batteria con il Giravite Phillips #00.
-
-
-
Stacca delicatamente il nastrino del touchpad connesso alla scheda madre aiutandoti con un paio di pinzette a becco inclinato. Il nastrino del touchpad è connesso alla scheda madre mediante un connettore che si piega e si deforma. Per riattaccare il nastrino, la linguetta di plastica dovrà essere delicatamente reinserita nel suo alloggiamento.
-
-
-
Se hai fatto tutto in maniera corretta, dovresti trovarti con queste tre parti, rispettivamente:
-
Modulo della scheda madre
-
Scocca anteriore
-
Scocca posteriore
-
-
-
Utilizza delle pinzette con base di supporto tipo "terza mano" o uno strumento simile per tener ferma la scheda durante la fase di saldatura.
-
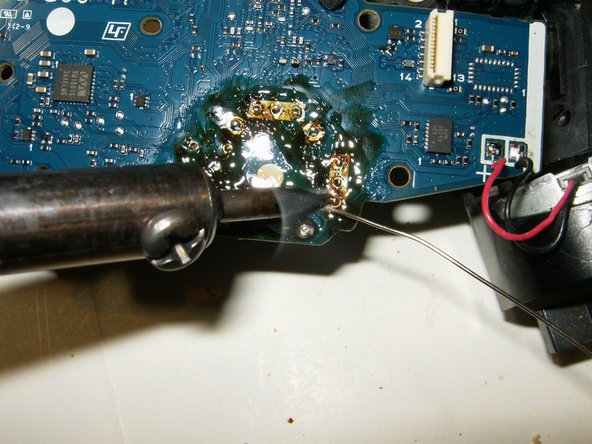
Questi sono i punti di saldatura che dovranno essere dissaldati. Poiché la scheda è sottosopra, la parte sinistra diventerà quella destra.
-
Usa una trecciola di rame per fondere e dissaldare i punti.
Bessere Alternative zu Entlötlitze und Flussmittel wäre ein Entlötsauger. Gibt es für um die 7 Euro bei Conrad oder ähnlich. Saugt das Lötzinn gleich weg und vermeidet eine Sauerei auf der Platine. So wie im nächsten Schritt... Sieht nachher viel sauberer aus!
De cuánto de temperatura 🌡️? Por favor quiero saber gracias
-
-
-
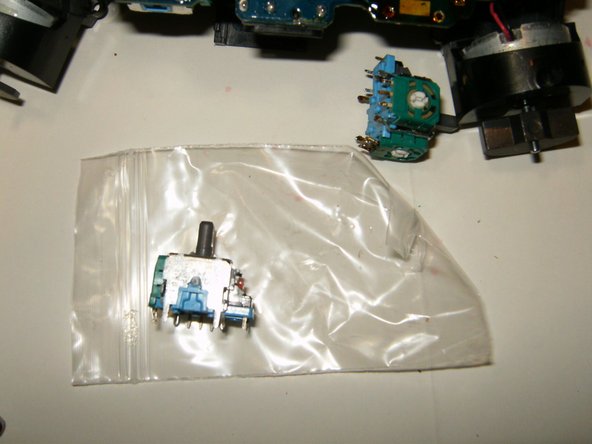
Non appena tutti i contatti sarano stati dissaldati il vecchio stick potrà essere rimosso. Potrebbero volerci un po' di tentativi, dal momento che si devono togliere tutti i punti di saldatura. In fase di dissaldatura, può essere utile tirare un po' il joystick.
-
Assicurati che tutti i contatti dello stick con cui effettuerai la sostituzione siano identici a quello originale.
-
Controlla anche che tutti i fori siano privi di residui. Per pulire i fori potresti usare sia degli aghi ipodermici sia delle punte da trapano molto sottili. La sostanza fusa che vedi sui circuiti non è che il fluido usato per la dissaldatura.
Hi Im haveing alot of trouble finding a reputable place to buy a replacement analog stick. Can anyone suggest a good place(that ships U.S) that sells a replacement of good quality?
Yeeeeeeeeeeahhh…I’m going to recommend you don’t use needles or bits to clear the holes. Just use high-quality solder-wick and flux to clear the holes— with an appropriate soldering tip. I see the OP used flux paste (judging from the prep) and used a brush to spread it. I’d highly recommend liquid flux; Amtech NC-559 flux — it’s the best I’ve ever used. Do the job correctly, and you’ll have no issues. PS — Try to use minimal heat when doing the job, as well. It’s probably just the way his flux paste burned, but it looks like he may have applied heat far longer than needed for those joints, but it could just be the flux burning. Also, clean the area with ~95% isopropyl alcohol (or higher) so it isn’t disgustingly sticky when that flux dries.
-
-
-
Inserisci il nuovo stick nella scheda. Assicurati che sia correttamente alloggiato e che tutti i contatti siano allineati con i fori della scheda.
-
Salda tutti i contatti alla scheda.
-
Ecco un'immagine della scheda dopo la riparazione. Ora ti resta soltanto da pulire il fluido con un po' di alchool isopropilico.
What kind of solder is good for this
Is this actually possible with a soldering iron?
It sure is. I used a regular run of the mill soldering iron. Nothing fancy…..are you having trouble with soldering it?
i did this and the analog will either not work at all or move all the way to one side on screen.
Hi, nice guide. I am having problems with ps4 controller. I am not able to desolder them. I work alot with xbox controllers and other stuff and i do not have Any kind of problems, but with ps4 controllers i am not able to desolder them with desoldering pistol, wick, adding solder and using my tools to desolder. I don't know what the problem is.
This is a double sided/soldered board. You need a a heat-gun and a lot of heat reflecting protection. I did it by carefully braking the joystick components apart and tackling each soldered joint once in isolation. Not easy.
There are many analog sticks out there. How do I know if the one I'm buying is compatible with my Dual Shock 4? Do you guys have a link to where I can buy the correct sticks for my controller which is model 2?
-


Per riassemblare il tuo dispositivo, segui le istruzioni nell'ordine inverso.
Per riassemblare il tuo dispositivo, segui le istruzioni nell'ordine inverso.
Annulla: non ho completato questa guida.
Altre 84 persone hanno completato questa guida.
Un ringraziamento speciale a questi traduttori:
100%


Questi traduttori ci stanno aiutando ad aggiustare il mondo! Vuoi partecipare?
Inizia a tradurre ›

Team

37 Commenti
Where can i buy the left stick ?
Swammieslippyslappy, there is no lead in the device, if so the solder would release much easier. Lead Solder goes to liquid at 180-190 Celsius vs lead free at 212-226 Celsius. I would suggest buying a desoldering iron (cheap ones are fine $10-$20 they have the bulb attached for one handed operation) as using a solder wick becomes rather tedious with the smaller parts.
Very helpful guide!! I've never soldered/desoldered anything before so this was a little difficult for me. I ran into a few problems along the way: my inital soldering iron was 30W and it wasn't melting the solder, so I had to buy a 40W iron and that one did the trick. I also had a rough time using the desoldering wick (the solder didn't seem to suck up into the wick) so I ended up using a combination of a desoldering pump and the wick. I eventually got the piece out and the rest was easy! Thanks again and if anybody needs help with this project feel free to message me and I'll do the best I can to help.
Hi SergeantCorbett,
I don't know if your offer still applies but I'm a soldering virgin and would appreciate any nuggets of wisdom you may have for me!
Thanks a lot
Jake
I managed to carry out the stick replacement. Desoldering was definitely the most difficult part.
Whilst I was struggling with the desoldering I accidentally leant my iron on the ribbon connector to the right and managed to melt it. I can not put the ribbon in the connector now.
The joypad works fine but it wont charge now because I can not reconnect the ribbon.
If anyone can give any advice of the pin layout of the connector so I can get it to charge, I would be really grateful. Or if anyone knows where I can source a replacement mainboard I would consider that as an option.
Hi tony,
Replacebase.co.uk do them
Cheers Jake
i did all this. had to use a solder pump and a soldering iron to remove the solder, coulding do it with just wick. put everything back together and everything is working now, except my L1 button? I just changed the Left analog. not sure what i did to futz up the L1. been searching the internets and have yet to find what to look for on this.
Some times the actual flex board is old and u have to buy a new one look at the board where the traces go to and conect with the casual pcb board the lil squares might be waisted and if they are u have to but. A new
Are you sure the controller will work after that? I'm going to be replacing that thing on my dads 2 controllers and That part of the motherboard that had to be desoldered looks super boiled, burnt and 100% broken. Whoever answers this you need to be 110% sure that the controller will still work after that
I should work . The reason it looks burnt is because they probably didn't use water soluble flux. So without the proper solvent chemicals, it left a gross brown residue. It's not actually burnt, just has a gross layer of flux that hasn't be cleaned off.
I had a feeling that this is what I was gonna have to do haha. Thanks for confirming that it would work!
Hi i have 1 problem. .. i changed my left stick, he's working but when i playing games automatically character walking to the left side... what is the problem i bought sticks from aliexpress and i got 2 sticks, so i tryed both of them... and still same problem.
What generation controller do u have the one with the light on the touch pad or the older
the problem is that you cant really change sticks on DS4.
every stick is different..thats why after placing the sticks in factory, sony is calibrate each stick by programming and you cant acces to it.
in NS switch for example nintendo let you recalibrate stick.
so changing sticks on PS4 or xbox one is hit and miss
I bought 2 sticks from ebay(seller: oo_875, ). the seller is related with the first comment ebay seller(you can find that clue from their review comment).
they are selling MALFUNCTION products. I think It is a same problem that Marius mentioned (the previous comment writer).
and I think a 40w soldering tool is not enough for desoldering that(took so long)
So, I failed.
Be careful on buying stuff and good luck to you.
I had a problem with unmelting solder before. Fixed by sanding and tining the soldering iron.
@dengo all the work was done with an inexpensive 30W soldering iron.
Actually 30w soldering iron is not enough buy a 60w one that will be better also u can buy the low melting solder so that u can desolder it way
Could the heat of the soldering iron damage the joysticks?
Laser Bean only if you burn the components or traces…….
did everything properly but when i connect my right analog stick drifts up and stays there
Hello, thanks for very helpfull guide.
I have two controllers, both with same issue - broken left stick. Is it possible to take the RIGHT stick from older controller and use it for LEFT stick position on controller? Is there any difference between left and right stick?
Thanks a lot for an answer.
Karel
Better yet practice removing them on controllers you do not use or need anymore, before the controller you actually want. The left and right sticks are the same, however the pin configuration may be diff on the board. In other words soldered in backward from the left.
My god, just replace it. Unless you have alot of experience in soldering and removing solder. Do not attempt unless its for practice. I did a mic replacement jack(headphone) and practiced on 2 with proper equipment. A large magnifying glass will go a long way as well. Soldering is an art much like welding, practice, understand what your getting into or simply trade the old one in for 30 and get a new one.
Bonjour j'ai bien fait toute les étapes mais une fois remonter le joystick ne fonctionne pas du tout pouvez vous m'aidez svp merci bonne journée email : lucas-boccaccini@hotmail.fr
Where can you buy original joysticks, most of the ebay ones don’t work properly as there is a huge deadzone at the edges of the sticks
Hi, i cant desolder ps4 analogue sticks, solder doesn't melt with flux, wick, add a bit of solder too and it doesn't melt. Why? I can fix xbox controllers easily with the same solder iron.. Can anyone help me understand why this is happening?
Ps:i can solder the rumble motors with no problem.
Original solder is lead-free which is harder to melt than ordinary lead solder. Some people add some lead-based solder to the joints and mix it with the present non-lead solder, it makes it easier to melt. Also some spots require a higher temperature as the temperature 'escapes' quickly, for example: onto the analog stick metal cover.
Pawel C. -
I recommend using a heat gun, solder sucker, or a real desoldering gun. Using a only wick to desolder was pretty impossible for my controller since the entire hole, both sides, were filled with non-leaded solder. So I got a solder sucker and even then ended up prying out the stick since there was still a little solder left on the other side. And in the end, the replacement stick that I got off of ebay has very bad response, nothing like the OEM.
Yo lo realice y me queda apuntando para la izquierda. Nada más que podrá ser ya lo cambie 2 veces y sigue igual