Introduzione
Il "pulsante" home dell'iPhone 8 Plus è in realtà un sensore a stato solido, che incorpora anche il Touch ID (riconoscimento dell'impronta).
La maggior parte dei pulsanti home sostitutivi non funzionerà, quindi verifica la cosa con cura prima di iniziare la tua riparazione. Il pulsante home originale del tuo iPhone è accoppiato in modo univoco in fabbrica alla scheda logica; e senza il processo di calibrazione proprietaria di Apple, perfino il pulsante home originale di un altro iPhone non funzionerà. Per riparare un pulsante home guasto, dovresti installare uno specifico pulsante home universale. Nota che questa parte sostitutiva funziona solo come pulsante; il Touch ID non funzionerà.
Se stai sostituendo solo uno schermo rotto, puoi usare questa guida per rimuovere e trasferire il tuo pulsante home originale nel nuovo schermo, preservando così tutte le funzionalità, Touch ID compreso.
Per evitare di danneggiare o strappare accidentalmente i cavi del display, è meglio staccare completamente il gruppo display prima di iniziare le riparazioni sul sensore home/Touch ID. Ma se pensi di non avere problemi, puoi saltare i passi relativi al distacco del display e andare direttamente alla sezione sensore home/Touch ID.''
Cosa ti serve
-
-
Spegni il tuo iPhone prima di iniziare lo smontaggio.
-
Rimuovi le due viti pentalobe da 3,4 mm sul lato inferiore dell'iPhone.
-
-
-
Posiziona strisce sovrapposte di nastro trasparente da pacchi sullo schermo dell'iPhone finché non l'hai coperto tutto.
-
Se non riesci a far aderire la ventosa nei prossimi passi, applica del nastro adesivo resistente (come del nastro americano telato) come una maniglia e alza lo schermo con quello.
-
-
-
Tira la maniglia blu indietro per sbloccare i bracci dell'Anti-Clamp.
-
Fai scorrere i bracci oltre il bordo sinistro o destro del tuo iPhone.
-
Posiziona le ventose vicino al bordo inferiore dell'iPhone, una di fronte e una sul retro.
-
Premi le ventose insieme per farle aderire sull'area desiderata.
-
-
-
Scalda un iOpener e fallo passare tra i bracci dell'Anti-Clamp.
-
Piega l'iOpener così che sia appoggiato sul bordo inferiore dell'iPhone.
-
Attendi un minuto per dare all'adesivo la possibilità di staccarsi e creare una fessura d'apertura.
-
Inserisci un plettro sotto lo schermo quando l'Anti-Clamp avrà creato una fessura abbastanza grande.
-
Salta i prossimi tre passaggi.
-
-
-
Usa un asciugacapelli oppure prepara un iOpener e applicalo per circa 90 secondi al bordo inferiore dell'iPhone per ammorbidire l'adesivo sottostante.
6/14/23 I did this repair but used a heat gun on low for 60 seconds. This allowed me to open the case as the instructions say, but in the end the Home button failed. I probably over heated it. I used this "go around" for a virtual Home button. I don't care about touch ID:
-
-
-
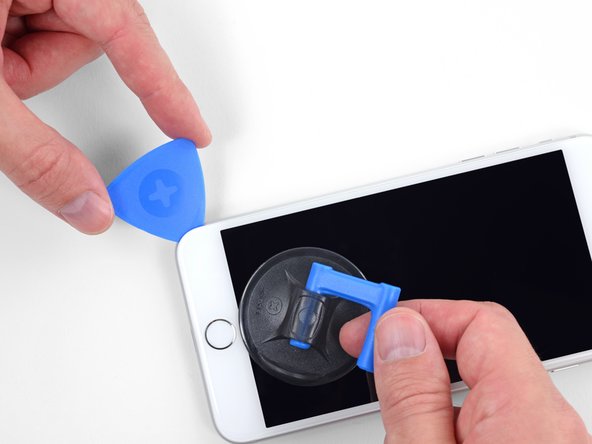
Applica una ventosa nella metà inferiore del pannello frontale, appena sopra il pulsante home.
Using just the single suction cup that is included in the battery replacement kit probably wouldn’t open the device. An iOpener and an iSlack should be the recommended method. However, you can get it open with just the single suction cup and iOpener, but does take a lot of time.
Get an iOpener and iSlack with the battery replacement kit.
I used a flat x-acto (#18) blade knife tool to gently pry back the screen enough to allow me to insert the pick near the bottom corner. I then worked the pick under the screen as mentioned in steps 5 & 6 below then. This worked really well for me.
I used the suction cup without heating the phone - the adhesive came away quite easily without applying any heat. Maybe due to age of phone (nearly 4 years old). Worth trying.
My screen was very shattered, and was quite hard to get suction, as my tape was very low quality. However, after pulling it up a little bit, I was able to insert a regular razor blade into the very small gap and used that as a lever.
Oh my goodness! Don't do that again. You can definitely damage something in the phone if you use a sharp metal razor blade..
cytur -
-
-
-
Tira la ventosa applicando una tensione forte e costante fino a creare una piccola fessura tra il gruppo display e il case posteriore.
-
Inserisci nella fessura un plettro di apertura o un altro attrezzo fine per una profondità di qualche millimetro.
After multiple tries and using a very hot iOpener, it will not open.
In sheer frustration, I pulled out my trusty pocket knife and managed to lift the bottom of the screen slightly, but in the process, cracked the glass from the bottom to the home button. The case is open now.
-
-
-
Fai scorrere il tuo attrezzo attorno all'angolo e lungo il bordo sinistro del telefono, spostandoti verso i pulsanti del controllo volume e l'interruttore della modalità silenziosa, per rompere l'adesivo che tiene in posizione il display.
-
Fermati vicino all'angolo superiore sinistro del display.
Do not go over the top otherwise you can crack the screen. Sadly happened to me :(
The instruction should be:
“Stop near BUT BEFORE REACHING the top left corner of the display”
-
-
-
Inserisci nuovamente il tuo attrezzo nell'angolo inferiore destro dell'iPhone e fallo scorrere attorno all'angolo e lungo il lato destro del telefono per separare l'adesivo.
I had really good luck using a hairdryer on some of the more stubborn portions of adhesive.
-
-
-
-
Fai scorrere uno strumento di apertura sotto il display lungo il bordo superiore del telefono per allentare l'adesivo rimasto.
Be very careful at this step. The glass at the top will break very easy when the display is lifted too much.
-
-
-
Apri l'iPhone sollevando il display dal lato sinistro, come per sollevare la copertina posteriore di un libro.
-
Appoggia il display contro qualche tipo di supporto per mantenerlo aperto mentre lavori sul telefono.
Das “links” ist auf dem Foto rechts.
-
-
-
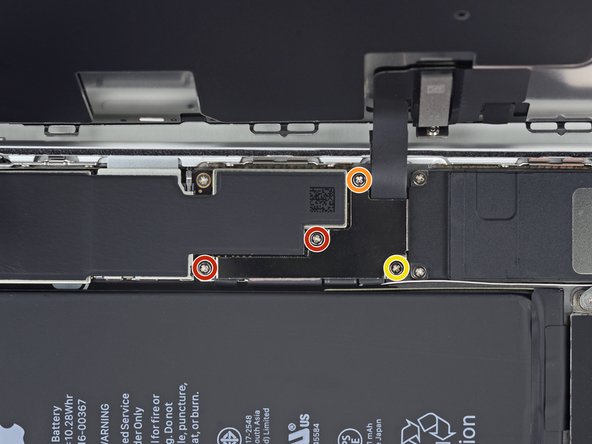
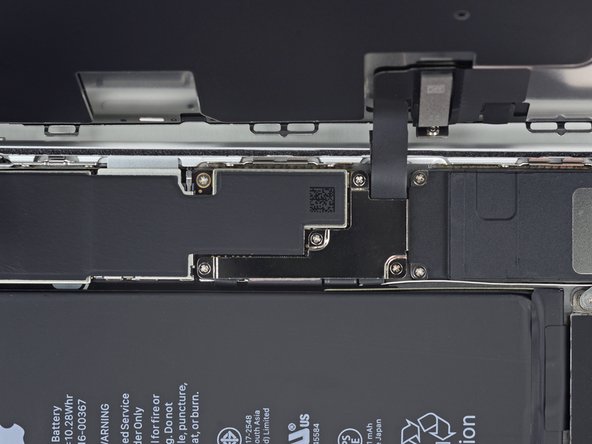
Rimuovi le quattro viti Phillips (JIS) che fissano la staffa del cavo inferiore del display alla scheda logica:
-
Due viti da 1,3 mm
-
Una vite da 1,4 mm
-
Una vite da 2,7 mm
The Phillips screwdriver bit is the PH000. The measurement refers to the screw length.
-
-
-
Usa la punta di uno spudger per staccare il connettore della batteria sollevandolo dal suo zoccolo sulla scheda logica.
-
Piega lievemente da un lato il cavo del connettore per evitare che questo possa fare contatto con lo zoccolo e quindi alimentare il telefono nel corso della tua riparazione.
When I reassembled the iPhone 8 Plus, I had to plug it into a Lightning cable to wake it up (just pushing power button wasn’t sufficient).
-
-
-
Usa la punta di uno spudger oppure un'unghia per staccare il grande connettore inferiore del display tirandolo dritto verso l'alto dal suo alloggiamento.
I got hold of a iPhone 8 Plus with cracked screen that I am planning to fix.
Here is my problem:
When I tried to take out the screen from my phone, (step 15-18) I was curious about the new screen, so I tried to connect it. It was completely dead! Then I tried the old cracked one, and suddenly that was dead to! This is a phone that some fool has been inside earlier and changed battery, but I suspect he has done some more really stupid things. The Taptic Engine is living its own life and vibrating every time I slightly touch the home button. (I have a new Taptic Engine) The phone is also full of dust and small particles that does not belong there. One tri-point Y000 screw (step 18) is even missing! Now the biggest problem is that both screens are black! I know the phone is on, because I hear voice command speak when I turn on the power. The screen worked before I tried to change it? And one last thing: My new LCD screen came with new flex cables. Is it possible to switch over, so I can use the old ones?
Hi,
Is your problem solved?
Be careful of damaging MOSFETs by the LH side of the large lower display cable. After replacing the battery and turning the device on, the phone showed low charge and didn't have a charging symbol even after plugging into multiple cables and chargers. Turns out I had damaged the logic board attempting to disconnect the connector.
-
-
-
Stacca il secondo connettore inferiore del cavo del display, proprio sotto quello che hai disconnesso nel passo precedente.
I used the other end of the spudger on this connector and it seemed to work a little better for me. I came in from underneath the top-right edge instead of the bottom right.
-
-
-
Rimuovi le due viti tri-wing Y000 che tengono in posizione la staffa sopra il connettore del gruppo sensore del pannello frontale:
-
Una vite da 1,0 mm
-
Una vite da 1,2 mm
una vite da 1mm e due viti da 1.2 mm???
Ciao Matteo! Grazie per l’osservazione. Ho appena modificato il testo :) La traduzione è aperta a tutti. Hai quindi la possibilità di fare le tue suggestione direttamente nel testo e sei il benvenuto se vuoi usare di questa possibilità nel futuro. Grazie ancora per la vigilanza! Saluti, Claire
The tool kit does include a 1.0 or1.2mm screwdriver! How am I supposed to remove those screws?
Bought the screwdriver that supposedly fits these screws and it still doesn’t work.
My bracket looks different. Can’t get these screws out.
kit came with wrong bit. i received 2x P02 (penta tips) and no tri point y000.
-
-
-
Usa la punta di uno spudger oppure un'unghia per staccare dalla sua sede il connettore del gruppo sensore del pannello frontale.
-
-
-
Rimuovi il gruppo display.
Should there be a step somewhere in here to point out when to remove the blue plastic from the new iFixit screen?
-
-
-
Svita le quattro viti tri-wing Y000 che fissano la staffa sopra il sensore home/Touch ID:
-
Una vite da 1,2 mm
-
Tre viti da 1,3 mm
The 1.2mm screw on the home button stripped for me. I ended up bending the bracket on each side in order to remove the home button. I then bent it back as best I could during reassembly and screwing it down.
-
-
-
Fai leva sotto il bordo sinistro del connettore del cavo del pulsante home per disconnetterlo dal suo zoccolino.
I accidentally severed the cable, now my sensor is disabled. So far this was the most delicate cable I encountered because it was so small.
-
-
-
Capovolgi il gruppo display. Usa un asciugacapelli oppure prepara un iOpener e applicalo sul bordo inferiore del display per circa 90 secondi per ammorbidire l'adesivo sottostante.
-
-
-
Usa con delicatezza una levetta di apertura per separare l'adesivo che fissa il cavo del sensore home/Touch ID al retro del pannello display.
This did not work for me…. ended up breaking the connector from the home button. Most likely messed up the customer’s iPhone… the adhesive would not pry up with just pick… does iFixit offer a home button replacement?
did not work for me either, also ended up breaking the connector, just use the tweezer to separate it. do not use opening pick!!!!! it’s too thick for it!!
Isopropanol and heat will loosen the adhesive and its possible to gently remove with plastic pick, metal tweezers risk damaging the Home button cable and disabling the Touch facility.
Pretty easy to follow instructions if you have patience and careful hands. If you have clumsy hands you will not succeed in fixing any small electronics. There are some small things you should use to help you succeed at fixing small electronics, like some scotch tape or other clear tape to hold some of the cables in place while you work on small electronics items, also a small heavy bottle or object to propped the iPhones cases against to hold them from falling over so that your hands can be free to perform your tasks. Great job you are doing iFixit personel and I am with you all the way with fighting for our rights to fix our electronics equipment.
Isopropanol in conjunction with the heat really did the trick here. Heat up first, then use plenty of the alcohol to pry it up carefully using the pick.
Heat dryer on high worked for me.
I heated the tip of a thin knife with a hot air gun and slide it under the flexible cable. When I hit resistance I reheated the knife. Keeping it parallel to the board while doing this. After 4 heatings the knife moved the rest of the way and the cable lifted easily off of the iPhone back. This method left enough glue on the cable that it restuck fine when moved to the new iPhone.
Apple loves to make this the most difficult thing. I've been successful many times, and not so on other repairs. I just finished a repair and everything was in tact, but sadly it didn't work. Took a part and put back. So I turned on the assistive touch home button. They will be getting a new phone soon, so not a big issue except Pride.
-
Se la tua parte sostitutiva non dispone di una camera frontale o il cavo per il sensore, segui questi passi per trasferirli.
Confronta la nuova parte con l'originale in quanto potresti aver bisogno di trasferire dei componenti o rimuovere delle strisce protettive dell'adesivo prima di procedere all'installazione.
Per riassemblare il dispositivo, segui le istruzioni nell'ordine inverso.
Porta i tuoi rifiuti elettronici a un riciclatore certificato R2 o e-Stewards.
La riparazione non è andata come previsto? Prova delle soluzioni di base ai problemi, oppure rivolgiti alla nostra comunità Risposte] per trovare aiuto nella risoluzione dei problemi.
Annulla: non ho completato questa guida.
Altre 54 persone hanno completato questa guida.
Un ringraziamento speciale a questi traduttori:
100%
Questi traduttori ci stanno aiutando ad aggiustare il mondo! Vuoi partecipare?
Inizia a tradurre ›
7 Commenti
aiuto mi son cadute e quindi perso
sensore home/Touch ID Una vite da 1,2 mm Tre viti da 1,3 mm
dove le trovo?
Every time I have tried to transfer the home button from the broken screen to the replacement LCD - the home button has not worked. No tears in the cable. The connector is attached. Screw isn’t too tight. What could I be missing?
ATTENTION: Don’t screw in that one screw over the home button too much, or the button breaks! I just found one proper explanation for it in this YouTube video (https://www.youtube.com/watch?v=rDVnp90a...). Basically, that one screw that goes over the Home button should not be tightened too much, so that the metal plate doesn't bend (which it did for me).
This was truely helpful.
Anybody have the issue where the button works when the phone is in 2 pieces, but when you assemble the screen onto the phone body, the button no longer responds after a restart??
Power on phone while in 2 pieces -> home button is working
Attach screen to phone body -> home button is still working
Restart phone with phone assembled -> home button not responding
Hallo Zusammen
Wird bei diesen Mikroschrauben nur das Gewinde gemessen oder die gesammte Schraube inkl. Schraubenkopf? Ich frage, weil mir die Schrauben des Homebutton weggespickt sind 1.2 und 1.3mm...
Danke
LG
Hallo Alex!
We measure the entire screw for our guides.


what do I do about super stripped screws?
Ean Palacios - Replica
I’m sorry, your comment slipped past my radar earlier. For future fixers that might see this and ask the same question, you can check out our stripped screw guide for some detailed advice.
Adam O'Camb -
Do you need a toolkit like the essential toolkit
Adam Palmer - Replica
Hi Adam. Having a tool kit with all of the listed parts above is best. The screw heads are very small and each set of screws needs a very specific type of driver to remove them without stripping any of them.
Kyle Luksa -