Salta al contenuto principale

Questa versione può contenere modifiche errate. Passa all'ultima istantanea verificata.

Sostituzione schermo Motorola Moto Z2 Force

Cosa ti serve

  1. Sostituzione schermo Motorola Moto Z2 Force, Schermo: passo 1, immagine 1 di 2 Sostituzione schermo Motorola Moto Z2 Force, Schermo: passo 1, immagine 2 di 2
    • Usando l'estremità piatta dello spudger in nylon, tira via il nastro adesivo nero disposto sopra il connettore dello schermo a cui è attaccato il nastro nero.

  2. Sostituzione schermo Motorola Moto Z2 Force: passo 2, immagine 1 di 3 Sostituzione schermo Motorola Moto Z2 Force: passo 2, immagine 2 di 3 Sostituzione schermo Motorola Moto Z2 Force: passo 2, immagine 3 di 3
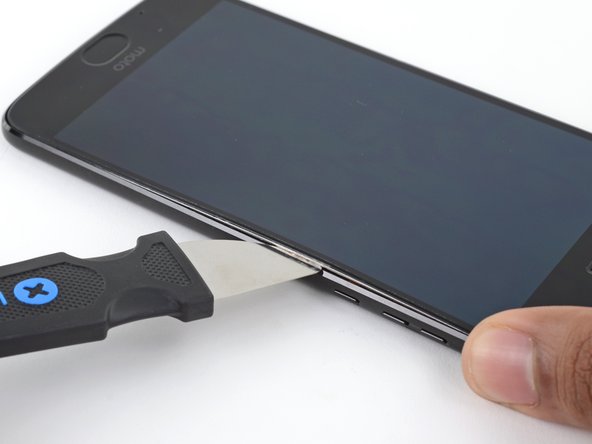
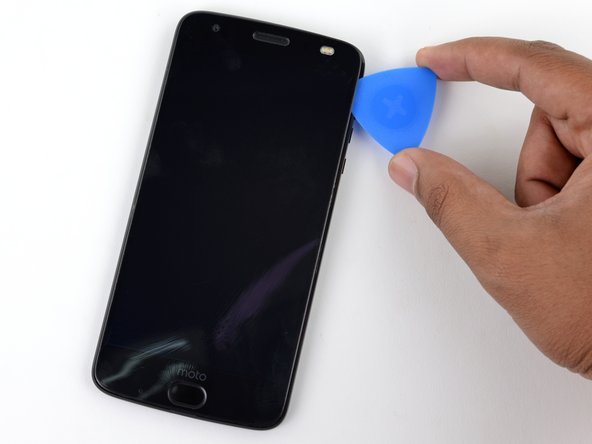
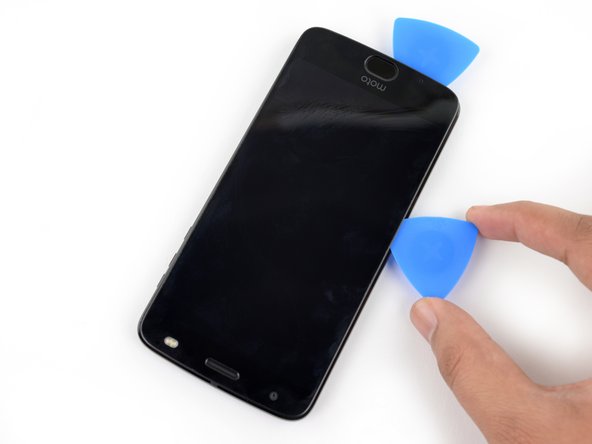
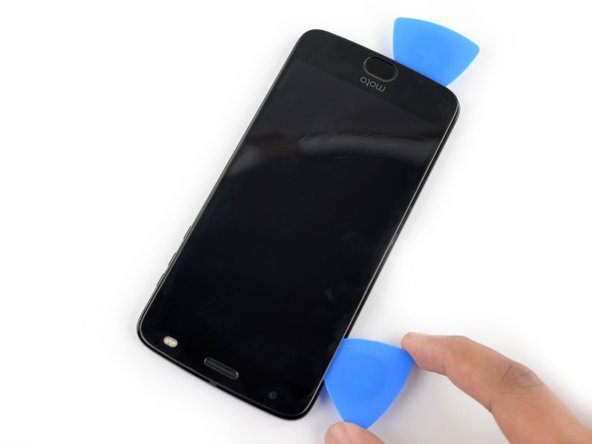
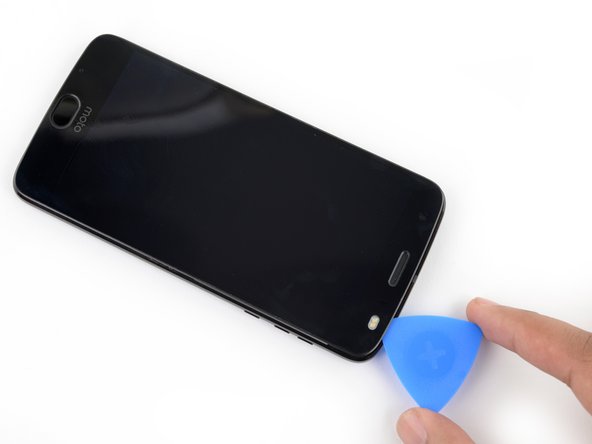
    • Incunea lo strumento di apertura in plastica nella fessura creata dalla separazione tra schermo e scocca nell'angolo inferiore destro per tenerlo aperto.

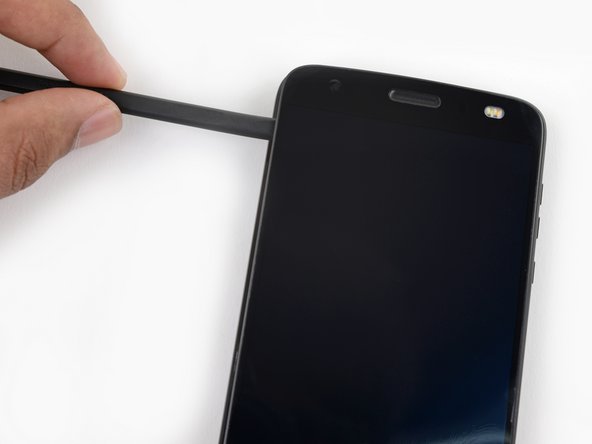
    • Inserisci lo spudger in nylon nell'angolo inferiore sinistro dello schermo e fai leva per sollevare il display.

    • Continua a inserire gli strumenti di apertura in plastica e lo spudger tutto attorno al telefono e fai leva sullo schermo nei vari punti finché non si separa completamente dal dispositivo.

    • Rimuovi lo schermo con delicatezza e lentezza, altrimenti il display potrebbe rompersi.

  3. Questo passaggio è privo di traduzione. Aiuta a tradurlo

    Sostituzione schermo Motorola Moto Z2 Force: passo 3, immagine 1 di 2 Sostituzione schermo Motorola Moto Z2 Force: passo 3, immagine 2 di 2
    • With the Jimmy still inserted, insert an opening pick under the silver midframe, on top of the Jimmy in the same location

    • Remove the Jimmy.

  4. Sostituzione schermo Motorola Moto Z2 Force: passo 4, immagine 1 di 3 Sostituzione schermo Motorola Moto Z2 Force: passo 4, immagine 2 di 3 Sostituzione schermo Motorola Moto Z2 Force: passo 4, immagine 3 di 3
    • Inserisci lo spudger al di sotto del blocco del sistema di ritenuta che collega il nastro nero dello schermo alla scocca.

    • Spingi in alto il blocco per liberare la ritenuta.

    • Separa il nastro nero dalla ritenuta tirandolo delicatamente verso sinistra.

  5. Sostituzione schermo Motorola Moto Z2 Force: passo 5, immagine 1 di 3 Sostituzione schermo Motorola Moto Z2 Force: passo 5, immagine 2 di 3 Sostituzione schermo Motorola Moto Z2 Force: passo 5, immagine 3 di 3
    • Rimuovi lo schermo alzandolo da destra e facendo perno sul bordo sinistro; disponi lo schermo a faccia in giù a fianco della scocca del dispositivo.

  6. Questo passaggio è privo di traduzione. Aiuta a tradurlo

    Sostituzione schermo Motorola Moto Z2 Force: passo 6, immagine 1 di 2 Sostituzione schermo Motorola Moto Z2 Force: passo 6, immagine 2 di 2
    • When separating the left side of the screen assembly, take care to not snag the display cable located on the left edge near the bottom of the display.

  7. Questo passaggio è privo di traduzione. Aiuta a tradurlo

    Sostituzione schermo Motorola Moto Z2 Force: passo 7, immagine 1 di 3 Sostituzione schermo Motorola Moto Z2 Force: passo 7, immagine 2 di 3 Sostituzione schermo Motorola Moto Z2 Force: passo 7, immagine 3 di 3
    • Insert another opening pick underneath the bottom edge of the screen assembly and slide it around the bottom left corner of the device so it is underneath the assembly's left edge.

    • Slide your tool all along the left edge of the phone to separate the metal clips and adhesive securing the screen assembly.

    • Like before, ensure you are separating the entire assembly by identifying the three metal clips on the right edge of the device.

  8. Questo passaggio è privo di traduzione. Aiuta a tradurlo

    Sostituzione schermo Motorola Moto Z2 Force: passo 8, immagine 1 di 3 Sostituzione schermo Motorola Moto Z2 Force: passo 8, immagine 2 di 3 Sostituzione schermo Motorola Moto Z2 Force: passo 8, immagine 3 di 3
    • Slide your tool around the top edge of the screen assembly and slice all along it to slice through its adhesive.

    • Take care to not insert your tool more than ~4 mm past the edge of the display to prevent damaging the front facing sensor array.

  9. Questo passaggio è privo di traduzione. Aiuta a tradurlo

    Sostituzione schermo Motorola Moto Z2 Force: passo 9, immagine 1 di 2 Sostituzione schermo Motorola Moto Z2 Force: passo 9, immagine 2 di 2
    • There are two large pads of adhesive securing the screen assembly near the top edge but further past the 4 mm that have already been sliced through.

    • The front facing sensor array and cable surround the right patch of adhesive from the top and right, so prying or slicing from the top or right edge may damage the cable. The following steps will describe how to separate the adhesive from the left edge.

  10. Questo passaggio è privo di traduzione. Aiuta a tradurlo

    Sostituzione schermo Motorola Moto Z2 Force: passo 10, immagine 1 di 1
    • Apply a small amount of high concentration (>90%) isopropyl alcohol underneath the screen assembly's left edge, near the top of the device.

    • Allow the device to sit upright on its right edge for ~5 minutes to allow the alcohol to penetrate and weaken the adhesive.

  11. Questo passaggio è privo di traduzione. Aiuta a tradurlo

    Sostituzione schermo Motorola Moto Z2 Force: passo 11, immagine 1 di 3 Sostituzione schermo Motorola Moto Z2 Force: passo 11, immagine 2 di 3 Sostituzione schermo Motorola Moto Z2 Force: passo 11, immagine 3 di 3
    • Insert an opening pick as deep as possible under the top left corner of the screen assembly to slice through the left patch of adhesive.

  12. Questo passaggio è privo di traduzione. Aiuta a tradurlo

    Sostituzione schermo Motorola Moto Z2 Force: passo 12, immagine 1 di 3 Sostituzione schermo Motorola Moto Z2 Force: passo 12, immagine 2 di 3 Sostituzione schermo Motorola Moto Z2 Force: passo 12, immagine 3 di 3
    • Slowly and carefully slide the flat end of a spudger under the left edge of the screen assembly. Gradually insert it deeper to pry up the top edge of the assembly and release the right patch of adhesive.

    • Add more isopropyl alcohol as needed, but take care to not use too much, as this may dissolve other adhesives in the device that would preferably remain sticky. Give any additional alcohol some time to penetrate the adhesive before continuing.

    • Only pry up the assembly enough to slide the spudger underneath and release the adhesive. The assembly is still attached via the display cable, and prying the left side too far upward may damage it.

  13. Questo passaggio è privo di traduzione. Aiuta a tradurlo

    Sostituzione schermo Motorola Moto Z2 Force: passo 13, immagine 1 di 2 Sostituzione schermo Motorola Moto Z2 Force: passo 13, immagine 2 di 2
    • Lift the screen assembly from the right edge and swing it open. It is still attached to the phone chassis at the lower left edge, so do not fully remove it yet.

    • If the screen assembly remains stuck, slice the adhesive repeatedly as needed.

  14. Questo passaggio è privo di traduzione. Aiuta a tradurlo

    Sostituzione schermo Motorola Moto Z2 Force: passo 14, immagine 1 di 2 Sostituzione schermo Motorola Moto Z2 Force: passo 14, immagine 2 di 2
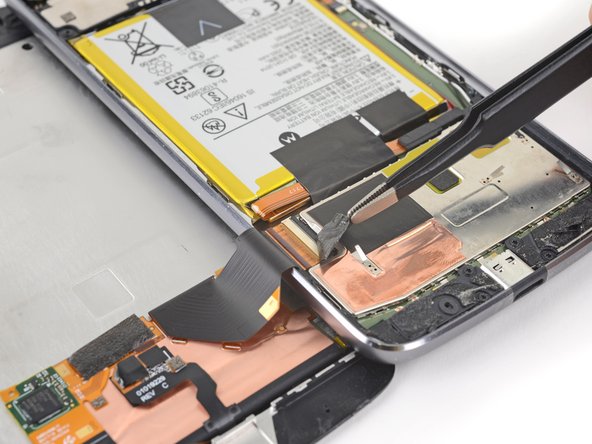
    • Use a pair of tweezers to remove the black piece of tape covering the battery connector.

    • Try your best to keep this piece of tape intact and retain it for reassembly.

  15. Questo passaggio è privo di traduzione. Aiuta a tradurlo

    Sostituzione schermo Motorola Moto Z2 Force: passo 15, immagine 1 di 3 Sostituzione schermo Motorola Moto Z2 Force: passo 15, immagine 2 di 3 Sostituzione schermo Motorola Moto Z2 Force: passo 15, immagine 3 di 3
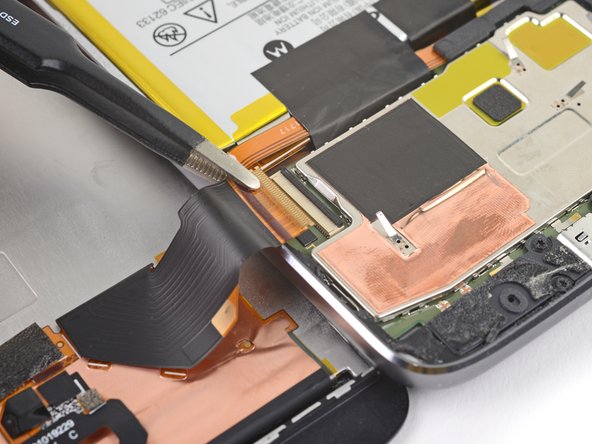
    • Use a spudger to pry up the locking tab on the display cable's ZIF connector.

    • Use a pair of tweezers to slide the display ribbon cable out of the connector.

  16. Questo passaggio è privo di traduzione. Aiuta a tradurlo

    Sostituzione schermo Motorola Moto Z2 Force: passo 16, immagine 1 di 1
    • Remove the screen assembly.

    • When putting your device back together, be sure to reconnect the display, turn the device on, and test all functionality before closing your device and sealing it back up.

    • During reassembly, pause here and replace the adhesive around the edges of the display if you are reusing your screen assembly.

    • After closing your device back up, stack something heavy, like a textbook or two, on top of the device for 30-60 minutes. This ensures a strong adhesive bond.

Conclusione

Per rimontare il tuo dispositivo, segui queste istruzioni in ordine inverso.

Altre 17 persone hanno completato questa guida.

Un ringraziamento speciale a questi traduttori:

en it

0%

albertob ci sta aiutando ad aggiustare il mondo! Vuoi partecipare?
Inizia a tradurre ›

Tarun Thiruma

Membro da: 11/20/19

35.271 Reputazione

134 Guide realizzate

14 Commenti

What about installing the new screen?

John - Replica

lol exactly what i was thinking, john!!

like what the !&&*….guide us thru removing the entire screen and then just leave us with our d in our hand lol

PETE ZITO - Replica

Just do the same thing backwards.

Jade Davis -

Can I use a z2 play screen on the z2 force?

Paulo Alberto Werhli Meier - Replica

You can but they have a big difference the LCD pixelation. The Z2 Force has 2,560x1,440 pixel resolution while the play has a 1,920x1,080 resolution. So even thought it can be done it is not recommended.

Cole Jensen -

Aggiungi Commento

Visualizza Statistiche:

Ultime 24 Ore: 0

Ultimi 7 Giorni: 6

Ultimi 30 Giorni: 58

Tutti i Tempi: 18,083