Questa traduzione potrebbe non riflettere gli aggiornamenti più recenti dalla guida originale. Aiuta ad aggiornare la traduzione o visualizza la guida d'origine.
Introduzione
Usa questa guida per sostituire lo schermo del tuo Motorola Moto Z Play cambiando l'intera unità schermo/digitizer. Il gruppo sostitutivo di solito non comprende il sensore impronte digitali o il flash della fotocamera frontale. Queste parti devono essere trasferite dal vecchio schermo al nuovo, salvo che debbano essere a loro volta sostituite.
Avviso: data la tenacità dell'adesivo del il display, allo spazio ridottissimo per infilare lo strumento di apertura, e all'elevata quantità di calore richiesta, ci sono elevate probabilità di danneggiare lo schermo mentre si cerca diu rimuoverlo. Se devi comunque cambiarlo, non ti preoccupare; altrimenti usa tutta la cautela possibile e segui gli avvisi di questa guida.
Cosa ti serve
-
-
Se possibile, scarica la batteria prima dello smontaggio. Con la batteria carica, aumenta il rischio di incendio o esplosione se la batteria viene surriscaldata o danneggiata nel corso della riparazione.
-
Se il tuo schermo è crepato, coprilo completamente con nastro da pacchi trasparente per trattenere le schegge di vetro ed evitare lesioni.
-
-
-
Prepara un iOpener e scalda il telefono lungo il suo bordo sinistro per circa due minuti oppure finché non è lievemente troppo caldo per essere toccato. Questo aiuterà ad ammorbidire l'adesivo che fissa il display.
-
-
-
Prendi come riferimento la prima immagine, che mostra il retro del gruppo display (a destra) dopo che è stato rimosso dal telefono (a sinistra).
-
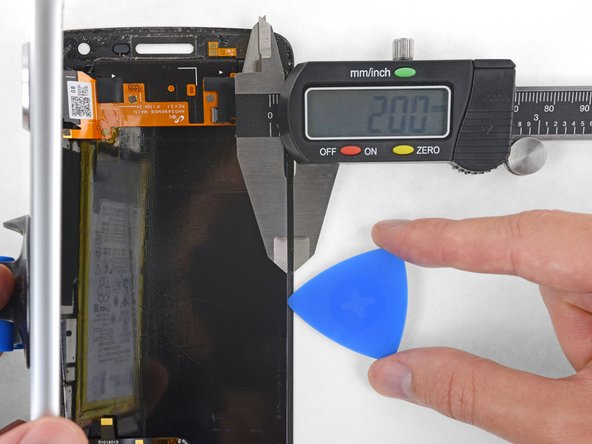
Se prevedi di riutilizzare il gruppo schermo, fai molta attenzione ai bordi laterali. Quando tagli la colla in queste zone, devi stare attento a inserire il tuo attrezzo meno di 2 mm, altrimenti lo strumento potrebbe entrare in contatto con il pannello e danneggiarlo.
-
Le carte da gioco sono uno strumento di apertura più sicuro, ma molto più lento. È più difficile che danneggino il pannello del display, il che è una buona cosa se intendi riutilizzarlo.
-
-
-
Applica una ventosa al display, vicino alla parte mediana del bordo sinistro.
-
Tira la ventosa applicando una forza abbastanza decisa e costante per creare una piccola fessura tra il gruppo schermo e il case posteriore.
-
Questa azione può richiedere di applicare una forza notevole sulla ventosa, ma devi soltanto aprire una fessura molto piccola per poter infilare il tuo attrezzo.
-
Se hai dei problemi, applica dell'altro calore per ammorbidire ancora l'adesivo e riprova. L'adesivo si raffredda rapidamente, quindi può essere necessario scaldarlo ripetutamente.
-
-
-
Inserisci il tuo attrezzo nell'angolo superiore destro del telefono e inizia a farlo scorrere sotto il lato superiore della cornice per separare la colla.
-
Quando il tuo attrezzo ha appena superato il bordo sinistro dell'altoparlante voce, fermati.
-
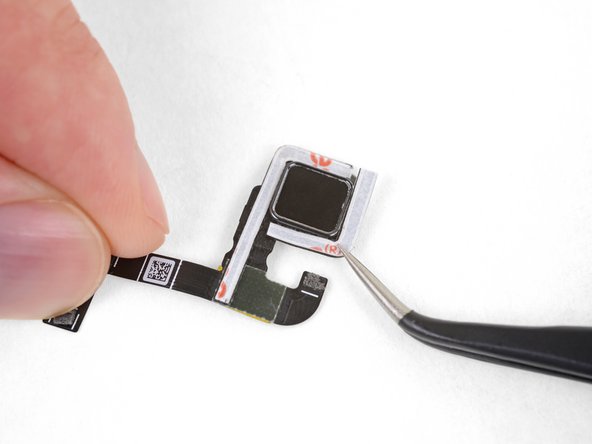
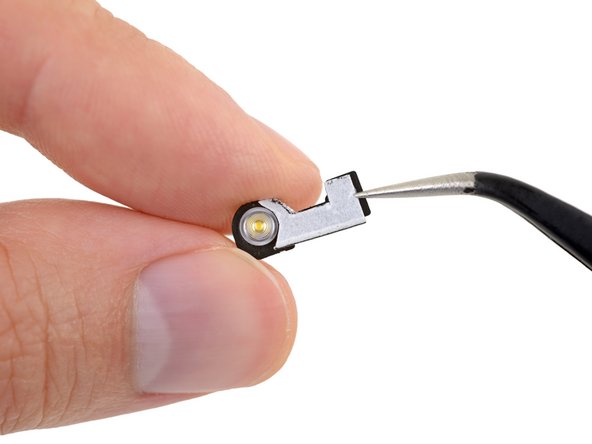
Fai passare tuo attrezzo oltre la parte superiore del modulo flash per la fotocamera da selfie per evitare di danneggiarlo.
-
-
-
-
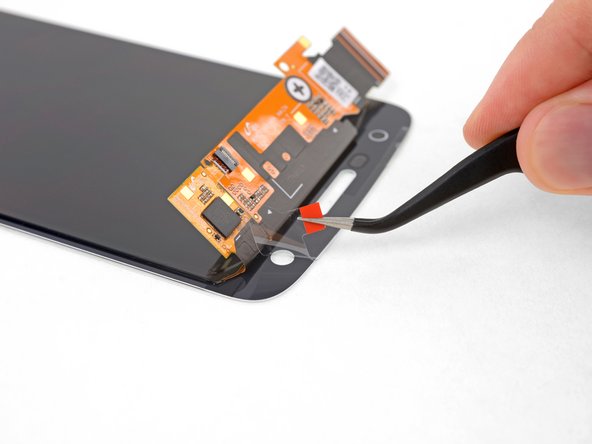
Mentre tieni aperto lo schermo, usa la punta di uno spudger per sollevare la linguetta di blocco sul connettore ZIF del sensore impronte digitali.
-
-
-
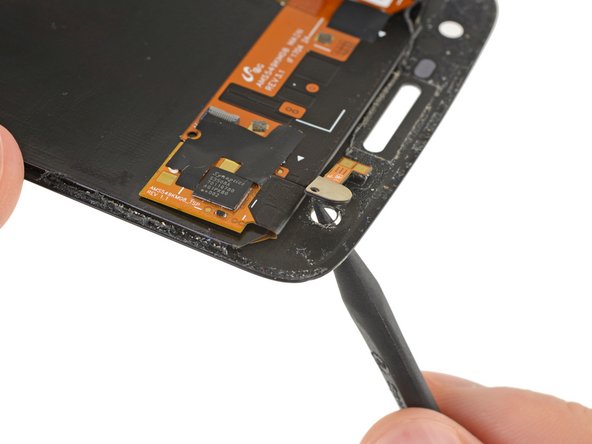
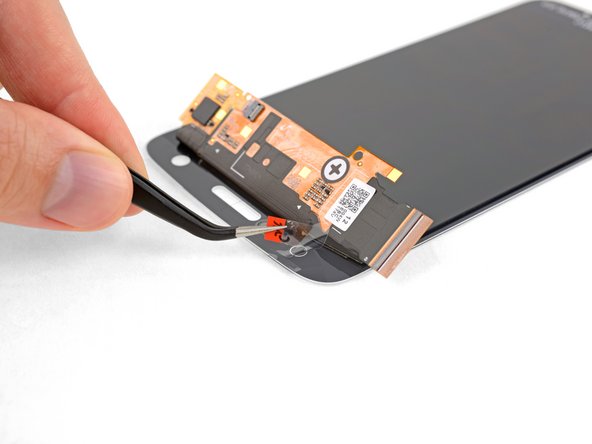
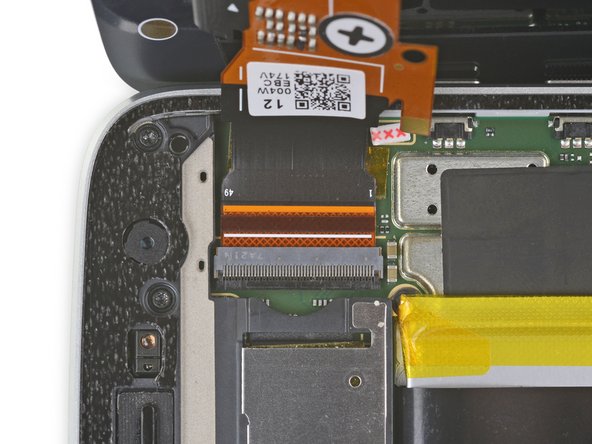
All'altra estremità del telefono, usa lo spudger per far scattare in posizione aperta la linguetta di blocco sul connettore del cavo dello schermo.
The locking tab on the is dark colored and runs almost the entire width of the ZIF connector. It is located on the opposite side from where the cable connects into. Pry upward from the bottom- it works like a hinge.
-
-
-
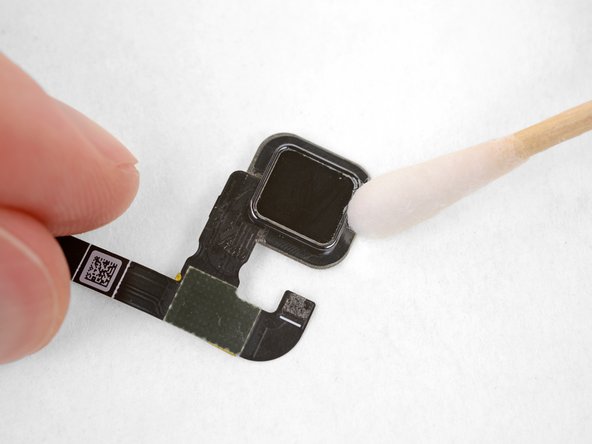
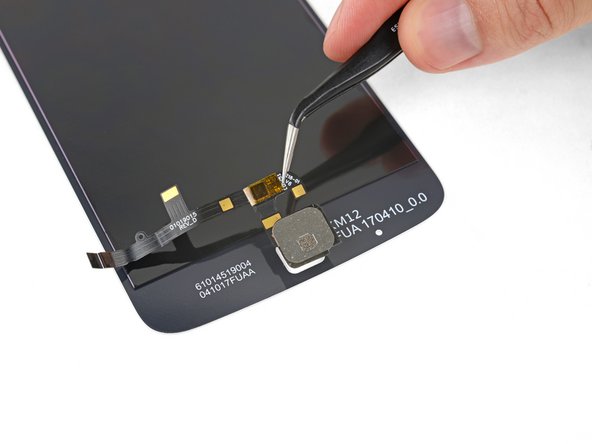
Applica calore per 2-3 minuti nella zona della cornice sotto il display sul tuo vecchio gruppo schermo per ammorbidire l'adesivo che fissa il sensore impronte digitali.
-
-
-
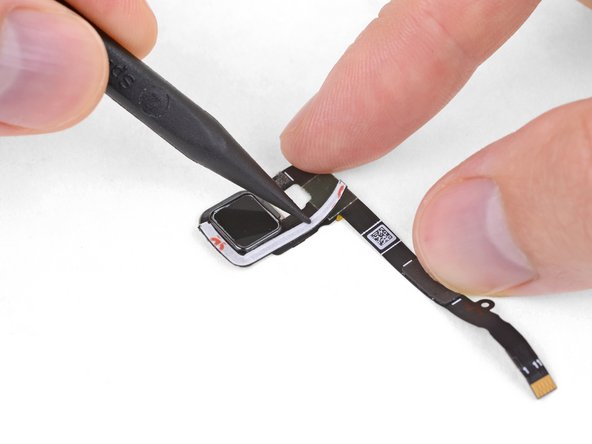
Stacca e rimuovi la protezione del nastro adesivo sul sensore impronte digitali.
-
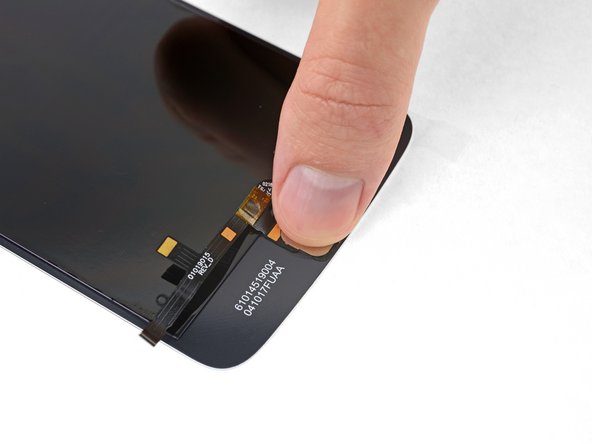
Disponi il tuo nuovo schermo faccia in giù e cala con attenzione il sensore impronte digitali nella sua posizione sul retro del gruppo display.
-
Premi fermamente il retro del senso impronte digitali per diversi secondi per consentire all'adesivo di attaccarsi bene e fissare l'elemento al suo posto.
-
-
-
Stacca e rimuovi tutto il vecchio adesivo residuo dalla scocca del telefono.
-
Usa la punta dello spudger per raschiare e rimuovere tutti i pezzi di adesivo che sono rimasti appiccicati.
-
Per risultati ottimali, pulisci l'area sotto l'adesivo rimosso con alcol isopropilico per predisporre la superficie in modo che il nuovo adesivo si incolli più saldamente.
-
-
-
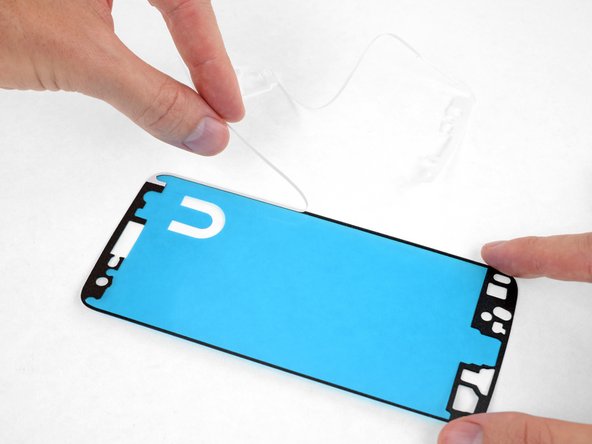
Se il tuo foglio ha una protezione di carta, staccala e rimuovila.
-
-
-
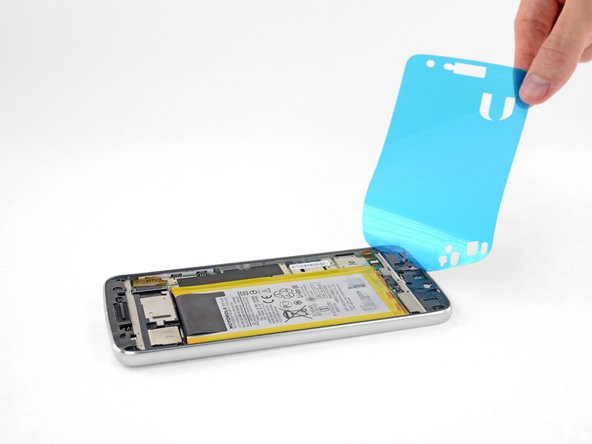
Stacca ed elimina la protezione di plastica, scoprendo l'adesivo per il display.
Should the removal of the blue plastic backing wait until after verifying the screen works in the next step?
Well, you can’t connect the screen with the plastic in the way. But in principle, you’re right—it wouldn’t be a bad idea to pause before installing the display adhesive, plug everything in, and verify that it works. Unfortunately, you then have to unplug it again to install the adhesive, so you’ll want to test it again once it’s plugged back in, but before sealing up your phone—just to make sure the cables are seated properly. So, the verification step is probably best left where it’s at.
Well, I connected the screen to the motherboard without peeling off the plastic.
It is possible!
And after testing the phone I took off the plastic foil from the adhesive without unpluging the two connectors. The plasic foil herefor has two cuts in the area of the connectors .
So I think it’s a good idea to swap step 35 to step 36.
-
-
-
Prima di sigillare nella sua posizione lo schermo, connetti i cavi flessibili del display del sensore impronte digitali e quindi accendi il telefono.
-
Prima di sigillare lo schermo, collauda tutte la funzionalità per essere sicuro che la tua riparazione sia andata a buon fine.
-


Porta i tuoi rifiuti elettronici a un riciclatore certificato R2 o e-Stewards.
La riparazione non è andata secondo i piani? Vai sulla nostra comunità Risposte per trovare aiuto nella risoluzione dei problemi.
Porta i tuoi rifiuti elettronici a un riciclatore certificato R2 o e-Stewards.
La riparazione non è andata secondo i piani? Vai sulla nostra comunità Risposte per trovare aiuto nella risoluzione dei problemi.
Annulla: non ho completato questa guida.
Altre 54 persone hanno completato questa guida.
Un ringraziamento speciale a questi traduttori:
75%

albertob ci sta aiutando ad aggiustare il mondo! Vuoi partecipare?
Inizia a tradurre ›


13 Commenti
I am also confused about the Double Sided Tape. My kit seems to have come with everything I need except for this double sided tape!
i with that i had seen this before i let some third party company ruin my otherwise perfectly good phone
Followed exactly as written and successfully replaced screen on my water damaged Moto Z Play. Be sure to test everything before sealing the screen to adhesive. I didn’t test the camera prior to sealing the screen and don’t feel like opening it back up! Purchased the $99 kit with screen and tools. Unfortunately, the iOpener didn’t last second time in the microwave and leaked even after waiting 10 minutes per directions.
Screen successfully replaced. I managed to crack the plastic backing plate of the front-facing LED, but that doesn’t matter. The last bit about the heavy stack of books was rather silly in my opinion. I heated the screen with a hairdryer and pressed the phone screen down on a soft mouse mat. I don’t a have microwave, so I couldn’t use the provided iOpener at all.
Install went well. I was sweating bullets since this was my first time doing a smartphone repair, but this guide was very thorough. Take your time and be careful since this is very precise work. I also took probably about an extra 30-60 minutes carefully cleaning the dust and hair that had collected just barely under the edges of the screen after several years of use. I really recommend it since how often do you plan on opening up your phone like this?
The entire surface of my screen was completely shattered (100%) and removing all the little peices of it was difficult. I bought the complete kit and followed these instructions. I managed to pry the screen peice by peice, without heat or the suction cup tool. Very tedious work (unless you’re use to working with such small, delicate instrumentation), so take a break if you’re feeling frustrated. I would highly recommend using some type of hands free magnification throughout the process. My phone works perfectly now- complete success! Thank you IFIXIT.
This worked perfectly for me. Thank You!!!!
Excellent step by step. I was nervous at first, but I managed it! This is my first cell phone screen repair. I can hardly wait until something else breaks!
~Kristi
Excellent explanation. My son and I bought the spare screen (pre-assembled with touch screen) of his old and crashed Moto Z2Play from another website, but my IFixit Pro-Tech Toolkit made the difference!!
Thank you!
And keep on Fixing It!!
Warum ist es so wichtig das Handy beim Displaytausch auszuschalten?
I also cracked the plastic backing plate of the front-facing LED. My advice is to use a knife to separate the flash flex cable, and carefully cut through the adhesive securing it in place BEFORE you try to push the LED out of its mounting hole from the front. If you push the LED out first, it will crack the plastic backing plate underneath the flex cable. It still works OK when you glue it back to the new screen. Other than that, repair was a complete success.