Introduzione
Usa questa guida per sostituire uno schermo rotto, crepato o difettoso nel tuo Apple Watch Series 4.
Ti raccomandiamo di aggiornare il tuo Apple Watch a watchOS 5 o successivo (e di aggiornare l'iPhone accoppiato a iOS 12 o successivo) per evitare errori di pairing dopo la sostituzione del display.
La sostituzione dello schermo può causare problemi con Apple Pay. Se possibile, per ridurre la possibilità di malfunzionamenti, cancella tutte le informazioni sul tuo account Apple Pay prima della sostituzione e inseriscile nuovamente una volta che avrai installato il nuovo display.
Questa guida mostra la procedura standard sulla sola versione con il solo GPS dell'Apple Watch, ma la versione cellulare/LTE è simile. Le differenze importanti sono scritte nel testo.
Cosa ti serve
-
-
Prima di iniziare ogni riparazione, stacca l'orologio dal caricatore e spegnilo.
-
Se il tuo touchscreen è rotto e ti impedisce di spegnere l'orologio, usa questo metodo alternativo per spegnerlo.
-
-
-
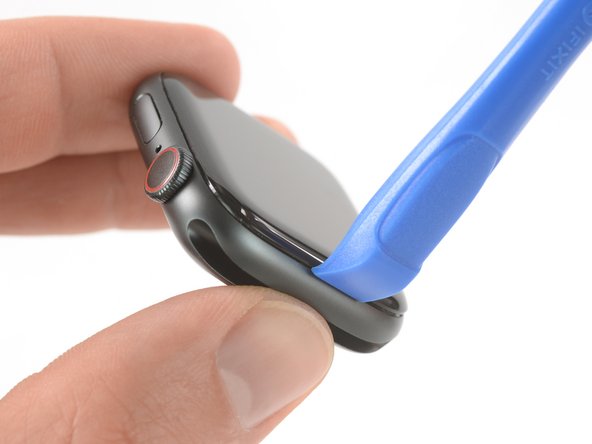
Dato che la fessura tra lo schermo e la scocca è davvero sottile, per separare le due parti serve una lama affilata. Leggi le avvertenze seguenti con cura prima di continuare.
-
-
-
Prepara un iOpener (oppure usa un asciugacapelli o una pistola termica) e scalda il quadrante dell'orologio finché non è lievemente troppo caldo da poter essere toccato.
-
Lascia l'iOpener sull'orologio per almeno due minuti per scaldare completamente lo schermo e ammorbidire l'adesivo che lo fissa alla scocca.
-
-
-
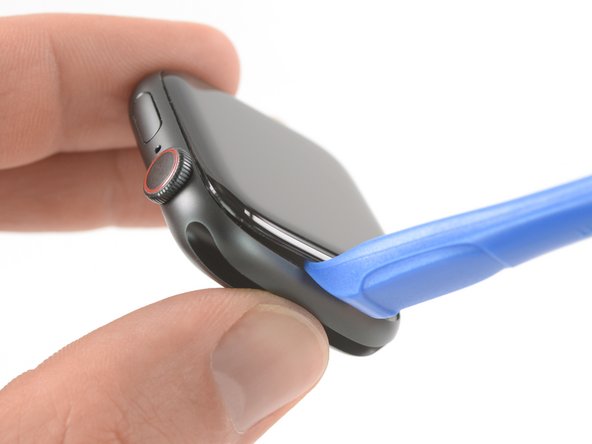
Una volta che hai aperto una piccola fessura con la lama curva, rimuovi la lama stessa e inserisci nella fessura la parte più sottile di uno strumento di apertura.
-
Spingi nella fessura lo strumento di apertura, ruotandolo e usando il pollice come fulcro per sollevare ancora un po' il display.
-
-
-
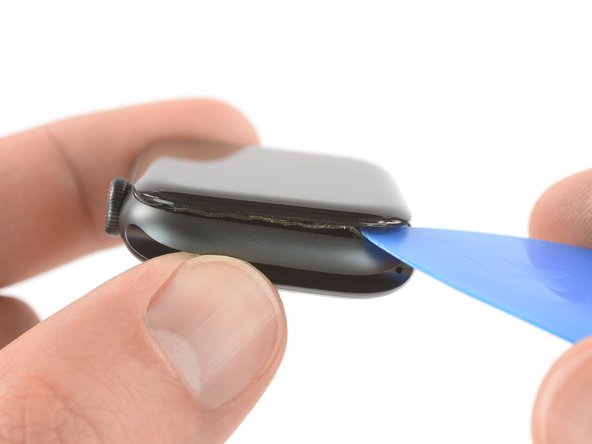
È facile che il sensore Force Touch si attacchi al telaio dello schermo invece che alla scocca dell'orologio. In questo caso, inserisci un plettro di apertura sotto il display e separa con delicatezza dal display la guarnizione del Force Touch.
-
Fai scorrere il plettro lungo il display per separare l'adesivo tra la guarnizione del Force Touch e lo schermo.
-
-
-
Apri il display a un angolo di circa 45° e usa delle pinzette per staccare l'adesivo tra lo schermo e la guarnizione del Force Touch.
-
Fai passare l'adesivo attorno e dietro ai cavi del display per toglierlo completamente. Dato che l'adesivo deve essere comunque sostituito, puoi tagliarlo se questo ti semplifica l'operazione di rimozione.
-
-
-
Piega con delicatezza all'indietro lo schermo finché non avrei abbastanza spazio per sollevare la batteria.
-
Inserisci un plettro di apertura tra la batteria il Taptic Engine.
If you are just replacing the screen then there is no need to remove battery.
When removing the screen I tore the two outer cables attached to the lcd screen. What are their purpose? I read somewhere they are just some sort of shield. Will my watch function normally without them?
thanks
-
-
-
-
Applica un po' di alcol isopropilico ad alta concentrazione (oltre 99%) a un cotton fioc e applicalo sulla lamina adesiva nera. Lascia che penetri nell'adesivo per circa due minuti.
-
In alternativa, puoi disporre un iOpener riscaldato al di sopra dello schermo per ammorbidire l'adesivo. Applicalo per almeno due minuti.
-
-
-
Applica una modesta quantità di alcol isopropilico ad alta purezza (oltre 99%) a un cotton fioc oppure usa un panno per la pulizia per rimuovere delicatamente l'adesivo rimasto sulla guarnizione del Force Touch.
-
-
-
Usa l'estremità a punta di uno spudger per disporre esattamente l'adesivo e quindi premilo nella sua posizione.
Don’t remove the blue protective film until you’ve got the screen connected to the ribbon cables. You’ll almost guaranteed to need a third hand to get the ribbon cable back in. Don’t forget to flip up the connector locks on the case side and flip them back down after inserting the cable.
-


Per rimontare il tuo Apple Watch Series 4, segui queste istruzioni in ordine inverso per riattaccare lo schermo e la batteria.
Porta i tuoi rifiuti elettronici a un riciclatore certificato R2 o e-Stewards.
La riparazione non è andata secondo i piani? Vai sulla nostra comunità Risposte per trovare aiuto nella risoluzione dei problemi.
Annulla: non ho completato questa guida.
Altre 34 persone hanno completato questa guida.
Un ringraziamento speciale a questi traduttori:
100%

albertob ci sta aiutando ad aggiustare il mondo! Vuoi partecipare?
Inizia a tradurre ›


17 Commenti
Can you tell me what the black adhesive tape with flex ends that covers the flex ribbons is used for and can it be replaced ?
That is for shielding and grounding purposes. If you get a spare you can of course replace it. But be careful not to damage the display cables.
Sheila, this you can purchase on Aliexpress. i tried to get it elsewhere, seems noone else stocks it. cost approx $10. i found it here: https://www.aliexpress.com/item/10050019...
I have replaced an original screen from another apple watch and everything seems to have gone well. But when I try to pair with the iphone it doesn't succeed. Is it because I didn't put the NFC chip from the original apple watch? What can be?.
It is an apple watch series 4 44 mm + cellular.
Thank you very much.
Do you have to replace the black flex ribbons when preparing the apple watch or can you leave them out?
Very difficult repair, indeed. Be very careful about the side wires, they can be very easily be cut when opening the screen. I just hope having a contact supper to supper will be enough… Response in some hours.
This tutorial could be completed with an advice about how to bring the screen wires back to their connectors. That was the most difficult part for me. I was afraid to cut or destroy them.
Concerning the parts, I found the adhesive ring very thick compare to the adhesive I had to remove. What I had as parts did not correspond to what was shown in the repair tutorial. The watch is getting pressed now so I can’t judge if the adhesive is ok or too thick.
It was also very difficult to separate to only get the ring.
Anyway, thanks for this tutorial. Without it, impossible to repair the first time.
Sorry for replying after such a long time: I have cut the smaller side wires (both, I'm very proud of myself ;) ), did you have any problems using the watch with such wires cut? It seems very difficult to find replacement parts for such components.
Replaced screen and testing before closing everything back up. Screen comes on, but it doesn’t respond to touch. Is this due to a cable not connecting properly, or is this a bad screen? Comes on and looks great, but not touch responsive. -dw
Hi Andrew, yes, there might be a cable not sitting correctly in its connector. Those tiny cables are hard to handle and need to be inserted all the way in their connectors. Hopefully that solves the issue.
Quick question: the two wire cables at the sides of the black foil (Step 18) are of any use? I have broken mine (both) while opening the watch, and I am wondering if I have to throw everything in the garbage (I was replacing the battery) or I can still use the watch after battery replacement (I have to order the battery yet)
Pareil les 3 connecteurs impeccable mais un des deux stickers aux extrémités s'est cassé ... Est-ce pour cela que ma montre ne s'allume pas ?
Bonjour, j'ai respecté toutes les étapes une par une ... Et rien ne se passe dans ma montre ... Montre non utilisée pendant plus d'un an du coup j'ai choisi de changer la batterie ... Rien de plus ... La montre "chauffe" donc la charge semble fonctionner mais l'écran est noir et aucun éclair ou autre a l'écran ^^
Are there any news on Apple Pay function after replacing the screen? As I can remember at some time there was a disclaimer at this guide that there is currently no easy fix to get NFC and Apple Pay working after replacement. I thought if only changing the screen it's 100% not working but now it sounds like it could succeed or not. Is that right?
We haven’t tested it recently. So all we can say is in the introduction:
"Replacing the display can cause issues with Apple Pay. If possible, to reduce the likelihood of problems, delete all your Apple Pay account info before the replacement, and then re-enter it with the new display installed."
Oh boy I'm not exited for this repair... Hopefully it goes well...
Hi. I changed the screen on an apple watch series 4, now the screen works, whcih is great, but when I charge it, the green snake comes on but never charges. It heats up the bottom, gets very warm. Could it be the battery itself? Maybe needs a new one? Is rthere anything else that woudl be causing the battery to not charge and or heat up on the bottom when chaging the screen?
Derrick Brewer - Replica