Introduzione
Usa questa guida per sostituire un display rotto, crepato o guasto del tuo Apple Watch Series 2.
Assicurati di aggiornare il tuo Apple Watch a watchOS 5 o successivo (e l'iPhone accoppiato all'orologio a iOS 12 o successivo) per evitare problemi di accoppiamento dopo la sostituzione del display.
La sostituzione del display può causare problemi con Apple Pay. Se possibile, per ridurre il rischio che si creino problemi, cancella tutte le tue info sull'account Apple Pay prima della sostituzione; inseriscile di nuovo quando avrai installato il nuovo schermo.
Cosa ti serve
Panoramica Video
-
-
Prima di iniziare la riparazione, stacca l'orologio dall'alimentatore e spegnilo.
-
-
-
Prepara un iOpener (oppure usa un asciugacapelli o una pistola termica) e scalda il quadrante dell'orologio finché non è lievemente troppo caldo da poter essere toccato.
-
Lascia l'iOpener sull'orologio per almeno un minuto per scaldare completamente lo schermo e ammorbidire l'adesivo che lo fissa alla scocca.
I have heated up the iOpener to 165 degrees and left it on for more than a minute. No way I can lift the screen off with the exact knife. Tried different angles in various places, but no go. I also used a hair dryer un til the watch screen was too hot to touch and even tried a very hard cutting tool blade and also no go. Could n ever get the blade under the face I applied enough force where I could see that the blade left small marks, not very big, but could never get anything to move or lift. What am I doing wrong? I spent 47 years at a global computer company and I am used to taking apart small things and applying force when required. I don’t know what I am doing wrong. Please help me.
Getting the initial gap is not easy. Maybe a playing card could work its way in the tiny gap and cut some adhesive. After that there might be some success with an exacto knife. Or you want to try a piece of aluminum foil (folded for more rigidity) for cutting the adhesive. Be aware of the force touch gasket and that it might get damaged during that procedure.
I finally used a hot air gun set to 150 deg. C heating up the edges by slowly spinning the watch around before the technique worked. Difficult is the level noted and it’s correct. Finally worked and watch perfectly functioning.
I used a heat gun, too. I was worried after reading comments that it would burn up the LCD, so I heated it a little bit at a time, rotating it like you did, and checking to see if I could get my knife under it. I must have hit one of the buttons because it did turn on, but that did reassure me that the display was okay.
It's open. Now that the watch and I have had a few minutes to cool down, I'm ready for the next step. Not as difficult as I thought it could be. Tomorrow, I'll be replacing the battery in an iPod Touch 6th Gen.
bester -
I had to heat the iOpener 2 times and leave it on top of the watch for 10 minutes.
-
-
The Watch 3 stainless Steel has an additional Frame. Where do i have To Open it?
I wore thick gardening gloves just to be safe 😅 and it took a while but the screen did come off.
-
-
Infila il bordo di una lama curva nella sottile fessura tra il display e il case esterno. Inizia sul lato corto del display, vicino alla Digital Crown.
-
Premi fermamente esattamente verso il basso nella fessura.
-
Una volta inserita la lama, torcila per sollevare lievemente il display.
It’s difficult to grip case in a way that keeps fingers safe from the blade but doesn’t hit the side buttons and turn the device on!
If it’s a struggle to get the display to release, warm case for a few more minutes.
I have tried so may times to get the display to release but nothing works. Should have bought a new watch LOL. Kept the iOpener on 2 times for 10 minutes and it still won't open. There must be a better way.
Hi Susan,
if you're struggling to get the adhesive loose enough a hair dryer, heat gun, or hot plate may also be used, but be careful not to overheat the device. The edge should feel slightly too hot to the touch.
-
-
-
Una volta che hai aperto una piccola fessura con la lama curva, rimuovi la lama stessa e inserisci nella fessura la parte più sottile di uno strumento di apertura.
-
Spingi nella fessura lo strumento di apertura, ruotandolo e usando il pollice come fulcro per sollevare ancora un po' il display.
-
-
-
-
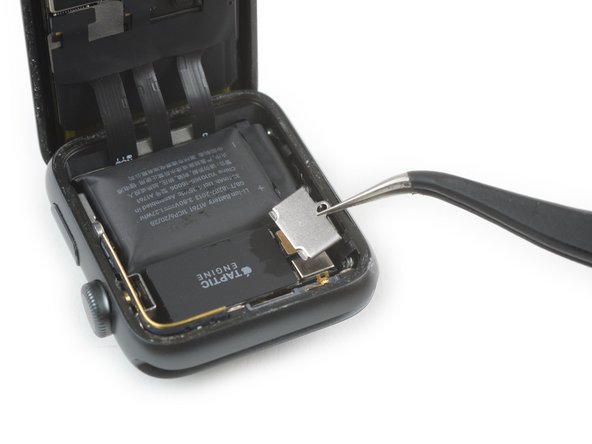
Usa un cacciavite Y000 per rimuovere la vite tri-wing che fissa la cover metallica del connettore della batteria.
-
Rimuovi la cover.
-
-
-
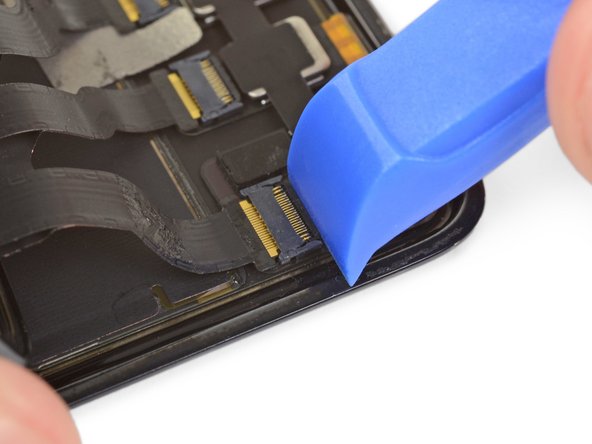
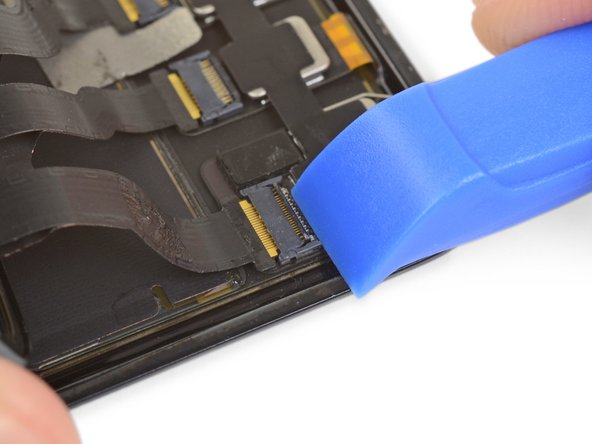
Usa delle pinzette per staccare il nastro che copre i connettori del cavo del display.
-
Inizia dalla parte inferiore destra del nastro e lavora con attenzione verso il connettore disposto al centro.
BMJ's comment translated by translate dot google dot com:
"The adhesive tape does not need to be completely removed. It is enough to expose the connectors. This means that when you put it back together you have the adhesive tape in the optimal position again and there is no risk of damaging the conductive film." -
-
-
Se si strappa, afferrala dalla parte inferiore sinistra per rimuoverla completamente. In questo modo la lamina corrispondente (posta sul display) non si danneggerà.
-
-
-
Usa con cautela uno strumento di apertura o un’unghia pulita per sbloccare il primo dei tre connettori ZIF sollevando la piccola aletta di fissaggio nera posizionata dalla parte opposta del cavo.
Ir is viral to lift the small black flap or you ruin the entire process here, I lost everythign here...the first one stuck and the entire connector discintigrated on me, not my first rodeo, but lost the entire project.
-
-
-
Rimuovi il display.
hi
how are you
Please answer me quickly
i have a apple watch 3 and broken lcd
can i replace this lcd with a lost apple watch lcd?
Does it work?
I've heard that Apple does not allow this and ban the device!!!!
-


Continua dal passaggio 10 della nostra guida al sensore Force Touch per richiudere lo smartwatch e completare la riparazione. Per ottenere un risultato migliore, non connettere il nuovo display fino alla conclusione del passo 17.
Continua dal passaggio 10 della nostra guida al sensore Force Touch per richiudere lo smartwatch e completare la riparazione. Per ottenere un risultato migliore, non connettere il nuovo display fino alla conclusione del passo 17.
Annulla: non ho completato questa guida.
Altre 98 persone hanno completato questa guida.
Un ringraziamento speciale a questi traduttori:
100%


Questi traduttori ci stanno aiutando ad aggiustare il mondo! Vuoi partecipare?
Inizia a tradurre ›

Team

18 Commenti
Job done….With a smashed screen remember to apply clear scotch tape to hold the screen together. Continue to heat the remaining stuck shards when the main bulk of the glass comes out. Pick them out carefully, and not to raise the gasket. Use a strong magnifying glass. the ifixit heat gel pack and tweezers helped me. Ensure that all tiny bits of glass have been removed form the body. Just turn it upside down, give a couple of gentle taps with something plastic. Pick out if necessary, taking care around the components. For a smashed screen, needs a good hour or more.
Congratulations on the successful repair. And thanks for your comment and additional hints.
This one was tough…and I’ve been doing various repair for years. Thank you iFixIt for top notch tutorials and instructions (and the progressive photos). I had a broken display and an iCloud locked watch for parts. Getting the display off the broken iWatch was easy…getting the replacement/good display off the other iWatch was very difficult. I keep at it and eventually it released, but I think I chipped the display edges slightly. If I have to do this one again, I may think twice. I’d say use plenty of heat. I used the iRemover, which helped a lot, it gets plenty hot and holds the heat for job. Once you’re inside, you’ll need that every so special 000 tri-lobe bit for the battery (for this I bought the iFixIt Pro toolkit…worth it to have a solidly made set of disassembly tools). I don’t think it’s worth breaking down the iWatch for repairs much further than the display or battery. The water resistant seal is compromised enough as it is with the display removal.
Just wondering are the ion x glass and sapphire crystal screens interchangeable because I have a broken series 2 aluminum case and it comes with the ion x glass but I want to get the sapphire crystal glass instead to make it stronger
Displays of the same Series, model and size should be compatible.
Just noticed that my reply might come across a little vague.
Same Series hopefully makes sense (some swapped Series 3 onto Series 2 and vice versa which lead to the displays getting warmen than usually).
Same model means LTE or GPS which is probably irrelevant since the Series 2 does not have LTE.
And same size is hopefully a no-brainer ;)
So to summarize, yes, Sapphire display of the same watch should work instead of an ion-x.
Please let me know if it won’t work.
I have an Apple Watch series 2 with wOS 5.2 and an iPhone 8 with iOS 12.3.1
After installing a new aftermarket display I’ve connected the watch with my phone with out any trouble. But I was not able to update to wOS 5.2.1 Also I added my credit card to wallet on the phone after the repair job, but was not able to add it to the watch.
So I tried to completely reset the watch and try it all again but now I am not able to connect it to my iPhone at all.
I have another Apple Watch 2 that has wOS 5.2.1 and a weak battery and a Digital Crown with ghosting behaviour but still the original display. Might it work to install the original display on the other watch to resolve the connection problems?
Has anybody made similar experiences and any idea/advice what I might do?
I figured out, why the Apple Watch did not pair even though wOS 5 was installed.
I opened it and figured out, that the GPS modules connector was loose and just fell of the display, when I touched the cable.
Connecting the (broken) display from another watch made it pair and upgrade again but still I am not able to add Apple Pay. I guess that it recognises the GPS module and since it is wOS 5 it works even though it is not the original GPS module. But I think, because it is not properly connected to all three cables of the display the GPS maybe is not able to fix a location which disables the Apple Pay function out of security or licensing reasons.
Now I think this experiment confirms, that any display will work under wOS 5.2 (maybe even wOS 5), even if it is the display from another Apple Watch.
I’m curious about the following statement.
“Continue from Step 10 of our Force Touch Sensor guide to re-seal your watch and complete your repair.For best results, don’t connect your new display until after Step 17.”
where is step 17? My up to date chrome browser is only showing 15 steps.
Other than that, I’m excited to fix my watch.
Hi alexander, that is step 17 in the Force Touch Gasket guide, not in this guide (which has only 15 steps). The Force Touch Gasket guide shows the steps with the display attached, but since you took it off during this guide you’re much better off attaching it after step 17. Have a successful repair
Do i need to change the front screen with the lcd screen or can i change only the glass?
Hi Cecilie, though it is possible to only change the glass, I’d not recommend it. You might feel the same after watching this video (it’s a Series 4 but basically the same procedure for the glass)—or you feel empowered by it and will try that procedure (with success hopefully): https://www.youtube.com/watch?v=PZYWzsB_...
it would be the same display of series 2 to series 3?
Ich konnte vor dem Displaytausch mein ApplePay nicht mehr deaktivieren. Nun lässt sich mit dem neune Display keine ApplePay-Karte mehr hinzufügen. Gibt es hierzu eine Lösung?
Hello, good afternoon, if one applewach is locked, does the display still work for another applewach?
Yes, swapping the display from a locked watch to an unlocked watch should work. Only thing that could not work is the NFC / Apple Pay since the chip on the back of the display carries the NFC information and needs to be transferred.
Verify your model. The back of the Cellular model just says GPS, so be sure to check the groves where the watch band goes to determine you model. I made the mistake of just reading the back of the device and since I’d been gifted the device didn’t know it was cellular. Cellular has a different type of touch force gasket, different screen, and different battery connections.
Ryan Holt - Replica
From what I just read on Apple, the only differences in watch series 3 is 38mm and 42mm.
mcr4u2 -
As a consumer all you need to know are 38mm and 42mm
Michael Adoga - Replica
The back will say GPS LTE if it’s the cellular version. If it doesn’t say LTE it is only the GPS version. The displays are different whether or not it is LTE(cellular).
themepark - Replica
This alternative method only reboots the watch.
Gregg Stanley - Replica