Introduzione
Segui questa guida per rimuovere il gruppo della scheda madre.
Cosa ti serve
-
-
Stacca il cavo di alimentazione insieme a tutte le periferiche.
-
Poggiare l'iMac rivolto verso il basso su una superficie pulita e morbida come indicato.
-
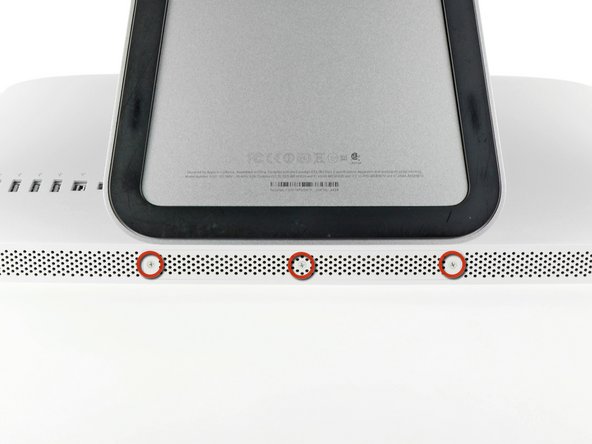
Allentare le tre viti con testa a croce che fissano lo sportello di accesso al bordo inferiore dell'iMac.
-
Rimuovere lo sportello di accesso.
-
-
-
Far scorrere delicatamente la linguetta di plastica nera della memoria RAM dal relativo slot.
-
Estrarre la linguetta di plastica nera dal bordo inferiore dell'iMac per estrarre il modulo (o i moduli) su quel lato dell'alloggiamento della memoria RAM.
It is far harder than I thought you have to pull REALLY hard and then there will be a little click and than you can gently pull out the RAM.
Press really hard, to the point you think you’ll cut your thumb, you’ll hear a slight ‘click’. If it’s not properly installed, the iMac will ‘beep, beep, beep’ In protest upon booting…
Brian -
I found it best to make use of the factory ‘pull tabs’. Much much easier than trying to pull the ram out by hand. It may seem like a good idea but, don’t be tempted to use pliers.
Brian -
Thanks for your Useful guide …. iMac Intel 21.5" EMC 2428 RAM Replacement was performed step by step on my Imac and every thing is perfect right now.
I was able to remove one side of the ram, but the other side would not budge. I was afraid that I was going to rip the plastic tab out of the computer. Any suggestions?
is it completely manditory to take out the ram? why not just keep it in? for some guides for replacing other components you dont have to, but in some you do. why is this the case? does it have to do with not getting shocked because there is power stored in there or some other reason? i was just wondering tho...
-
-
-
Verificare che il piccolo intaglio presente su ciascun modulo RAM (indicato nella prima immagine) corrisponda alla sporgenza in ciascuno slot (seconda immagine).
When reinstalling RAM in this machine or any iMac with upgradable RAM slots push hard to get them to go in (Apple really did make this one harder than it needed to be). If you don't push hard it won't go in and your computer won't work. (trust me on this learned the hard way)
I am having trouble with bottom 2 slots. As I get beeping sounds when using them. When removed it boots properly. I tried & tried to push the 2 , 2GB ram modules into the bottom slots BUT all get is beeping. Guess I have to settle for 4GB Rather than 8 unless someone has a suggestion.
Try swapping the to the other slots & don’t forget to press really hard until you hear the ‘click’.
Brian -
Is there an expirience to settle 1600 MgH Ram instead 1333 MgH manual required?
Added 16GB for a total of 20GB, runs great, do make sure of the “click”, the beep is disturbing
2x2 GB 1333 MHz RAM were installed as delivered. I couldn’t manage to get those two out of their slots. I don’t want to damage anything. So, I put 2x8 GB RAM 1333 MHz RAM bars in the other two empty spare slots to have 20 GB RAM in total. The iMac runs fine with it. As described above, make sure to push RAM until they ‘click’ in completely.
Why are we taking out the RAM modules just to put them back in on the next step ?
-
-
-
Fai aderire una ventosa accanto a ciascuno dei due angoli superiori del pannello di vetro.
-
Se la ventosa non aderisce, prova a ripulire il pannello di vetro e la ventosa con un solvente delicato.
Another comment on DATA & LCD Temp. Sensor cables: I had to remove the vertical sync, and the backlight cable, however, if you have an assistant or/can carefully rotate the screen clockwise/and then have it held up about 5" to 6" at a slight angle, you do not need to remove LCD data cable or LCD thermal cable, however - IMPORTANT: you must have a second pair of hands/or way to securely prop up the LCD. Also, don't rotate too much, since then you will pull out LCD data cable, and it renders the whole exercise moot, or can damage the cable or connector.
You don't need suction cups. The screen, held by magnets, can simply be pried off using a very thin blade such as a screw driver and fingers.
That's a bad idea. using a metal tool to pry off glass is likely to end with an expensive broken front glass.
Suction cups are common. Find a couple and do it the safe way. I use some cheap ones that came with iPhone repair kit.
No need for suction cups, I just stuck my nails (short like guys usually have) between the top part of the screen and body, and it came off easily. I've never done it before, so it seems to be very easy.
Just completed the replacement of the optical drive with an SSD using an OWC Data Doubler kit. Attempted to remove the optical drive without disconnecting any cables but found it a bit fiddly to orient the screen for good access. I bit the bullet and disconnected them and found the process less daunting than I imagined. Reconnecting them was similarly straightforward if you're careful.
Tip: you can skip the step for removing the optical drive thermal sensor connector from the motherboard. Still need to remove the sensor from the optical drive but you can leave that hanging and reattach it to the SSD later.
I’ve just successfully installed a 1TB SSD in place of my optical drive thanks to the information here- thank you to everyone who has contributed!
3 comments- the procedure described here seems to vary between HD replacement and dual HD/optical drive replacement. This can be confusing at times.
Expect there to be minor differences between the layout described and what you find when you open up your iMac. There are also, surprisingly, differences between the HD enclosure description, and the article provided by ifixit.
I was able to replace the DVD/HD enclosure single-handedly without fully removing the LCD, or deconnecting any of the cables (steps 5-11). It’s a bit cramped, and fiddly, but I was not happy removing any of the cables despite watching videos, etc., since they all seemed to involve applying more force than I was comfortable with. A more detailed description of how to release them might have helped, but even here, there may be minor variations even within the 2389 model.
Good luck!
Fingernails are all you need to free the glass from its magnetic hold. If you don’t have them, slip something thin and plastic, like a spudger, at a top corner.
Minha dúvida é a seguinte: após o técnico trocar o HD do meu iMac de 21,5 polegadas, a câmera parou de funcionar. Seria por causa da troca do HD? Tem solução?
Creio que o cabo da camera não foi plugado ou deu mau contato… ou até danificado.
glecyo@gmail.com
I can’t get my glass to budge. I’m replacing a cracked one and now it’s about to shatter.
I know that I'm replying really late but I advise to use clear tape over any cracks so the cracks don't get bigger
Check for chips in the glass BEFORE you do this step. If there is a chip when you pull up with the suction cups you will wind up with a jagged mess. If you do have a chip I would advise covering the screen near the chip with clear tape of some kind before lifting out. Mine shattered right at the chip and the resulting glass dust cloud got all over. My solution was buying a new glass screen.
-
-
-
Solleva il pannello di vetro in perpendicolare rispetto alla superficie dello schermo LCD, affinché sia possibile liberare i piedini di montaggio in acciaio inseriti lungo il lato sottostante al bordo superiore del pannello di vetro.
-
Estrai il panello di vetro dal bordo inferiore dell'iMac e mettilo da parte con attenzione.
What's the best product to clean the face of the LCD?
Microfiber Cloth
Try your best not touch it in the first place
Brian -
Wearing Nitrile or regular surgical gloves helps prevent finger prints if you accidentally touch the glass.
I use a Swiffer duster from above at the last moment before I let the magnets grab the glass cover. This has worked so well the last dozen or so times I’ve replaced a glass cover since I never have access to a “clean room” and don’t wear a “bunny suit”.
Also, more dust will shed from your skin if you’ve just taken a shower, so I like to finish these repairs in the morning before a shower.
-
-
-
Rimuovere le otto viti Torx T10 da 8 mm che fissano il display al case esterno.
Replacing the screws , especially the two uppermost ones , is awkward due to the magnets attracting the screws off the Torx driver
I’ve just replaced the screws by making a little tube from paper and wrapping it round each screw to keep it contained. A cut-down straw would be perfect for job.
I second this but use a tube of cardboard instead, then its quite easy.
jeank75 -
-
-
-
Sollevare leggermente il bordo superiore del display dal case esterno.
After sliding the display slightly towards the top edge, enough for the bottom edge to clear the retainers, an alternative is to raise the bottom edge out. Then unplug the LED backlight power cable (this step + 2), unplug the LCD thermal sensor cable (this step + 4), unplug the display data cable (this step + 3), and the display may be rotated over the top edge while leaving the vertical sync cable attached (this step + 1).
-
-
-
Estrarre il connettore del cavo della sincronizzazione verticale dal connettore femmina sulla scheda di azionamento LED, vicino all'angolo superiore sinistro dell'iMac.
Do not try to pull the plug off the circuit board as it's soldered. Pull the cable sideways out of the socket.
Skipped step 5-10. I used two 5-6" chopsticks to prop up the display, this gave me more than enough room to complete the rest of the steps. I only had to disconnect the 3 cables are directly connected to the hard drive. Replacing the Seagate hard drive with another Seagate hard drive eliminated any cable issues. Now I have 2TB SSDH
I was also able to skip steps 5 thru 10, which meant no messing with any cables except for the two for the HD (steps 13+14). Used a credit card to start the removal of glass panel (step 2) - much easier than I imagined. After removing display screws (step 3) I simply had a friend hold up the display's bottom edge as far as the cables would allow (careful not to stress at connection to logic board) and this provided enough room to remove the HD bracket screws (step 11), detach the HD cables, and remove the HD. Was replacing a failed 1TB Seagate with a 3TB Seagate so no problems with compatibility when reattaching the HD cables and everything worked fine when I restored the OS and data to the new HD. No fan issues. I did take great care to not get fingerprints on the inside of the glass panel and to blow off any dust specks before reinstalling it. It was a bit tricky to get the new HD back in without letting the magnets get a hold of it, so thanks for the warning posted here about that!
On my mid 2010 Imac I found it was not necessary to disconnect any cables (except of course those attached to the drive). Simply angle the monitor away from the case to a safe distance without stressing any cables and secure with tape. With a stubby screw driver it was easy to access and remove the drive.
Skipped steps 6-10; did step 5 so could lift top of display higher, then propped up. A photo of whole interior here would help (hard disk is top center). Used pliers holding T10 bit at right angle to unscrew hard disk holder. SSD installed loose (macOS and fan control app already loaded).
-
-
-
Ruotare il display dal case esterno affinché sia possibile scollegare il cavo di alimentazione della retroilluminazione LED dall'apposita scheda di azionamento.
First push down on the edge of the connector closest to bottom edge of the iMac. This unlatches the locking mechanism at the top edge of the connector. Then gently wiggle the connector away from its socket.
-
-
-
Estrarre il cavo dati del display direttamente dal connettore sulla scheda logica.
This cable is very short, I would remove it before any of the others. First time I did this, I didn't realize this and this cable just popped out of it's socket. Luckily, the board wasn't damaged.
i damaged my (step7) cable, and my iMac screen won't work, how to fix this?
I did the same thing. The pins are VERY easy to bend. I replaced it with a new cable from this company.
http://www.macpalace.com/922-9497-cable-...
Waiting for it to arrive.
Michael -
I wish this step was listed as a warning before lifting the monitor and as the first cable to undo. I broke it as it popped up and out, had to trash my Mac and I am stuck with a new hard drive.
I followed the directions to a T and everything worked going back together. That cable in step 7 is delicate so one must be very careful.
Same problem for me. I damaged this cable and am ordering one now.
This is a tough step so I would also suggest removing this cable first.
Yes, damaged mine too. It is better to take it out of the LCD and install it carefully on the logic board, then install it to the LCD.
asle -
Ok finally got the cable and was able to successfully finish the project.
That video cable is ROUGH to install.
The same thing happened for me. That cable was by far the shortest and a slight pull of the display up caused the connector to come free. Luckily it wasn't damaged by this. It was pretty unclear to me how that connector fit in as well. It slides in and out parallel to the surface of the mother board, up towards the top of the iMac to unplug and down towards the bottom to plug in. I agree, if I were to do this repair again that is the first interior cable I would disconnect. Maybe a closeup of the cable plugged in and unplugged to show exactly how it engages and disengages would be good as well.
It is fine to remove the cable from the logic board when when you remove the screen. But when when assembling back together I found it better to take the LVDS cable out of the LCD and install it carefully on the logic board. Then connect it to the top of the LCD. Also the connector to the LCD is much more solid and not so easy to bend.
This is by far the best way round to do this as trying to refit the cable to the logic board is a complete nightmare.
Russ -
I agree with asle, manipulating the display end of the cable would be easier - at least it cannot be any harder then manipulating the motherboard end.
Jerry -
well I did all t these steps and now the iMac won't turn on at all. I guess the big cable is not connected to the board as it used to... Mac is out of warranty so it's going out the door. RIP
this part is not complicated if you understand at first how the lock works.. remove the lock is easy, reassemble the cable and connect it is very problematic because the space to work is very tiny, but if you are carefully, it should be not a problem . try to see some videos from youtube first!
This totally blows.. If you want to do this correctly and not destroy your computer over this step, - OWC’s video will show you EXACTLy what to do with the display cable ..
Don’t raise the display more than 3-4 inches. Pull the tape off the back of the display and unhook the cable from the display, instead of trying to remove it from the motherboard. As soon as I raised the display, the cable snapped loose. Ordered a new cable from Amazon. Am waiting to see if works ok.
The worst thing about the whole tear-down procedure, was the display data ribbon cable in this step. As others have noted, It popped out of its socket on the mother board while disconnecting the lcd. I didn’t get a chance to see exactly how it connected on to the moboard . I damaged the dainty and minute ribbon end while trying to re-connect it to the wrong side of the receptacle. Duh! I feel so stupid. :(
I had to order a new ribbon cable ($14) . Luckily, i was able to plug new ribbon into the fragile moboard connector adequately, and then the lcd end, during re-assembly. This re-assembly step is made for a very small person with extremely small hands and big eyes (like someone out of Gulliver’s travels).
2010 iMac SSD kit from OWC. Their video does not adequately explain the difficulty of re-installing the display port ribbon cable into the logic board. The best procedure would be to follow asle (see prior comment 8/11/15). The problem is exasperated by the fact that the plug into the LCD is covered in tape.
Got VERY lucky with my SSD replacement. Just leaning the display back popped the cable off the logic board, and I had a very difficult time reinstalling the screen. It might be that the wire bail wasn’t secured in the first place, or the machine has been opened up prior to my obtaining it. I eventually used a parts box to rest the LCD high enough to reinstall the cable. Agree that this should be the first cable to be disconnected and last to be reconnected. Perhaps disconnecting it from the LCD should be considered as a first step?
-
-
-
Scollegare il connettore del cavo del sensore termico dell'LCD dal connettore femmina sulla scheda logica.
Be very careful - this connector very difficult to disconnect, and you have a high risk of pulling the cable pins out of the connect. If you have disconnected the 3 other cables, you can have a helper rotate the screen out of the way while you remove the hard drive.
I found this connector impossible to remove
I also found this extremely difficult to remove. Tiny cable with a death grip. I tried using two spudgers, my fingernails, and walking it out. In the end, I used two spudgers and pried it up, using leverage from the clip to the right.
Also, i recommend setting the iMac upright for this. I rested the screen on my chest while I dual wielded my spudgers.
eer ist zerbrochen! hoffe krieg ihn dann trotzdem wieder rein
This was connector was impossible to remove. Like a previous commenter, I did this with the machine upright and with the LCD Panel resting on my upper chest. Ultimately, the pins pulled out of the socket! Once they were out, it was relatively easy to remove the socket. I completed the drive replacement, (installed a 1 TB SSD) and then replaced the pins in the socket and reassembled the machine. One mental error I made was I couldn’t remember the correct orientation for the Black and White wires in the socket. In looking at the photos here on iFixIt, it looks like I reversed their orientation. However, the machine seems to be running fine. I installed macos High Sierra and migrated my data from my old HD and the machine has been running for two days now. I would hate to have to go back in and remove the socket and reverse the wire orientation. Anyone have advise on this?
In followup to my previous post, I launched TechTool Pro 9.6.1 and ran the Sensors Test. All Sensors tests were passed. These included:
LCD Proximity, LCD Thermal Compensation 2, LCD Proximity, Thermal Compensation. Machine seems to be running fine.
jmaher -
-
-
-
Rimuovere le quattro viti seguenti:
-
Una vite Torx T10 da 9,3 mm a testa grande
-
Tre viti Torx T10 da 9,3 mm a testa normale
-
-
-
-
Estrarre il connettore del sensore termico dell'unità ottica verso il bordo superiore dell'iMac per scollegarlo dal connettore femmina sulla scheda logica.
No need to do this! Just gently pull up the felt-pad sticky on top of the thermal sensor (looks like a tiny circuit board), then (again gently) peel the thermal sensor off the ODD. Leave it hanging while you remove the ODD and replace it with the SSD, then just put the thermal sensor covered by the protective felt-pad back onto the SSD enclosure.
I agree with cdansmith1, above.
I had removed the sensor completely. Booted up and the fan was like a jet engine - 4200rpm! I opened up the mac again to check the LCD thermal sensor cable was connected properly (as warned in Step 8). It was.
So, I simply used the spudger to peel off the felt sticky pad from and then the optical drive sensor too from the drive I'd taken out. Stuck the sensor onto the SSD using the same sticky pad, plugged it back into the original socket. Bingo. Booted up and everything was back to normal.
-
-
-
Sollevare il bordo interno dell'unità ottica e spostare il connettore dietro al telaio della GPU collegato alla scheda logica.
-
Estrarre con cautela l'unità ottica dai piedini di montaggio sul lato destro del case esterno, affinché sia possibile scollegare il cavo dell'unità.
-
Lasciar pendere l'unità ottica mentre si sposta il connettore del sensore termico dell'unità ottica dalla parte posteriore del dissipatore della GPU.
this part is complicated because the wire is very delicate. when you try to extract it passing through the others elements this wire trap it very easily on the other elements of the logic board
-
-
-
Svita la vite Torx T10 da 13 mm che fissa la ventola dell'unità ottica alla copertura esterna.
-
-
-
Scollega il connettore della ventola dell'unità ottica dalla sua presa sulla scheda madre.
-
Rimuovi la ventola dell'unità ottica dall'iMac.
-
-
-
Nei passi successivi, occorrerà scollegare i cavi seguenti:
-
Scheda SD e microfono
-
Altoparlante sinistro/destro
-
Antenna WiFi
-
Bluetooth/sensore luce ambientale/fotocamera/sensore della temperatura sinistro, sensore della temperatura del disco rigido e ventola del disco rigido
-
Ventola CPU/temperatura ambiente e pulsante di alimentazione
-
Sensore infrarossi
Be careful, reinstalling the logic board, some of these cables stand under the card and you have to remove the card again to get them… :((
-
-
-
Usa la parte piatta di uno spudger per sollevare entrambi i connettori delle antenne AirPort dalle rispettive prese sulla scheda AirPort.
I as well. These are delicate connectors...
-
-
-
Tira il connettore ventola CPU/temperatura ambiente verso il bordo inferiore sinistro dell'iMac per scollegarlo dalla sua presa sulla scheda madre.
-
Tira il connettore del pulsante di alimentazione verso il bordo inferiore sinistro dell'iMac per scollegarlo dalla sua presa sulla scheda madre.
-
-
-
Svita le seguenti quattro viti:
-
Una vite Torx T10 a filettatura grossa da 9,3 mm
-
Una vite Torx T10 a filettatura grossa da 25 mm
-
Due viti Torx T10 a filettatura fine da 22 mm
-
Tira dal case posteriore gli angoli in alto a destra e in basso a sinistra dell'alimentatore per liberare i supporti di montaggio negli angoli dell'alimentatore.
No need to do this if you’re just going to pull out the logic board for GPU replacement.
it's possible to change the HDD fan without completely removing either the main board or the power supply. After removing the 4 screws on the PS board, I only had to pull it outward a few mm to remove the plastic wall on the HDD side, which is the part which holds the heat sink (attached to the main board) in place, Once the wires were unplugged from the main board's edges, and the IR board detached from the case front, I was able (with some delicate wiggling) to tilt the board out at the top enough (without unplugging anything from the back side of the board!) to remove the fan. The only tricky bit was getting that one fan screw out, which I managed with a T10 bit fastened to a 1/4" open-end wrench with some masking tape. A little awkward, but it saved a whole lot of disassembly. Somebody probably makes a skinny little ratchet that takes 1/4 hex bits directly, which would have made it easy.
-
-
-
Solleva attentamente l'alimentatore dalla copertura esterna e giralo per accedere al connettore come mostrato, ricordando che i cavi dell'uscita DC (corrente continua) e dell'ingresso AC (corrente alternata di rete) sono ancora collegati all'iMac.
-
Scollega il cavo di uscita DC rilasciando il meccanismo di bloccaggio sul connettore mentre lo tiri via dalla sua presa sull'alimentatore.
-
Una volta che il meccanismo di bloccaggio ha superato la presa, tira via il connettore dell'uscita DC dall'alimentatore.
-
-
-
Tira leggermente la scheda madre lontano dal retro della copertura esterna, quindi sollevala per liberarla dal bordo anteriore del case esterno.
-
-
-
Rilascia il meccanismo di bloccaggio e tira via attentamente il cavo di ingresso DC dalla sua presa sul retro della scheda madre.
Step 44 Instruction is confusing. Why?
Because you suddenly mention a "mini display port cable" and "a USB cable" that up until now have never been mentioned. I'm not trying to be horsey, truly I'm not, but if you mean "plug in THE mini display port cable and THE USB cable" then I can assume both of these have previously been removed, although in scrolling back over all steps before step 44, I see no mention of either. So I remain confused about this instruction. All the rest of the steps are wonderfully clear and amazing. Apple itself cannot have provided a more perfect instruction (nor would they!). Well I'll leave this comment, although in re-reading Instruction 44, I now understand that these two cables are to be plugged in on the FRAME of the iMAC, OUTSIDE, so as to make sure the logic board INSIDE ends up properly aligned when reinstalled. My initial bad. Thank you.
-


Per rimontare il tuo dispositivo, segui le istruzioni in ordine inverso.
Per rimontare il tuo dispositivo, segui le istruzioni in ordine inverso.
Annulla: non ho completato questa guida.
Altre 38 persone hanno completato questa guida.
Un ringraziamento speciale a questi traduttori:
100%

Questi traduttori ci stanno aiutando ad aggiustare il mondo! Vuoi partecipare?
Inizia a tradurre ›

7 Commenti
Hi. I replaced the logic board and when I started to put it back together there was a half round cable that I have no clue where it goes. I really hope you can help me. Also the DVD drive was replaced cause it didn't work. It plays but it won't eject the DVD. It only ejects when it's tilted.
Yuuuuuuuuuuuuuupiiiiiiiiiii :) great guide
can we use logic board from imac 21.5 late 2012 to replace the one in imac 21.5 mid 2010? or even more put all internal thing from imac 21.5 late 2012 into imac 21.5 mid 2010 aluminium case?
The 2011 board may be compatible with the 2010, but the 2012 was completely redesigned and won’t work.
Thank you so much for this post! Especially picture # 23 - goofed here and missed the fact that we inserted the MIC cable into the ODD connector - they actually fit. Never did turn on it till we resolved this error. Your picture is the only we could find to determine our mistake. Many thanks !!
Before beginning unplug your iMac.
Henry Barnett - Replica
The screws are not phillips #1 as implied above. My phillips#2 bit fit.
John McWilliams - Replica
Yes phillips #2 is the correct Bit
Heath - Replica
Whenever I go this “deep” into any computer that has a motherboard battery, like the CR2032 for this iMac, I’ll add a new battery to my workflow. I’m in the “neighborhood” anyway.
The battery is in a spring-loaded compartment, which requires patience and persistence.
I make sure to test the new battery before installation. (The “3-2-1 Rule” applies: 3 of something means 2, 2 means 1, and 1 means none - I keep spare batteries on hand.)
When I took part in my dual-drive adventure, I also added a thorough dusting (outside/outdoors) - phew!
Carrick - Replica