Introduzione
Segui questa guida per sostituire la scheda madre nella tua Xbox One.
Ricordati che separare il dissipatore dalla CPU compromette la pasta termica originale. Dovrai pulirla e sostituirla con della nuova. Leggi questa guida per le indicazioni su come fare.
Cosa ti serve
-
-
Per aprire la tua Xbox, dovrai tagliare o rimuovere il sigillo di garanzia. Ma non preoccuparti: Microsoft, in base alla legge, non può invalidare la tua garanzia, a meno che tu non danneggi qualcosa. Divertiti!
-
-
-
Usa uno strumento di apertura in plastica per sollevare e rimuovere la griglia di ventilazione che circonda la porta USB laterale.
-
La griglia di ventilazione è piuttosto flessibile flessibile ed è tenuta in posizione da deboli clip in plastica - inizia a far leva dalla parte posteriore per staccare la griglia.
- 플라스틱 오프닝 도구를 애용해서 측면 usb 포트를 둘러싼 통풍구를 들어올려 분리하세요.
- 이 통풍구는 무척 유연하며 연약한 플라스틱 클립으로 고정되어 있습니다. 뒤쪽에서부터 들어올려 분리하고 떼어냅니다.
-
-
-
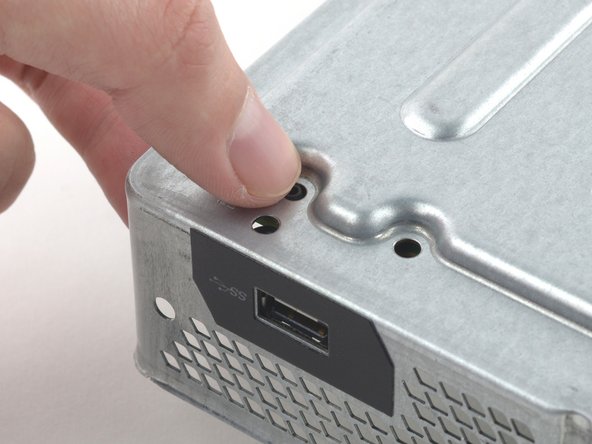
Fai scorrere la linguetta verso il retro della console e rimuovila.
Here is What's Stated in Step-3 : (There is a small plastic tab that reinforces the front corner of the Xbox.) Actually, the "Tab" is NOT SMALL at all. See the Picture: The "TAB" is the Piece that this Person has their Thumb on, is the Tab that you NEED TO SLIDE TOWARDS THE "REAR" of the Unit. You will be able to tell How this Large Tab Holds the Top and the Bottom Case Covers together. Take Note how to Replace this tab back where it Belongs, when you are putting the Case Covers back together. Hope that this comment will help you. 6-29-2017
- xbox의 전면 모서리를 지지하는 작은 플라스틱 탭이 있습니다.
- 뒤쪽으로 똑바로 밀어서 제거하세요.
What is this small tab referred to as?
What is it called i need to order one.
-
-
-
Inserisci la parte piatta di uno spudger tra la parte superiore e quella inferiore della scocca, nel punto punto dove si incontrano sul retro dell'apertura della ventola laterale.
prying does not work. my spudger is causing damage. my soft. plastic. spudger. and the %#*@ thing does not move. this is a common issue with the instructions on this site. you write instructions like you assume people have extensive repair experience. describe the plastic tab. add detail. because simply prying WILL damage the case. hire a %#*@ writer. cause you guys do not know how to precisely convey important detail. constant problem with tech companies actually. no writers.
- 벗겨낸 통풍구쪽부터 상판과 하판 사이의 틈으로 spudger의 평평한 끝을 밀어넣습니다.
- 플라스틱 클립들이 꽤 강하기 때문에 생각보다 강한 힘을 사용해야 합니다.
- 케이스를 완전히 열 때까지 spudger를 계속 끼워두세요. 클립이 강해서 작업도중 다시 닫힐 수도 있습니다.
it would be very very nice that the part, that you sell, will Fix. This an ols Tutorial. The new opening tools that you sell, will not help anything, cause there is no flat sign on the side. you link these tools at this tutorial, but never tested, if the new tools work. so i tell this you, no they dont fit. Thanks for nothing.
I ve made it this far with only a Lego membership card and a flimsier amusement park card (I'm a big year old)
I had to use a 1/32nd flathead screw driver. In the corner to get it started push the top joint of the case down and up will simultaneously pulling up and down to seperate the seam. You will need a 3rd hand to insert the 1/32nd flathead and pry up to get the case started.
I had a virgin never opened xbox day one og so that might be why I had to do it this way.
even the wikihow instructions are better
It’s easier if you push the top empty area part of the plastic with your finger, and stick the spudger about 3/4” (2 cm) away from the back of the xbox and start prying. You have to do this because that is the only spot where there are no clips in the way. If you do any less or more distance, the clips are in the way, and you’ll never be able to pry open the Xbox because the tool can’t get in.
A youtube video I found explains this step better. You are meant to pull up on one half and push down on the other, this separates the two halves. Then use a spudger on the rear of the console to separate the clip right under the warranty sticker, then move down the back of the console to the other clips
-
-
-
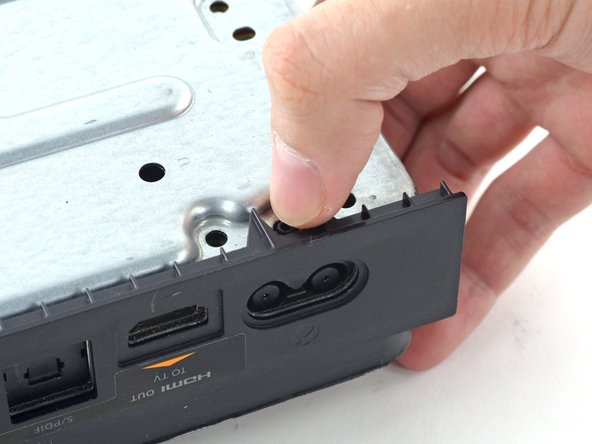
Inserisci uno strumento di apertura in plastica tra la parte superiore e quella inferiore della scocca per separare le clip sopra la ventola posteriore.
- 상판과 하판 사이에 끼인 후면 단자판은 여러개의 클립으로 고정되어 있습니다.
- 플라스틱 오프닝 도구로 후면 통풍구의 클립들을 분리하세요.
-
-
-
Continua a muoverti lungo la parte posteriore della Xbox sollevando le clip.
- 후면을 따라서 계속 클립을 들어서 분리하세요.
- spudger가 제대로 꽂혀 있는지 중간중간 확인하세요. spudger가 빠질정도로 케이스가 분리 되더라도 남은 클립들이 매우 탄력적이라서 방심하면 도로 닫히기 십상입니다. 원활한 진행을 위해 spudger가 잘 꽂혀서 사이를 벌리도록 유지하세요.
-
-
-
Continua a staccare le clip. Può essere utile far scorrere sulle linguette lo strumento di apertura in plastica.
- 클립들을 계속해서 분리합니다. 클립들을 가로질러 플라스틱 오프닝 도구를 주욱 미는 것이 도움이 될수도 있습니다.
- 후방 케이스를 따라 분리하면 상판이 열릴 기미가 보여야 합니다. 만약 열릴 기미가 보이지 않는다면 모서리부터 플라스틱 오프닝 도구로 분리를 시작하고 usb포트가 없는 쪽을 따라서 클립 분리를 다시 시도하세요.
-
-
-
Partendo dallo spudger che hai inserito nello spazio tra le due parti della scocca, solleva la parte superiore della scocca per liberare le ultime clip.
-
Solleva un po' la copertura superiore e falla scorrere per liberare l'accesso al pannello di controllo frontale.
I got confused here. I couldn’t unclip the front panel at all. I found out that if I open the case like a clamshell (or a book, with the front being the spine of the book) I popped right off easily.
Yeah, I saw your comment afterwards but this is exactly what I ended up doing as well. just a note for anyone reading this be careful of the flex cable as it does seem to put a questionable amount of strain on it when you open it in this manner.
-
-
-
Usa una pinzetta per sollevare la copertura blu di plastica sopra il connettore bianco sulla scheda.
-
Usa la punta di uno spudger per premere il meccanismo di chiusura del connettore verso il cavo per sbloccarlo.
Or anyone else who has this problem or reads this on this thread, which is not the correct thread for this question by the way, here is a link to the forum for that. It could be any of a number of issues including overheating, Portland elation, or infestation, among others.
Is there somewhere that I can buy a replacement zif connector
-
-
-
Usa delle pinzette per tirare il cavo del connettore fuori dalla scheda della console.
-
Rimuovi il case superiore.
-
-
-
Usa la parte piatta di uno spudger per liberare le linguette che collegano la parte frontale del pannello superiore al case superiore.
-
Rimuovi il pannello frontale dal resto del case superiore.
-
-
-
-
Tieni il pannello frontale vicino alla parte anteriore dell'Xbox.
-
Usa delle pinzette per sostituire il cavo del pulsante frontale nel suo socket ZIF.
-
Usa la parte piatta di uno spudger per premere la chiusura dello ZIF a sinistra per fissare il cavo.
My Xbox stopped working after this thanks
Mine did as well, its possible it may be the same reason. For me I had to unplug and plug it back in a few times and then clean off the contacts with isopropyl alcohol. Seems simple but if you haven’t already, I would try it.
-
-
-
Con il pannello frontale ad un angolo di 45 gradi, chiudi i ganci di plastica su quelli del case inferiore.
-
Premi la parte superiore del pannello frontale nell'Xbox, come per chiudere un cassetta delle lettere. Premi con decisione così che le clip del pannello frontale al case superiore si chiudano in maniera sicura.
-
-
-
Disconnetti delicatamente il cavo della cassa dalla scheda anteriore.
-
Usa il lato piatto di un paio di pinzette per scollegare il cavetto dell'antenna dalla scheda del pannello frontale.
If this connector is broken off, will that prevent the control panel to not work at all and NOT turn on? Is there a fix or work around IF this connector is broken off?
-
-
-
Rimuovi le due viti Torx T9 da 9,5 mm dalla scheda Wi-Fi.
-
Solleva il modulo Wi-Fi dal suo alloggiamento nella parte superiore della scocca metallica.
-
Lasciando dov'è l'antenna della scheda Wi-Fi, sposta leggermente la scheda, fino a scoprire la vite etichettata come "C3" che si trova al di sotto di essa.
When reassembling- put the outer ones on first to secure the port to the metal. Then putting the wi-fi board into the port will be easy
The T9 fit but was a tad big, for me the T8 worked fine
Where can i get a T9
-
-
-
Rimuovi le otto viti Torx T10 da 65 mm dalla parte alta del case metallico superiore.
-
-
-
Solleva - ma non rimuovere - la scocca superiore in metallo.
-
-
-
Scollega dalla scheda madre sia il cavo di alimentazione sia il cavo dati SATA dell’hard disk.
I found that it is not necessary to take out the hard drive in order to remove the front panel module. If you can lift the whole metal enclosure a little to get to the right most torx screw, then you do not need to move the hard drive.
Thanks for letting us know about when the open day is going to be. Will make sure get my work completed by rushmyessay before the day so I can attend it in peace.
-
-
-
Scollega i cavi di alimentazione e SATA del lettore CD dalla scheda madre.
I their a way to replace the motherboard pins the piece that connects to the hard drive, part on the motherboard that connects to HD
-
-
-
Solleva il gruppo della scheda madre dalla copertura inferiore.
-
-
-
Schiaccia le alette una verso l'altra e sfilale dal telaio per rimuovere i supporti.
-


Per rimontare il tuo dispositivo, segui le istruzioni in ordine inverso. Non dimenticarti di applicare un nuovo strato di pasta termica sulla CPU. Segui questa guida per vedere come fare.
Per rimontare il tuo dispositivo, segui le istruzioni in ordine inverso. Non dimenticarti di applicare un nuovo strato di pasta termica sulla CPU. Segui questa guida per vedere come fare.
Annulla: non ho completato questa guida.
Altre 56 persone hanno completato questa guida.
Un ringraziamento speciale a questi traduttori:
100%

Questi traduttori ci stanno aiutando ad aggiustare il mondo! Vuoi partecipare?
Inizia a tradurre ›

7 Commenti
Quick question. After reassembly do you need to reinstall an operating system or update anything thing or does the hard drive just go oh look new stuff yeah that's fine.
It depends - the hard drive needs to have it’s operating system files up to date to match whatever is flashed onto the motherboard. If the two dont match you get error E106. You can solve this https://support.xbox.com/en-US/xbox-one/...
My Xbox 1 will turn on and within 2 mins or less back off on it's on. I know for a fact it's not the power source, brick or cords. They work on another console. Any info would be awesome. Thanks!
Brian, same issue here. I replaced capacitors on my brick last year and works on another console. I have tried numerous reset options as well. I opened up and cleaned dust out with air compressor and 99% isopropyl alcohol. I also replaced the thermal paste on the processor and removed old paste carefully with alcohol. It still does the same thing like yours above. Turns on, fan turns on, no display, then turns off within 1-2 minutes. None of what I did above changed it, so decided between replacing motherboard or hard drive. I have my Xbox connected to external USB SSD, but still no avail. Not sure if my external had the OS on it though.
Have any of you had issues even after replacing the motherboard? Like, did it go out on you a couple months later? Did it still run the same? Time sensitive question please answer, thanks! Can't keep checking, o if you have an answer please contact me on Instagram at ugli_boi99
Can any1 tell me if a company replaces the mother board on a xbox one will it erase my game files and data
Does this help with xbox 1s as well? And does it require soldering.
In the United States the Magnuson-Moss Warranty Act of 1975 is a Federal Law that states that stickers and clauses are illegal. It says you can open your electronics without voiding the warranty, regardless of what language of that warranty says.
Dustin D'Amour - Replica
Stickers are illegal!?
Brandon -
For anyone concerned, if you apply heat with a blow dryer or heat gun you can carefully remove the sticker without damaging it, making it impossible to know that the sticker was ever removed.
Kelton Stewart - Replica
All the immature comments aside, thank you Dustin for sharing the information.
Wade - Replica
xbox를 열기 위해서 이러한 위조방지 테이프를 자르거나 떼어내야 합니다. 하지만 걱정 마세요. 여러분이 무언가 직접적으로 망가트리지 않는한 ms는 보증을 취소하지 않습니다.
승대/SeungDae 정/Jeong - Replica