Introduzione
Segui questa guida per sostituire la scheda madre del Microsoft Surface Pro 4.
C'è una buona probabilità che tu rompa il pannello dello schermo non rinforzato e delicato durante questa procedura. Assicurati di scaldare a sufficienza ed essere molto attento mentre tagli l'adesivo. Indossa degli occhiali protettivi nel caso il vetro si rompa.
Applicare della nuova pasta termica durante il rimontaggio potrebbe migliorare le prestazioni del tuo Surface. Se vuoi farlo, assicurati di avere della nuova pasta termica e dell'alcool isopropilico ad alta concentrazione o un solvente specifico per la pasta termica.
Cosa ti serve
-
-
Se il tuo schermo è crepato, evita che si rompa ulteriormente e di farti male facendo aderire del nastro al vetro.
-
Fai aderire delle strisce di nastro adesivo trasparente che si sovrappongono sopra lo schermo del Surface fino a coprirlo del tutto.
-
Fai del tuo meglio per seguire il resto di questa procedura come descritta. Comunque, dopo che il vetro si è rotto, continuerà a creparsi mentre lavori e potresti dover usare uno strumento in metallo per rimuovere il vetro.
-
-
-
Scalda un iOpener ed appoggialo al bordo destro dello schermo del Surface per due minuti.
I have done dozens of Surface Pro tablet repairs; if your screen is cracked or chipped AT ALL, you WILL make it worse. Plan on replacing it. Even if it's not cracked or chipped, the likely hood of removing this screen without damage (LCD separation or heat marks in the corners) is very low. Ive tried everything from hot plates to heat mats and the iOpener and nothing is reliable enough. I found that using my Warner heat gun set at 800*c and working on half an edge at a time with a LOT of 91% alcohol in a drip bottle along the edge, along with a very thin guitar pick (not the ones sold here, they are too thick) is the trick to loosening the glue. Work on the side and bottom first. The top is going to be the hardest as the adhesive will stick to the wifi/bluetooth antenna and you WILL tear them (Ive had to replace a fair amount of them). There's a delicate trick to doing it, but it's too hard to describe. If you've never done this repair before, I do not recommend it; find a professional.
Hi, thanks for the information, Very valuable.
I'm about to do this because my battery and fan aren't working.
There's no way anybody can fix it properly near me. Got any other tip to try not to break the screen and or any flex?
I've done works like this on small tablets and phones, but never this pc. I'll try to go slow.
Thanks again for your experience information.
-
-
-
Prendi nota della disposizione dell'adesivo dello schermo prima di continuare:
-
Queste zone contengono solo dell'adesivo e puoi tagliare in sicurezza.
-
La scheda e i cavi a nastro dello schermo sono qui, vicino al bordo. Taglia con attenzione e non infilare il plettro per più di 3 mm.
-
I delicati cavi dell'antenna sono sotto questa zona dello schermo. Segui attentamente la procedura al passo 13 per evitare di danneggiarli. L'adesivo qui è più spesso.
The bottom red section is narrow and not as thick as the bevel indicates. I went too deep with my tool and cut through a ribbon thinking that I could send my tool as deep as the black bevel edge. its like half that.
I did a screenshot of this image to always see it while progressing through the steps and did exactly the same mistake. I read every comment in the steps below but yours only now :( On my device it's 5mm from the edge of the screen glass to the ribbon.
I cut through as well, but was able to carefully solder the edges together enough to make a connection - works fine.
-
-
-
Infila un plettro nell'apertura dello speaker in alto a destra nello schermo e fallo scorrere tra il vetro e la griglia dello speaker.
-
-
-
Fai scorrere il plettro sotto il bordo destro del Surface per tagliare l'adesivo sotto lo schermo.
-
Lascia questo plettro infilato sotto il bordo destro per evitare che l'adesivo si reincolli.
-
-
-
Riscalda il tuo iOpener ed applicalo al bordo inferiore dello schermo del Surface per due minuti.
-
-
-
Infila un altro plettro sotto l'angolo in basso a destra e fallo scorrere attorno all'angolo, verso il bordo inferiore.
-
Fai scorrere il plettro sotto il bordo inferiore del Surface per tagliare l'adeesivo dello schermo.
-
Lascia questo plettro infilato sotto il bordo inferiore per evitare che l'adesivo si reincolli.
Yep. I scratched the corner of the LCD with the pick. Take the warning seriously folks! It’s really easy to do.
The warning says to not insert it more than 12mm but it should be not more than 5mm. There is a ribbon/display connection at the bottom and i damaged it.
-
-
-
Scalda di nuovo il tuo iOpener e applicalo al bordo sinistro dello schermo del Surface per due minuti.
-
-
-
Infila un altro plettro sotto l'angolo in basso a sinistra e fallo scorrere attorno all'angolo, verso il bordo sinistro.
-
Fai scorrere il plettro sotto il bordo sinistro del Surface per tagliare l'adesivo dello schermo.
-
Lascia questo plettro infilato sotto il bordo sinistro per evitare che l'adesivo si reincolli.
-
-
-
Scalda di nuovo il tuo iOpener e applicalo al bordo superiore dello schermo del Surface per due minuti.
-
-
-
Fai scorrere il plettro attorno all'angolo sinistro e sotto il bordo superiore del Surface. Fermati quando il plettro è a 7,0 cm dal bordo sinistro.
The right antenna is kind of P shaped (rotated 90° to the right) with the small end facing the middle. I'd suggest to stop at the middle when loosening the left antenna and to do the same thing coming from the right.
-
-
-
Infila la punta di un plettro sotto lo schermo dove ti sei fermato nel tagliare. Non infilarlo più a fondo del bordo della cornice.
-
Ruota attentamente il plettro verso destra, premendo il lato lungo del plettro nell'adesivo dello schermo sotto la cornice, tagliando l'adesivo mentre procedi. Non far scorrere il plettro lungo il bordo del Surface.
-
Ripeti questa procedura di inserimento del plettro dove hai appena tagliato e rotazione verso destra sotto tutto il bordo superiore del Surface, finché il plettro si trova a 64 mm dal bordo destro del Surface.
Bij mijn exemplaar bleek het onmogelijk om de bovenrand volgens de aanwijzingen los te maken. Ik heb de boel vele keren opgewarmd en ben meerdere malen met het plectrum langs de rand gegaan. Maar er beleef iets hardnekking vastplakken. Ik moest uiteindelijk de lijmverbindingen los maken zoals bij de andere randen. Achteraf bleek dat bij het gedeelte waar de antennes zaten het frame en het scherm volledig met elkaar verlijmd zaten met de antennes er tussen. Dat kostte me uiteindelijk de antennes. Gelukkig geen schade aan andere zaken. Niet zo'n grote ramp want ik kon nog antennes bestellen. Maar hou er rekening mee.
-
-
-
Solleva molto lentamente il gruppo dello schermo dalla copertura del Surface. Se incontri della resistenza, fermati e controlla che tutto l'adesivo sia tagliato.
-
Usa un plettro per tagliare tutto l'adesivo rimasto.
-
-
-
Solleva la parte superiore del gruppo dello schermo dal case mentre fai scorrere la parte inferiore dello schermo verso i connettori della scheda madre.
-
Appoggia delicatamente lo schermo sul case con i connettori rivolti verso l'alto. Stai attento a non piegare i cavi dello schermo.
-
-
-
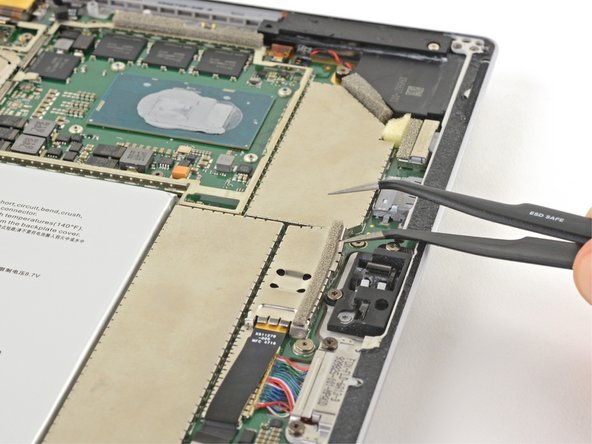
Usa la punta di un paio di pinzette per fare leva sulla schermatura EMI dalle aperture tra i "denti".
-
Ripeti questa procedura a diversi punti attorno al perimetro della schermatura finché non l'hai liberata.
-
-
-
-
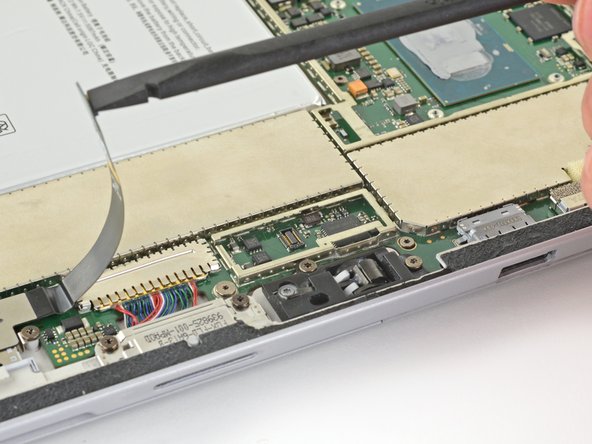
Usa le pinzette per rimuovere le due schermature EMI che coprono i connettori dei cavi dello schermo.
-
-
-
Rimuovi lo schermo dal Surface.
-
Durante il rimontaggio, fermati qui e segui questa guida per sostituire l'adesivo dello schermo.
-
-
-
Utilizza un cacciavite Torx T5 per rimovere le quattro viti da 4,5 mm che tengono in posizione la staffa di supporto per l'antenna
This screw bit was not included in the battery replacement kit. Only Philips and Flathead were included.
This Torx bit was not included in the battery replacement kit. Only a Philips and Flathead bit
-
-
-
Rimuovi la staffa di supporto per l'antenna con cautela.
I had ripped through 2 of the 3 antennas when cutting through the top adhesive. Not sure how anyone removes this display without ruining at least one of them.
I saw on Reddit this post: https://www.reddit.com/r/techsupportmacg...
It works perfectly! My wifi was one that was cut. It’s now made of aluminum foil and is pulling down 147Mbps and pushing 80.88Mbps up.
A ce stade il semble important de faire attention au micro. Pour ma part, il avait un résidu de colle entre celui-ci et le support à retirer.
On my device the mic is glued to the antenna board. I'd recommend to detach it's ribbon cable from the motherboard before removing the antenna board
-
-
-
Infila una punta di un paio di pinzette appuntite in una fessura nell'angolo della schermatura EMI che copre il dissipatore.
-
Usa le pinzette per fare leva e sollevare la schermatura EMI dalla scheda madre il più possibile senza piegarla. Per ora non rimuoverla.
-
Stai attento a non forare la batteria con le pinzette mentre lavori sulla schermatura.
-
-
-
Usa un cacciavite Torx T3 per svitare le due viti dal dissipatore:
-
Una vite da 2,4 mm lungo il bordo superiore della placca rettangolare che copre la batteria
-
Una vite da 2,2 mm lungo il bordo inferiore della placca rettangolare che copre la batteria
La première vis de 2,4 est une Torx 4, pour ce qui me concerne et non pas une Torx 3.
Attention la deuxième vis est bien une TORX 3
Remarque : La boite à outil "Essentiel electronics Toolkit - Grade B (ref EU145571-1)" ne contient pas l'embout T3
Pour ma part j'ai utilisé donc le T4 en forçant un peu. Pas cool ;-(
-
-
-
Usa un cacciavite a croce Phillips per svitare le tre viti da 2,4 mm che tengono ferma la ventola.
-
Usa un cacciavite Torx T5 per svitare l'ultima vite da 4,4 mm che tiene ferma la copertura della ventola.
These screws were in a different area on my Surface, Pro 4 bought at release. The fan was visible and attached to the heat sink. Remove the two torx screws on the fan housing. No need to remove the Philips head screws that secure the fan.
Sorry I’m super brand new to the game. I don’t know the difference between 1.5mm Torx T4 and 3.0mm Torx T4. I look under tools I need to buy, and the tool kits only say Torx T4 or T5, without the milimeters dimensions.
Je fais écho au commentaire de vennic, les longueurs indiqués en mm sont les longueurs des vis et n’impactent pas les tournevis à utiliser. Bien ranger les vis par longueur permets de mettre les bonnes vis aux bons endroits lors du remontage de l’appareil.
Cajuteq -
The fan connector on mine was held in place by a white clamp on the side closest to the middle of the chassis. The long edge toward the middle flips up to vertical. That frees up the fan connector. Likewise for the black “wire” connector right beside it.
As previously mentioned, the fan should be disconnected (look at step 36) BEFORE you remove the fan/heat sink assembly. Ive done DOZENS of these repairs and the fan has always been part of the heat sink assembly.
I did all of this, now surface won't turn on. Any ideas?
-
-
-
Usa un cacciavite Torx T5 per svitare le viti del dissipatore attorno alla CPU nel seguente ordine, un giro alla volta, finché non sono svitate:
-
Vite 1
-
Vite 2
-
Vite 3
-
Vite 4
-
Durante il rimontaggio, usa lo stesso metodo per avvitare queste vite, avvitandole una giro alla volta finché non sono salde.
These screws were T5 Torx in mine, not T3 as in the instructions.
T5 Torx screwdriver is correct.
T4 Torx for me.
What does one turn at a time mean?
One turn for the "red" screw, one for the orange, one for the yellow, then green and now again one turn red, orange, yellow, green ... This cross pattern distributes the pressure evenly .
VauWeh -
I think I need a T6 torx screw the screwdriver is not working for these screws
-
-
-
Usa la parte piatta di uno spudger per sollevare delicatamente il dissipatore dalla CPU.
-
-
-
Infila la punta di uno spudger in un foro delle viti nella copertura della ventola e sollevala per separarla dalla ventola.
The fan should be disconnected (look at step 36) BEFORE you remove the fan/heat sink assembly. Ive done DOZENS of these repairs and the fan has always been part of the heat sink assembly.
These instructions were correct for my Surface. The fan cover was attached to the heatsink but the fan was not.
-
-
-
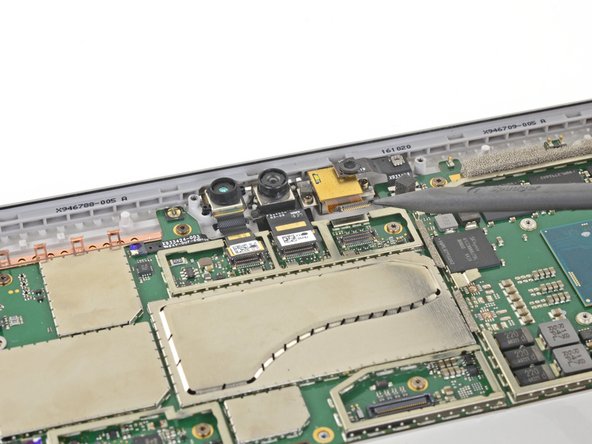
Infila una punta di un paio di pinzette appuntite in una fessura nell'angolo della schermatura EMI che copre i connettori della fotocamera.
-
Usa le pinzette per fare leva e sollevare la schermatura EMI dalla scheda madre il più possibile senza piegarla.
-
Rimuovi la schermatura EMI.
-
-
-
Fai leva con la punta di uno spudger per scollegare tutti i tre cavi delle fotocamere dalla scheda madre.
Missing the part to disconnect the ribbon to the left of the cameras, luckily, it disconnected by itself when I removed the motherboard.
Yes that's very important (white and blue socket on photo) !
I forgot to reconnect it on reassembly (unluckily, it doesn't reconnect by itself ;o)
Phil68 -
-
-
-
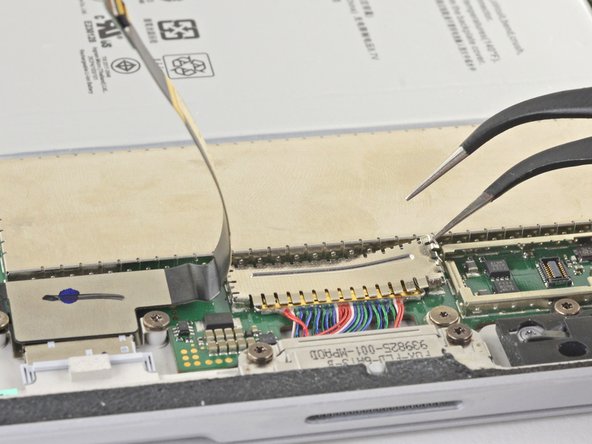
Usa la punta del tuo spudger per sganciare il connettore ZIF che tiene fermo il cavo dei tasti del volume/di accensione.
-
Sfila delicatamente il cavo dei tasti del volume/di accensione dal connettore ZIF.
While you're here, you'll want to disconnect the ZIF connector directly opposite from this one, which can be seen in the lower right of these photos, nearer the camera cable connection points. The guide doesn't mention removing that cable, but you'll need it removed before you can lift out the motherboard.
-
-
-
Infila la punta dello spudger tra i cavi dello speaker e la scheda madre fino a toccare il connettore del cavo dello speaker.
-
Prestando attenzione, fai leva sul connettore del cavo dello speaker per scollegarlo dalla scheda madre.
1. the picture can be misleading
2. use the flat end instead or you might damage the plastic part of the connector. see Microsoft Surface Pro 4 Sostituzione dell'altoparlante sinistro.
-
-
-
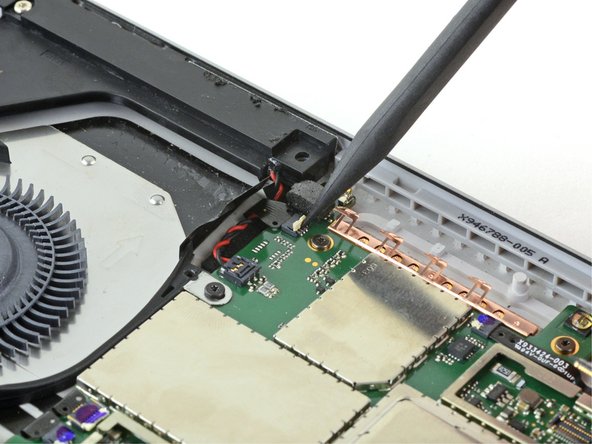
Usa la punta del tuo spudger per sganciare i connettori ZIF della ventola e della presa jack.
The fan should be disconnected when you removed the fan/heat sink assembly in Step 29 (which is NOT mentioned).
-
-
-
Usa la punta del tuo spudger per sfilare delicatamente i cavi della ventola e della presa jack dalle loro prese ZIF.
The fan should be disconnected when you removed the fan/heat sink assembly in Step 29 (which is NOT mentioned).
-
-
-
Usa un cacciavite Torx T3 per rimuovere queste vite dalla ventola:
-
Una vite da 2,5 mm
-
Due viti da 2,4 mm
I didn't realize that one screw (red) here was different, and it looks like I put it in a different place during assembly, and the remaining screw, of course, did not hold. Be careful with the screws!
I have a question: can I buy a set of these screws for Surface Pro 4 to change the spoiled ones? I noticed that sometimes they get damaged on top and it is difficult to screw them on afterwards.
-
-
-
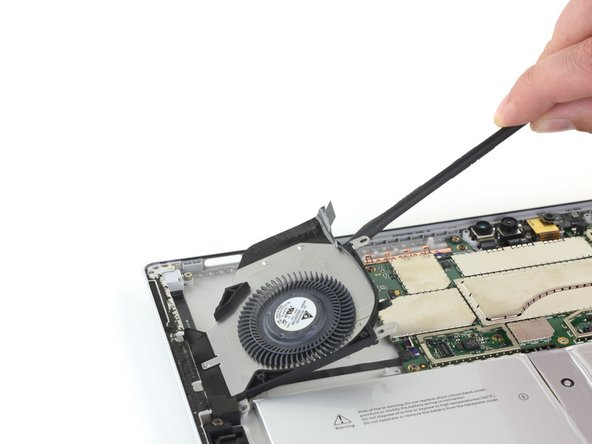
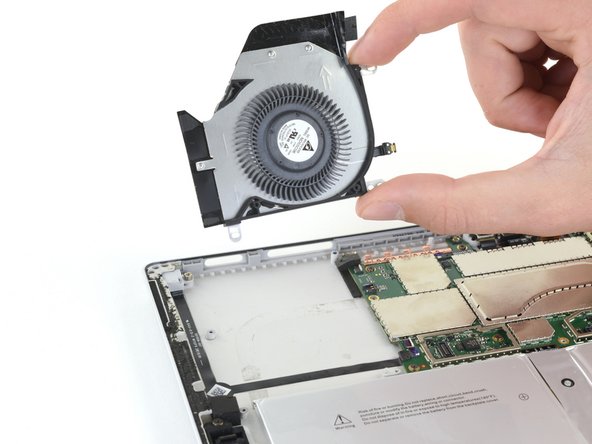
Usa uno spudger per sollevare un lato della ventola.
-
Prendi la ventola e rimuovila.
-
-
-
Infila una punta di un paio di pinzette in una fessura nel bordo della schermatura EMI che copre il cavo ed il connettore del lettore della scheda microSD.
-
Usa le pinzette per fare leva e sollevare la schermatura EMI dalla scheda madre il più possibile senza piegarla.
-
Rimuovi la schermatura.
-
-
-
Usa la parte piatta del tuo spudger per sollevare il connettore del lettore della scheda microSD dalla sua presa.
-
Solleva il cavo del lettore della scheda microSD e spostalo dalla schermatura EMI che copre il gruppo della ricarica.
It's probably best to remove the microSD card reader at this point. The guide never states to remove it, but it eventually disappears from the photos. Two T5 screws are all that are holding it down. Easier to take those out and remove the assembly than to try to remove the EMI shield underneath while also holding the ribbon cable out of the way.
Not necessary to remove the reader. When reinserting the motherboard, you can slide it easily enough underneath it. It may make it easier, but isn't necessary.
A ce stade, la nappe était coller sur le blindage. Pour ne pas trop plier la nappe, j'ai poussé la spatule. La colle n'était pas trop résistante.
-
-
-
Infila una punta di un paio di pinzette in una fessura nel bordo della schermatura EMI che copre il connettore del gruppo della ricarica.
-
Usa le pinzette per fare leva e sollevare la schermatura EMI dalla scheda madre il più possibile senza piegarla.
-
Rimuovi la schermatura.
-
-
-
Usa la parte piatta di uno spudger per ruotare verso l'alto l'aletta di bloccaggio che tiene fermo il connettore del cavo del gruppo di carica.
-
-
-
Usa un cacciavite Torx T5 per rimuovere le due viti da 3,1 mm che tengono in posizione il lettore di schede microSD.
-
-
-
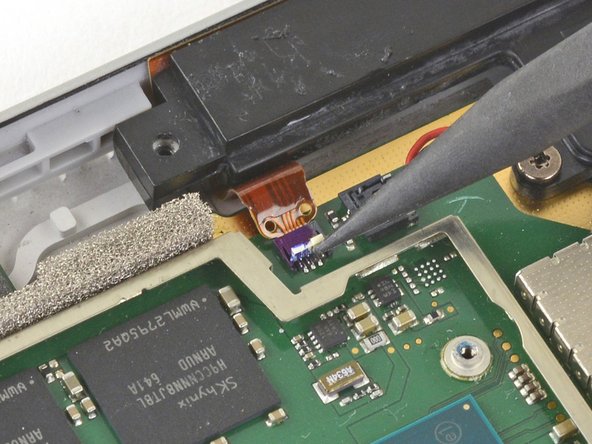
Usa la punta del tuo spudger per sganciare il connettore ZIF tra il processore e lo speaker destro.
-
Scollega il cavo dal connettore ZIF.
This one broke during reassembling, so I could not fix the connector properly. I tried to find out what it is, but the only hint I found was, that it is some kind of antenna. I could not find out what kind of antenna. Anyway, after completion everything I needed worked fine: Bluetooth and Wireless LAN. I appreciate any hint about the purpose of this antenna.
That's my question too
Mj Ro -
Perhaps one of the two WiFi frequencies (2.4 or 5 GHz)?
Phil68 -
-
-
-
Infila la punta di uno spudger tra i cavi dello speaker destro e la scheda madre fino a toccare il connettore del cavo dello speaker.
-
Solleva attentamente il connettore del cavo dello speaker per scollegarlo dalla scheda madre.
-
-
-
Usa un cacciavite Torx T3 per svitare le seguenti viti dalla ventola e dalla scheda madre.
-
Dieci viti da 2,4 mm
-
Due viti da 2,2 mm
-
Usa un cacciavite Torx T5 per svitare le due viti dello speaker destro:
-
Una vite da 4,2 mm
-
Una vite da 6,0 mm
Use a T5 Torx screwdriver to remove screw in left and right speaker.
BE CAREFUL! Use a T5 Torx screwdriver to remove an ADDITIONAL screw on the top corner of the right speaker. It should not take a tremendous amount of force to remove the speaker.
This screw is in the frame of the SP4. Mine was a T3.
An additional screw has been marked up and added to the original photo regarding the issues with the right fan removal. Thanks to the community for the feedback!
-
-
-
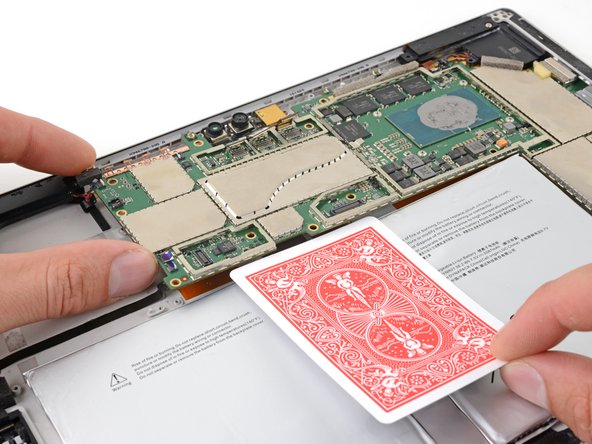
Solleva leggermente il lato sinistro della scheda madre.
-
Metti un carta da gioco o qualcosa di simile tra la scheda madre e il connettore.
-
-
-
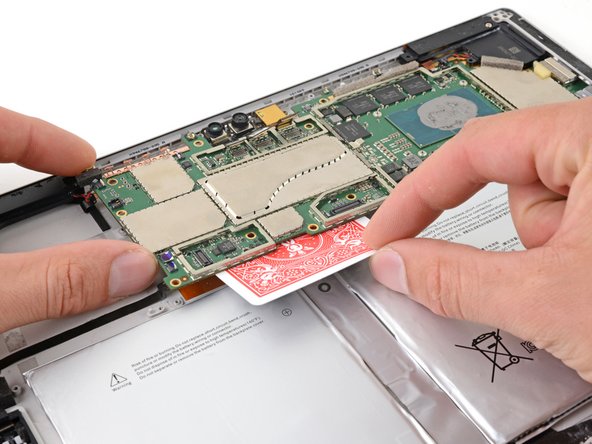
Prendi la sezione stretta dello speaker destro e sollevala leggermente.
-
Sfila lo speaker destro dalla copertura.
-
Rimuovi lo speaker destro.
I didn’t read about the other T5 (about 6 mm) holding down the right speaker. It needs to be removed prior to this step.
You also need to remove a screw in the top right corner of the speaker
Yup there is an unmentioned t5 screw that the other comments catch
-
-
-
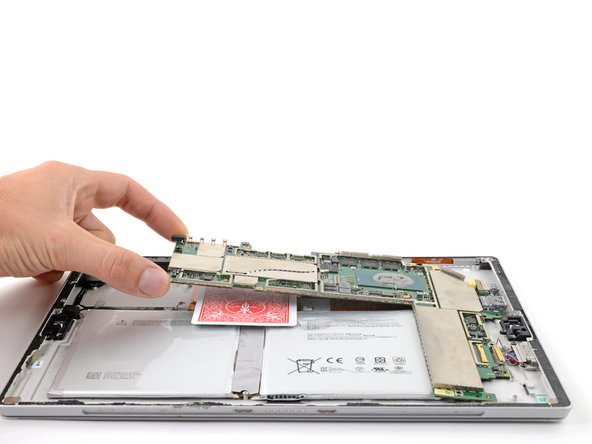
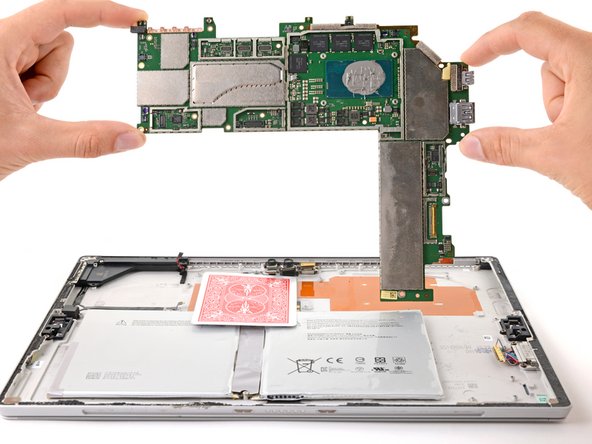
Rimuovi la scheda madre prima sollevando il lato sinistro ad un angolo di circa 30 gradi.
-
Sfila delicatamente le porte I/O sulla scheda madre dalle loro aperture e rimuovi la scheda madre.
There seems to be an additional ZIF connector by the Left most camera that also needs to be disconnected. Beware.
Also, the micro SD reader obstructs a little bit (at bottom right )as you remove the motherboard.
-


Per rimontare il tuo dispositivo, segui le istruzioni in ordine inverso.
Porta i tuoi rifiuti elettronici a un riciclatore certificato R2 o e-Stewards.
La riparazione non è andata come previsto? Prova delle soluzioni di base ai problemi, oppure rivolgiti alla nostra comunità Risposte per trovare aiuto.
Annulla: non ho completato questa guida.
Altre 3 persone hanno completato questa guida.
Un ringraziamento speciale a questi traduttori:
100%


Questi traduttori ci stanno aiutando ad aggiustare il mondo! Vuoi partecipare?
Inizia a tradurre ›

3 Commenti
awesome info; used it to strip four "broken" tablets and reassemble as three working tablets (Schottky diodes and bad batteries)
Un genio, paso por paso, muy didactico como pracico! Gracias por toda tu informacion me he dado cuenta que es un trabajo muy meticuloso y no es para andar a la apuradas! Realmente muchas gracias
If I have a screen protector on the screen should I remove it? Will it interfere with the heating process?
IronJoker - Replica