Introduzione
Segui questa guida per sostituire la scheda madre di un MacBook Air di fine 2020 (M1).
Ricordati che il Touch ID non funzionerà dopo aver sostituito la scheda madre. Il sensore del Touch ID originale del MacBook è associato esclusivamente alla scheda madre originale durante la produzione e, senza la procedura di associazione proprietaria di Apple, anche con una scheda madre originale di un altro MacBook Air non funzionerà.
Se sostituisci la scheda madre, dovrai installare un sensore Touch ID associato a quella scheda per continuare ad usarlo.
Cosa ti serve
-
-
Se il tuo MacBook ha installato Big Sur v11.1 o successive, potresti non riuscire a disabilitare l'Auto Boot. Puoi procedere normalmente, ma assicurati di scollegare la batteria non appeni riesci.
-
Usa un cacciavite Pentalobe P5 per svitare le seguenti viti:
-
Due viti da 7,9 mm
-
Due viti da 7,3 mm
-
Sei viti da 2,6 mm
-
-
-
Infila le dita tra lo schermo e la copertura inferiore e tira verso l'alto per rilasciare la copertura inferiore
-
Rimuovi la copertura inferiore.
-
Appoggiala in posizione e premila con decisione per agganciare i ganci nascosti al di sotto. Dovresti sentirli scattare in posizione.
-
-
-
Usa la parte piatta di uno spudger per sollevare e sganciare il braccio di bloccaggio in metallo sul connettore della batteria.
-
Tira verso l'alto il braccio di bloccaggio in metallo per scollegare il connettore della batteria dalla sua presa sulla scheda madre.
-
Se necessario, spingi prima il lato posteriore del connettore, quello con i fili, nella posizione iniziale, quindi fai oscillare la parte anteriore del connettore nella posizione corretta.
If having difficulty in flipping the bar up, place the machine vertical and not that there is a small “locking nib” that the bar has to clear. You may have to give the bar honest persuasion to clear the nib.
The bar can lock backwards making it very hard to even see let alone move. Great care is needed to shift it. I had to use two thumbnails, one on each side, then once flipped forward it takes more push than I expected to clip it in place. Ensure the plug is fully seated first !
-
-
-
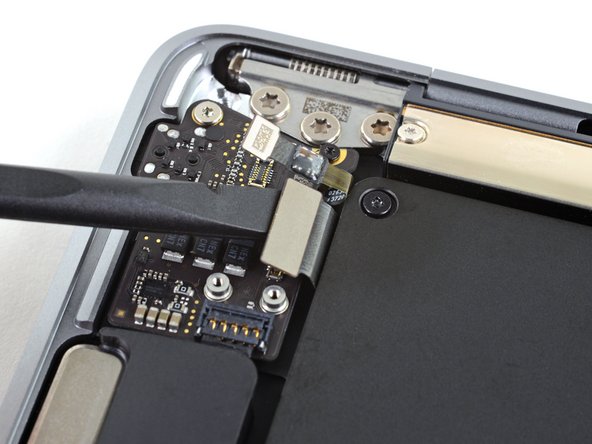
Usa un cacciavite Torx T3 per svitare le tre viti da 1,4 mm che tengono ferma la copertura del connettore della scheda audio.
-
-
-
Usa la parte piatta di uno spudger per sollevare il connettore della scheda audio e per scollegarlo dalla scheda stessa.
There is the smaller connector that’s not being mentioned. It’s the closest one to the hinges.It’s also part of the smaller audio board.
Lamajr, that small connector is for the Touch ID button and disconnecting it isn't necessary for removing the logic board only. If you're removing the audio board itself, steps for disconnecting that small cable can be found here. Happy fixing!
-
-
-
Usa un cacciavite Torx T3 per svitare le due viti da 1,4 mm che tengono ferma la copertura del connettore dell'USB-C.
-
-
-
-
Usa un cacciavite Torx T3 per svitare la vite da 1,4 mm che tiene ferma la copertura del cavo dell'antenna.
-
-
-
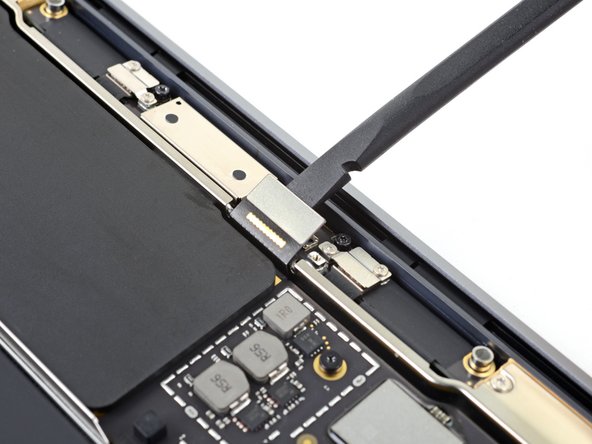
Usa un cacciavite Torx T3 per svitare le due viti da 1,4 mm che tengono ferma la copertura del cavo del trackpad.
-
-
-
Infila la punta di uno spudger sotto il cavo dello speaker sinistro e fai leva verso l'alto per scollegarlo dalla scheda madre.
Note that the perspective has shifted here and we're looking from the opposite direction than the rest of the guide.
-
-
-
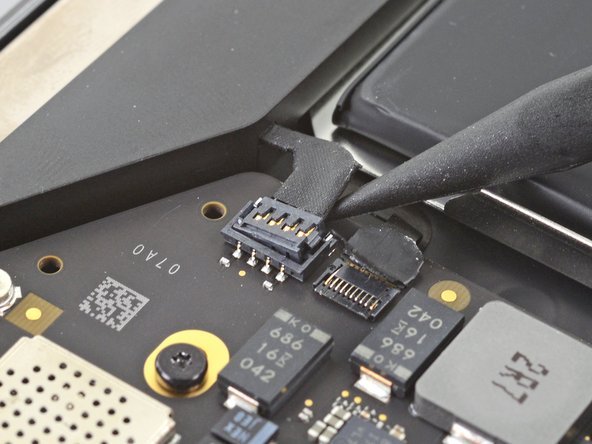
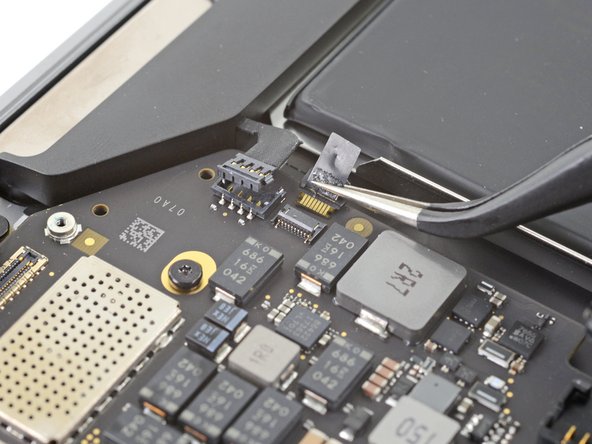
Usa un paio di pinzette per rimuovere il nastro che copre il connettore del cavo del microfono.
-
Usa la punta di uno spudger per ruotare verso l'alto la piccola aletta di bloccaggio sul connettore ZIF del cavo del microfono.
-
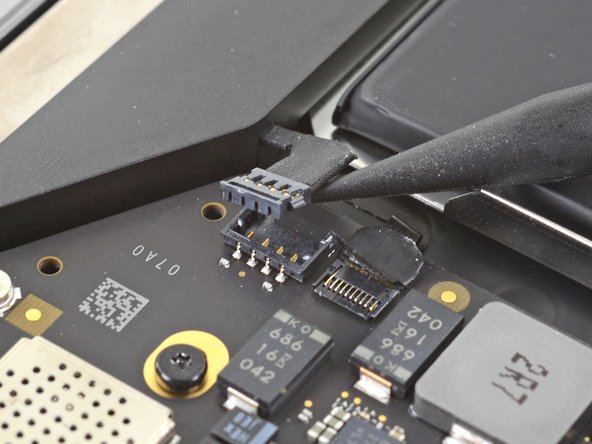
Sfila il cavo del microfono dalla sua presa.
-
-
-
Usa un cacciavite Torx T5 per svitare le sei viti che fissano la scheda madre alla copertura superiore:
-
Tre viti da 3,5 mm
-
Una vite a cuscinetto da 6,0 mm
-
Due viti da 3,4 mm
-
-
-
Cavo della batteria
-
Cavo della scheda audio
-
Cavo della scheda USB-C.
-
Cavi delle antenne
-
Cavo dello schermo
-
Cavo del trackpad
-
Cavi dello speaker sinistro e del microfono
I’m having an issue getting the last logic board screw out. Any tips?
Which one did you get to last? What kind of issue are you having?
I’m trying to reassemble but having a hard time reconnecting the microphone and trackpad cables. What should I do?
The trackpad cable is pretty straightforward, you just have to make sure it's aligned properly and press it down into the connector. The mic cable is a bit trickier if you've not dealt with this type of socket. The cable goes underneath the connector and the you have to pull it in as far as it will go. It's best to take a good look before you pull it out to see how far it needs to go into the connector (I believe this is a type of ZIF [zero insertion force} but it can take a decent amount of force at times, enough to break that little strip of plastic they give you to pull it into place).
Looking for the wifi component?
It's part of the logic board, there's no replaceable component (sadly).
-


Confronta la tua parte di ricambio con quella originale: potrebbe essere necessario il trasferimento di alcuni componenti o la rimozione di protezioni adesive dalla nuova parte prima di installarla.
Per rimontare il tuo dispositivo, segui le istruzioni in ordine inverso.
- Una volta completata la riparazione, il tuo laptop potrebbe non accendersi fino a quando non è collegato all'alimentazione.***
Porta i tuoi rifiuti elettronici a un riciclatore certificato R2 o e-Stewards.
La riparazione non è andata come previsto? Prova delle soluzioni di base ai problemi, oppure rivolgiti alla nostra comunità Risposte per trovare aiuto.
Annulla: non ho completato questa guida.
Altre 28 persone hanno completato questa guida.
Un ringraziamento speciale a questi traduttori:
100%


Questi traduttori ci stanno aiutando ad aggiustare il mondo! Vuoi partecipare?
Inizia a tradurre ›


10 Commenti
Thank you
How do we access the data on a board that is not working due to corrosion ? We have been informed that the SSD is integrated in the board so until same is working we cannot access the data.
There used to be a data port on the board that needs a very special piece of equipment to access. You'd need to send it to data recovery, open your wallet very wide, and keep your fingers crossed. It looks like that port no longer exists? Your data is probably gone, but Apple saved you a lot of money on recovery services!
Looking for the WiFi component?
alguien sabe si existe un adaptador para este tipo placa logica a sdd para?
A strange question
Would you start a MacBook Air WITHOUT a battery, powering the board directly as if it were a desktop? 🤔
Does anyone know what voltage the battery cables provide?
Thank you.
It should power on without the battery connected. The voltage should be 20v.
Kann man wo die einzelnen Bauteile (ICs.,,) des Logic Boards kaufen?
Ich möchte mein Logic Board reparieren statt tauschen.
Is it possible to buy somewhere the parts of the logic board? I would like to repair my logic board, instead of replacing it.
ok si je ne change pas id touche celui-ci ne fonctionne pas ... mais il sert de bouton d,allumage aussi , celui-ci fonctionne t'il comme on/off
Bonjour @gedfr Oui, les fonctions "basiques" du bouton restent. Veuillez cependant toujours vérifier auprès du vendeur de la pièce quelles sont les fonctions garanties.
ESD safe mat, plugged into ground, with a wrist strap, also grounded, are the best best to protect the logic board.
Robin Ray - Replica
Re-Assembly Tip: Before putting the screws back in, snap the lower case on and test to make sure the MacBook powers up. When I first re-assembled, I became very nervous I did something wrong because it would not power on. It turns out I just needed to plug the laptop into a power source for it to power up (despite having a good charge before disassembly). It was the perfect way to test the new USB-C ports!
Austin - Replica
Big points to this one, especially for mentioning needing to plug the laptop in. The bottom case needs to be screwed in and laptop needs to be plugged in before it will boot.
Bayden Yazalina -
Wiha 4PL driver for these screws.
Greg Worrel - Replica
Printing out all the images from this Ifixit guide prior to starting and using duct tape help me keep track of screws.
raju midjdeya - Replica