Questa traduzione potrebbe non riflettere gli aggiornamenti più recenti dalla guida originale. Aiuta ad aggiornare la traduzione o visualizza la guida d'origine.
Introduzione
Segui questa guida per rimuovere o sostituire la scheda madre del tuo Google Pixel 4 XL.
Attenzione: Google avvisa che smontare il gruppo del laser anteriore può risultare in una pericolosa esposizione a delle emissioni laser invisibili ad infrarossi. Leggi le avvertenze sulla sicurezza qui.
Cosa ti serve
-
-
Infila uno strumento o una punta per l'estrazione delle schede SIM o l'estremità di una graffetta nel piccolo foro nel vassoio della scheda SIM sul bordo sinistro del telefono.
-
Premi con decisione per espellere il vassoio.
-
Rimuovi il vassoio della scheda SIM.
-
-
-
Prepara un iOpener e appoggialo al bordo inferiore del vetro posteriore per un minuto.
-
-
-
Applica una ventosa al bordo appena riscaldato premendola sul vetro il più vicino possibile al bordo.
-
-
-
Tira la ventosa verso l'alto con forza elevata e costante per creare una fessura tra il pannello posteriore e il telaio.
-
Infila la punta di un plettro nella fessura.
-
-
-
Fai scorrere il plettro sotto il bordo inferiore verso l'angolo sinistro per tagliare l'adesivo.
-
Ora fai scorrere il plettro sotto il vetro dall'angolo sinistro a quello destro per tagliare completamente l'adesivo sotto il bordo inferiore.
-
Lascia il plettro sotto l'angolo in basso a destra per evitare che l'adesivo si reincolli.
-
-
-
Prepara un iOpener e appoggialo al bordo sinistro del telefono per un minuto.
-
-
-
Prepara un iOpener e appoggialo al bordo destro del telefono per un minuto.
-
-
-
Con i primi due plettri ancora inseriti, infila un terzo plettro sotto la parte inferiore del bordo destro del vetro.
-
Fai scorrere il plettro verso l'angolo in alto a destra, tagliando l'adesivo sotto il bordo destro.
-
Fermati quando raggiungi l'angolo in alto a destra e lascia il plettro infilato sotto il vetro.
-
-
-
Fai scorrere il terzo plettro attorno all'angolo in alto a destra e lungo il bordo superiore, tagliando l'adesivo rimasto sotto il vetro.
-
-
-
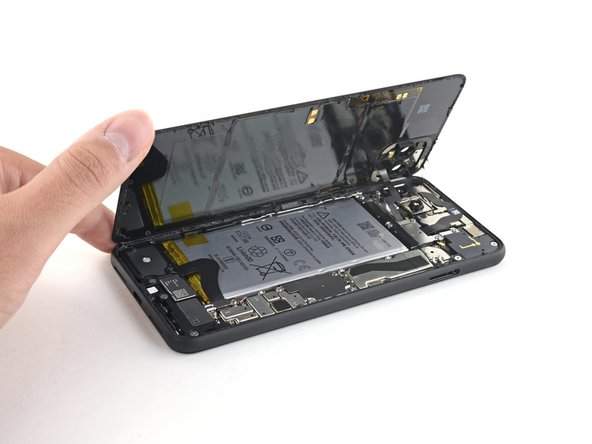
Una volta tagliato l'adesivo lungo tutto il perimetro del telefono, solleva attentamente il bordo destro del pannello posteriore in vetro, aprendolo come un libro.
-
Non cercare ancora di rimuovere del tutto il pannello: è ancora collegato al telefono.
-
-
-
Continua ad aprire il pannello posteriore finché riesci ad appoggiarlo al bordo sinistro del telefono, stando attento a tirare troppo i cavi a nastro ancora collegati.
Geoff B: These are good instructions. Any technician worth his or her salt will test the device for functionality before sealing it up. That’s why it reads, “During reassembly…and test all functions before sealing it up.” Not confusing if you read and comprehend the full pin.
No instructions on how to fit new sticky gasket before assembly. Removing old adhesive was a messy business, I used IPA on a cotton bud and removed as much as possible with flat end of spudger and kitchen paper.
-
-
-
Svita le quattro viti Torx T3 che tengono fermo la copertura del connettore della batteria:
-
Una vite da 1,8 mm
-
Una vite da 4,1 mm
-
Una vite da 4,4 mm
-
Una vite da 4,0 mm
Anyone know the thread size of the 1.8mm screw mentioned here? Mine went missing, and I need to get a replacement. I've got a bunch of tiny screw kits, but none of them have fit!
-
-
-
-
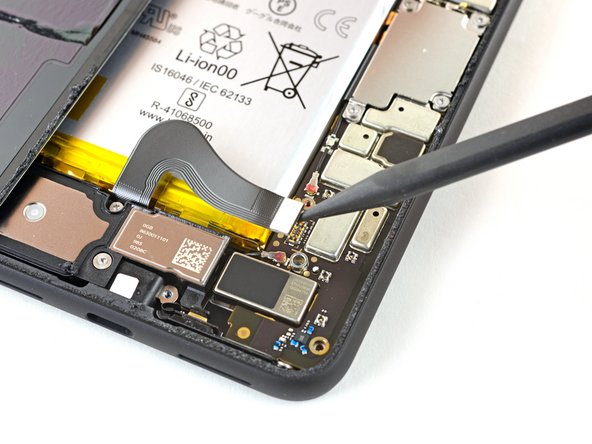
Usando la punta di uno spudger, fai leva sul connettore della batteria per sollevarlo e scollegarlo dalla sua presa sulla scheda madre.
What are the 5 copper dots under the battery connector for.
When you reattach the connector to the motherboard this is a good time to power up and check basic functionality temporarily. Even though it had appeared it was correctly lined, my camera was not functional, in particular the switch button from the rear to the front camera, I was stuck in selfie mode. Then I was getting a message on the screen, possible hardware or software issues. Once I reattached the connecter (several times) until it was correctly inlined, the error went away and I was able to switch from the rear and front cameras.
That was a good call! Thanks!
Esther -
-
-
-
Usa un cacciavite Torx T3 per svitare le due viti da 4,1 mm che tengono ferma la copertura del connettore del pannello posteriore.
Wouldn’t it make more sense to use the same (orange) color circles as the other 4.1mm screw?
Maybe Google did it to avoid exchange in the models where they differ
-
-
-
Usa la punta di uno spudger per sollevare e scollegare il connettore del pannello posteriore.
-
-
-
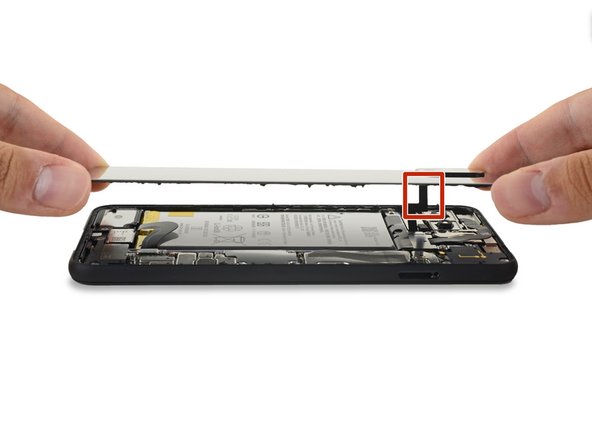
Rimuovi il pannello posteriore.
REASSEMBLY ADHESIVE: This is the step during reassembly that you'll want to set the back glass adhesive strip on (before you reattach ribbons). Set the adhesive strip into the body of the phone with the red tabs down (toward the body of the phone, it will simply rest inside the lip of the phone body). Press the back glass onto the adhesive strip to set the strip onto the back glass, lift the back glass back out of the body of the phone. Next reattach the ribbons, test functions, reattach connector covers, peel red adhesive cover off of the adhesive (on the back glass) then set the back glass into the phone lip. This could have been explained far better but was skipped over and the generic adhesive instructions posted in the comments are useless for this.
There are also detailed instructions at answer 742532, "How do I apply new back panel adhesive on a Pixel 4xl?" (sorry it doesn't let me link directly). But it advises adhering the adhesive to the main frame first before the glass. I do notice a slight lip on the main frame on both sides, which seems less forgiving to align with than the glass, so I would imagine doing the frame first would be easier? I haven't done this yet myself, so would be interested in opinions.
Update: it appears the discrepancy is due to a difference between the third-party adhesives and the iFixit "genuine" one. The iFixit one is not mirror symmetric and must be adhered to the glass back first, though it has cutouts that avoid protrusions and facilitate this. The third-party one (I believe) has no such cutouts and thus must go on the frame first.
However, in trying to follow Michael's instructions, I could not get the adhesive and red tabs off the blue plastic without distorting the adhesive, and had to take the clear side off first. I ended up directly placing the adhesive onto the glass back, without the frame to help align (I posted my method in the above-mentioned answer 742532). The cutouts in the blue plastic seem to have been made with this in mind.
-
-
-
Solleva delicatamente la striscia adesiva estensibile della batteria per accedere alle viti sottostanti.
-
-
-
Usando la punta di uno spudger, fai leva sui connettori della fotocamera e dei sensori per scollegarli dalla scheda madre.
-
-
-
Svita le tre viti Torx T3 che tengono fermo il gruppo della fotocamera e dei sensori anteriori:
-
Due viti da 2,7 mm
-
Una vite da 3,1 mm
-
-
-
Usa un paio di pinzette per rimuovere il gruppo della fotocamera e dei sensori anteriori.
Additional Sensor from Step 28 is held down with adhesive. Gently pry up on cable to remove sensor assembly.
-
-
-
Usa un cacciavite Torx T3 per svitare le quattro viti da 3,5 mm che tengono ferma la copertura del connettore dello schermo.
-
-
-
Usa un paio di pinzette per rimuovere la copertura del connettore dello schermo.
-
-
-
Usa la parte piatta di uno spudger per scollegare il connettore dello schermo dalla scheda madre.
-
-
-
Usa un cacciavite Torx T3 per svitare la vite da 2,7 mm che fissa la scheda madre alla cornice.
-
-
-
Usa la punta di uno spudger per scollegare il connettore dei tasti laterali dalla scheda madre.
-
Scollega i due connettori delle fotocamere posteriori dalla scheda madre.
The screw on the top left of the motherboard is out in this picture, but removal is not included in previous steps. It’s still visible in Step 30.
Thank you! Good catch. I’ve added a new step for removing that screw.
-
-
-
Usa la punta di uno spudger e fai leva delicatamente sull'estremità del connettore dell'antenna per scollegarlo dalla scheda madre.
-
Scollega il connettore inferiore dell'antenna.
-
-
-
Usando uno spudger, solleva l'estremità della scheda madre per rimuoverla dalla cornice del telefono.
-
-
-
Solleva delicatamente la scheda madre, stando attento a non impigliare alcuno connettore dei cavi a nastro.
-
Rimuovi del tutto la scheda madre.
-


Confronta la tua parte di ricambio con quella originale: potrebbe essere necessario il trasferimento di alcuni componenti o la rimozione di protezioni adesive dalla nuova parte prima di installarla.
Per rimontare il tuo dispositivo, segui le istruzioni in ordine inverso.
Porta i tuoi rifiuti elettronici a un riciclatore certificato R2 o e-Stewards.
La riparazione non è andata come previsto? Prova delle soluzioni di base ai problemi, oppure rivolgiti alla nostra comunità Risposte per trovare aiuto.
Annulla: non ho completato questa guida.
Altre 10 persone hanno completato questa guida.
Un ringraziamento speciale a questi traduttori:
90%

Questi traduttori ci stanno aiutando ad aggiustare il mondo! Vuoi partecipare?
Inizia a tradurre ›


4 Commenti
where can i purchase a pixel 4xl motherboard replcement?
This guide doesnt mention thatthe front camera and sensor array is married to the motherboard and replacing one without the other will cause face unlock to not function. This situation throws a "Certificate Expired" error and neither factory reset nor reflashing/sideloading firmware corrects this. Google support says repair or replace is the only remedy. I'm currently trying to prove that assertion wrong.
Hey J L, Did you ever manage to find a solution for the certificate expired issue? I recently replaced my front camera and sensor assembly hoping to fix broken face unlock sensor. Encountering the same certificate expired issue after replacement
Echo -