Questa traduzione potrebbe non riflettere gli aggiornamenti più recenti dalla guida originale. Aiuta ad aggiornare la traduzione o visualizza la guida d'origine.
Introduzione
Usa questa guida per sostituire il modulo fotocamera posteriore del tuo Fairphone 3.
Cosa ti serve
-
-
Inserisci l'unghia del pollice o un attrezzo di apertura come uno spudger nell'incavo in basso a destra della cover posteriore.
-
Solleva la cover posteriore per iniziare a staccare le clip di plastica.
-
-
-
Usa un'unghia o un attrezzo di apertura nell'incavo che funge da appiglio per far leva ed estrarre la batteria dal suo vano.
-
Fai leva per sollevare la batteria finché non riesci ad avere una buona presa su di essa.
-
-
-
Rimuovi le tredici viti a croce Phillips #00 (lunghezza 4 mm).
vis M 1.4/4 mm
-
-
-
-
Inserisci un plettro di apertura sul bordo destro del telefono tra il midframe e il modulo display.
-
Fai scorrere il plettro di apertura verso il basso fino all'angolo inferiore destro per sganciare le clip di plastica che bloccano il modulo schermo.
Hello. I do not have an opening pick; one was not provided with the telephone or the camera module. How am I supposed to install the item if I have not been either provided with, or informed of the requirement for, a necessary tool? This makes it extremely difficult for a customer to make their own installations or repairs. Also, I do not have a spudger, and I had to look up what a spudger is. These are not everyday items found in most people’s toolboxes, so I feel that they should be provided, or a warning should be given when buying items (such as the camera module) which will require additional tools to install.
Hi, you are right, there should be a hint to buy those tools. Maybe you have a guitar pick or a very thin spatula or putty knife. It is better to not use metal, to not damage the frame, but if you have no other tool this may help.
Attention de bien insérer sur la rainure la plus à l'extérieur, vous allez sinon decoller le joint fixant l'écran à proprement parler au reste du module.
Si ça vous arrive, vous le saurez en voyant que la partie décollée est toujours reliée par une nappe à la partie inférieure de l'écran. Pas de panique, appliquez quelques points de colle par dessus le joint d'origine et recommencez la procédure, cette fois dans la bonne rainure (et la procédure devrait vous paraître beaucoup plus simple ;) )
Punaise, moi cette partie de mon écran se décolle toute seule. Juste un tout petit peu, par le haut. Vous me conseillez de le décoller plus pour pouvoir y mettre de la colle ?? Quelle colle serait le mieux ? (pas envie d’acheter un écran vu que le mien fonctionne très bien quand même)
Hello, I got frustrated when I didn’t find any opening pick. I’m not a guitarr player either ;-) , so I took a old credit card instead. It worked fine! I got a spudger when I bought the FP3.
Anyway, these tools are not common in most households, so they should be provided or at least they should be hinted that they are needed.
Hey, I cut the edge off a stiff plastic packaging and inserted it. It was itself too wobbly, but widened the gap enough so I could insert the edge of a credit card which worked just fine.
Ich hatte kein Plektrum habe es mit einer Chip-Karte probiert, das ging auch.
-
-
-
Fai scorrere il plettro di apertura attorno all'angolo inferiore destro e usalo per sganciare le clip di plastica nella parte inferiore del modulo schermo.
Hallo
nachdem mein Handy ausversehen runtergefallen ist, war das Display dunkel; ein/aus half nichts, akku raus/rein auch nicht. Es gab Brumgeräusche wie beim Starten wenn ich Start gedrückt habe, das Display blieb dunkel. Ich konnte das Display mit etwas mühe(ungeübt) ausbauen und wieder einbauen. Danach ging es wieder; Danke euch hier für die Anleitung. So ein Plektrum habe ich leider nicht mehr, ich glaub es war eines dabei. Ich habe mir mit einem kleinen Plastiklöffel geholfen, der ist jetzt mein Star :-)
Sehr gut! Viel Spaß mit deinem Fairphone!
-
-
-
Rimuovi il gruppo schermo.
ATTENTION !l’écran neuf comprend un cache plastique qui tient avec 2 vis ! pour monter le nouvel écran il faut dévisser les vis et enlever le cache plastique
Die weiße Plastikabdeckung an dem neuen Modul muss vor dem Einbau noch gelöst werden (2 Schrauben).
Vielen Dank für die kleinschrittige Anleitung, dir mir als Reparaturmuffel geholfen hat, mein Handy wieder zu aktivieren. Hintergrund: nach einem Sturz war das Display total verpixelt. Durch aus- und Einbau des Displays wurden die durch den Sturz gelockerten Kontakte wieder neu verbunden und - siehe da - es funktioniert wieder alles wie am ersten Tag! Da bin ich froh, daß ich mich für ein fairphone entschieden habe.
Sehr gut! Weiter viel Spaß mit deinem Fairphone!
-
-
-
Rimuovi le due viti a croce Phillips #00 lunghe 4,1 millimetri.
-
-
-
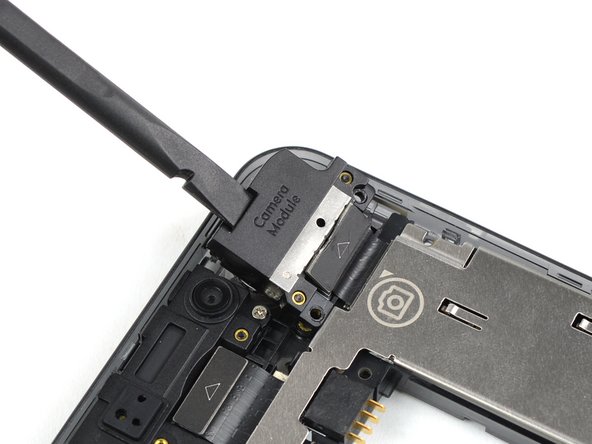
Rimuovi il modulo della fotocamera posteriore.
An dieser Stelle nicht vergessen, die blaue Abdeckfolie zu entfernen beim Einsetzen eines neuen Moduls!
-


Per rimontare il tuo dispositivo, segui queste istruzioni in ordine inverso.
Per rimontare il tuo dispositivo, segui queste istruzioni in ordine inverso.
Informazioni su che cosa fare con ilk vecchio modulo si possono trovare sulla pagina di supporto FairPhone e sul forum FairPhone.
Porta i tuoi rifiuti elettronici a un riciclatore certificato R2 o e-Stewards.
La riparazione non è andata come previsto? Prova delle soluzioni di base ai problemi, oppure rivolgiti alla nostra comunità Risposte per trovare aiuto nella risoluzione dei problemi.
Per rimontare il tuo dispositivo, segui queste istruzioni in ordine inverso.
Per rimontare il tuo dispositivo, segui queste istruzioni in ordine inverso.
Informazioni su che cosa fare con ilk vecchio modulo si possono trovare sulla pagina di supporto FairPhone e sul forum FairPhone.
Porta i tuoi rifiuti elettronici a un riciclatore certificato R2 o e-Stewards.
La riparazione non è andata come previsto? Prova delle soluzioni di base ai problemi, oppure rivolgiti alla nostra comunità Risposte per trovare aiuto nella risoluzione dei problemi.
Annulla: non ho completato questa guida.
Altre 17 persone hanno completato questa guida.
Un ringraziamento speciale a questi traduttori:
87%

albertob ci sta aiutando ad aggiustare il mondo! Vuoi partecipare?
Inizia a tradurre ›


3 Commenti
How NOT to remove the display!
I just destroyed my display module a bit and had to fix it with glue. :(
This works better: https://www.youtube.com/watch?v=wGTYZNzg...
I think this guide should mention that the camera connecting cable can become disconnected accidentally on its other end (under the metallic cover) which is easy to miss. This forum post helped me: https://forum.fairphone.com/t/be-careful...
The metallic cover can be removed easily after screwing off two Torx screws. Couple of people on the forum experienced this and it helped me solve my problem.
Pas de problème pour changer le module. Les explications données par ifixit sont claires et aisées à suivre.