Introduzione
Questa guida mostra solo come rimuovere il lettore DVD.
La Xbox 360 è progettata in modo che il lettore DVD funzioni solo con la specifica console sul quale è stato installato in fabbrica. Sostituire un lettore DVD difettoso con uno nuovo non funzionerà, poiché quello nuovo ha una chiave digitale diversa, che quindi la console non riconoscerà.
Cosa ti serve
-
-
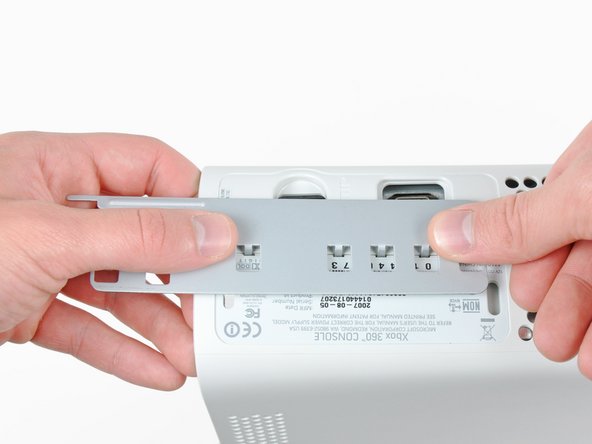
Mentre premi il pulsante di sbloccaggio sul gruppo del disco rigido, solleva il bordo anteriore.
-
Rimuovi il gruppo dell'hard drive dalla presa d'aria superiore.
-
-
-
Inserisci la parte piatta di uno spudger o il bordo dello strumento di apertura per la Xbox 360 nella piccola apertura sul bordo anteriore della presa d'aria inferiore.
-
Solleva il bordo anteriore della presa d'aria inferiore dalla mascherina.
You can avoid this step by pulling the front cover off. Just make sure you don't break the springs for the USB bay area.
Hello, thank you ifix for this guide, I followed this guide, I got stuck at some point but I resolved it. Also I want to share this resource: Step by Step guide to fix Xbox 360 errors it helped me go through all the things associated with Xbox 360 and the troubleshooting of errors. Hope this can also help you all.
-
-
-
Per per sganciare le clip, inizia da quelle più vicini al bordo frontale della presa d'aria inferiore.
-
Mentre tiri leggermente verso l'alto il bordo anteriore della presa d'aria inferiore, spingi i ganci più vicini alla parte anteriore della ventola stessa verso l'interno della console con la punta di uno spudger.
-
-
-
Infila la parte piatta dello spudger tra la mascherina e la scocca esterna vicino al tasto di accensione.
-
Fai scorrere lo spudger lungo il bordo della mascherina per rilasciare i ganci che la tengono ferma.
The faceplate just pulls off, using a tool is completely unneccessary. https://beta.support.xbox.com/help/xbox-...
-
-
-
La presa d'aria superiore è fissata alla console con delle clip. Le prime due sono posizionate sotto la presa d'aria vicino alla mascherina, come mostrato in figura.
-
-
-
Infila la parte piatta di uno spudger nelle piccole aperture menzionate nel passo precedente per sganciare le clip.
I found this step difficult. I wasn't able to see where the clips were from the pictures. If you look at step 14 you can see what the clips look like after the vent is taken off. Once you realize where they are it is a lot easier.
-
-
-
-
Metti in verticale la console con il lato superiore rivolto verso il basso.
-
Rimuovi l'etichetta della garanzia dalla console.
LOL “Romove the warenty seal”
-
-
-
Premi lo strumento di apertura per la Xbox 360 nelle fessure dei ganci vicino alle porte I/O che uniscono la scocca inferiore a quella superiore.
-
Mentre premi sullo strumento, separa la scocca superiore da quella inferiore per rilasciare le clip.
I didn't have an XBox tool, so I followed instructions in this video for this step (https://www.youtube.com/watch?v=qaxIB6cX...) to pry it open with your fingers and a screwdriver.
The small (metal) women's hair clip is best for un-latching the tabs. The screw drivers just make the holes bigger.
You can also use the pointed end of a plastic spudger to push each clip free while you separate the case with your free hand.
-
-
-
Mentre tieni separate le due metà della scocca, usa la punta di uno spudger o dello strumento di aperura per la Xbox 360 per premere sulla lunga clip evidenziata in rosso al centro della console.
-
Il gancio dovrebbe rilasciarsi, lasciando così solo quelli vicini alla presa d'alimentazione ad tenere insieme le due parti della scocca.
-
-
-
Usa la punta di uno spudger per rilasciare il gancio che fissa il tasto d'espulsione al telaio in metallo.
-
Infila la punta di uno spudger tra il tasto d'espulsione e il lettore CD.
-
Fai leva sul tasto d'espulsione e rimuovilo dalla Xbox 360.
-
-
-
Svita le 6 viti Torx T10 argento da 64 mm che uniscono la scocca superiore al telaio in metallo.
-
-
-
Rimuovi il nastro argentato che unisce il lettore CD al telaio in metallo.
Looking at mine, I doubt it. It looks like standard foil tape
-
-
-
Prendi il cavo d'alimentazione e tiralo fuori dalla sua presa sul drive ottico.
-
Scollega il cavo SATA dalla sua presa sul lettore CD.
I found the power cable to be very tough to get out, at least it is the first time doing this.
I found it much easier to remove the SATA cable after lifting the assembly mostly out of the case.
-
-
-
Solleva il lettore CD per rimuoverlo dal telaio in metallo.
Be careful not to lose or break the two teeny metal clips securing the optical drive assembly snugly to the metal casing on either side of the drive's front face. I used a spudger to press in the topmost tines on these clips because they were catching on the drive and bending up. The clips should stay on the metal housing, not come off with the drive.
-
-
-
Mentre spingi la copertura del lettore DVD verso la parte superiore del lettore stesso, usa la parte piatta di uno spudger per liberare le due clip di fissaggio sotto la copertura.
-


Per rimontare il dispositivo, segui le istruzioni in ordine inverso.
Per rimontare il dispositivo, segui le istruzioni in ordine inverso.
Annulla: non ho completato questa guida.
Altre 236 persone hanno completato questa guida.
Un ringraziamento speciale a questi traduttori:
100%

Questi traduttori ci stanno aiutando ad aggiustare il mondo! Vuoi partecipare?
Inizia a tradurre ›

24 Commenti
who knows xbox360 can use desktop drives?We have all kinds of drives,but i am not sure if it is fit for xbox360.
Thanks
That has nothing to do with this guide. If you have any question regarding this equipment, go to the answer section.
Very easy to follow, got my drive fixed...thanks!
" Replacing a defective optical drive with a replacement optical drive does not work. The replacement will have a different DVD drive key, which the game console will not accept."
Not entirely accurate, that statement.
Having fixed a PS3 blu-ray drive by following the excellent guide on here, tried the same technique.
I had a bad drive in my xbox, and I replaced it with a new drive (of the same type). I took the daughter-board from the faulty drive and transplanted it to the good drive. It involved stripping down both drives, disconnecting 2 ribbon cables and unsoldering about 8 wires, transplanting the daughter-board - and resoldering the wires. Then reassembling. It worked for me, anyway.
Sounds like an extremely patience depleting process.
I did this once on one of the newer 360s that are more basic, with help from someone , using scissors.
I am getting the famed red ring of death now...it there any troubleshooting I can do to fix this? I followed all steps and made sure that each wire mirrored the old unit.
you actually can swap the drives out pretty easy. you just rip the key off of the old drive and flash it on the new one. you have to make sure you purchase the same drive model and the use jungle flasher. would they allow an extraction and flashing guide on here? and while you are at it, you can mod them pretty easy as well ;)
Because, You cannot replace the laser without replacing the drive. It is not possible to replace the laser.
No instructions on how to replace the PCB or what kind of drives there are?
So easy a GIRL can do it! Thanks!
This guide is incomplete thus the pictured console wont work upon drive replacement. Please finish the steps for flashing for they are a very required step in replacing the drive at all.
Author just ended the repair when there were more steps needed lol. I have done so many of these repairs and it shouldn’t be in the difficult section. If the PCB is ok, just swap it into a different drive deck you know that works. If your PCB is broken , you will need an X360 USB Pro and 3rd part software to extract the key and flash it and original firmware to the new PCB. I should update this tutorial for it is pretty weak.
What kept you from fulfilling your proclamation?
I realize my 360 is old but I cannot afford to replace it with the one. I replaced the dvd drive and same wont read problem, so I swapped the old board with the new and verified it is the board that is bad, not the drive itself. Now what do I do? Give up and scrap it? How expensive is the fix to replace the board? Are the parts still available? Im not concerned with the technical difficulty.
This guide sucks. He says you cant swap the disc drives without the logic board or it wont work. Then proceeds to swap the drive but doesnt actually show anything about swapping boards too lol
So people will follow this guide and miss a huge key part, thus ending with a nonworking disc drive lol
Crap guide.
It's right there in the header section. It literally says that this guide is ONLY about taking out (and in reverse order putting back in) the optical drive and that, for a new drive to work, it wont work without extra steps. So only very inattentive people will end with a nonworking drive.
But instead of contributing and adding a corresponding guide on how to exchange the logic board in the drive you chose to nag and have a whinge.
Crap comment.
Thank you so much. I was able to fix my Xbox 360
You will have to transfer the daughterboard.
With out googling it I believe there was 3 diff models of DVD drives so make sure u replace it with the same model drive than remove the pcb board from the old one and put it in the new one because there married to the Xbox main board other wise it won't work with the new replacement . MAn I moded ps1s on and remember most of this stuff like it was yesterday. Fun .fun.
WARNING: Just replacing the drive will not make it work correctly. Microsoft has married the drives to the motherboard. Hence, in order to get full operation out of the drive you'll have to perform more steps not listed here. Search in the FAQ on this specific topic for more details. Otherwise, before buying a new drive, try cleaning the inside of the old one and/or replace the belt involved in opening and closing the drive door.
- Good Luck
Eric - Replica
Thanks..helped!
joseph zulu - Replica
bress the button and lift with the same hand! i thought mine was stuck because of this pic!!!
Maths with Luigi - Replica