Introduzione
Se il tuo frullatore non gira o è molto rumoroso, segui questa guida su come sostituire l'ingranaggio a vite senza fine.
Cosa ti serve
-
-
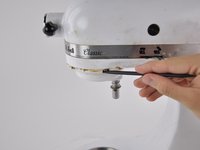
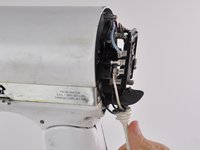
Usa uno spudger per fare leva sull'anello anti gocce e rimuoverlo.
-
-
-
-
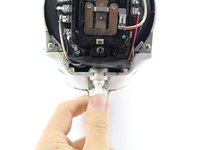
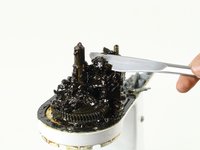
Usa un coltello per il burro o una spatola per rimuovere il grasso dagli ingranaggi.
-
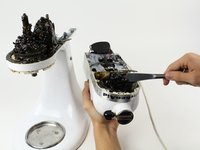
Metti il grasso nella copertura dell'alloggio del motore.
-


Per rimontare il dispositivo, segui le istruzioni in ordine inverso.
Per rimontare il dispositivo, segui le istruzioni in ordine inverso.
Annulla: non ho completato questa guida.
Altre 59 persone hanno completato questa guida.
Un ringraziamento speciale a questi traduttori:
100%
Daniele Carminati ci sta aiutando ad aggiustare il mondo! Vuoi partecipare?
Inizia a tradurre ›
Team

Cal Poly, Team 14-28, Maness Fall 2014 Membro di Cal Poly, Team 14-28, Maness Fall 2014
CPSU-MANESS-F14S14G28
4 Membri
22 Guide realizzate
29 Commenti
Some corrections:
Step 1 -- Suggest (as the Service Manual does) using a flat-blade screwdriver and tap it with a light hammer to drive the drip ring off.
Step 2 -- the correct size pin punch is 5/32"
Step 3 -- Using two flat-blade screwdrivers, one on each side, pry off the planetary.
A plastic spudger is likely to break. Two points of leverage opposits each other distributes the load and prevents to the planetary and its shaft.
Step 11 -- The proper punch size is 3/32"
Steps 12 & 13 -- There is a washer on each side of the worm gear. Retain these and place one on each side off the grar when reassembling.
A link to the Service Manual:
Very useful reply.
Step 3: I needed two flat head screwdrivers to pry off the planetary gear.
Step 9: Recommend adding a new seal for the upper housing and new food grade grease. If you have plastic chips from the broken worm gear, you won't want them damaging the new worm gear. Also, if that grease is black its probably time to replace it. Happy Baking!!!
nshourds -
Cheers Finkerbell,
Very helpful info, as was the main part of the guide.
Not sure what model number I was working on, but when I l lifted off the motor housing, there was still wires connected to the base.
Just be careful at this stage in case you have the same...
my model K5SS WH is the same as yours until step 5. It doesnt have the two bolts as shown in the picture for step 5 so i wasnt able to complete the repair. any suggestions.