Introduzione
Segui questa guida per sostituire il sensore della guida del Joy-Con sinistro nella console Nintendo Switch.
La Switch utilizza delle viti JIS, ma all'occorrenza puoi usare un cacciavite Phillips. Stai molto attento a non spanare le viti. Le punte Phillips di iFixit sono progettate per essere compatibili anche con le viti JIS.
Nota: Quando rimuovi la piastra di protezione, dovrai cambiare la pasta termica tra la piastra e il dissipatore. Dato che la pasta termica normale non è pensata per essere usata per riempire fessure così grandi, la miglior soluzione è la pasta viscosa K5 Pro.
Nota: questa guida, così come il ricambio che vendiamo, è compatibile con il modello originale del 2017 del Nintendo Switch, oltre al modello aggiornato del 2017 (numeri modello HAC-001 e HAC-001(-01), rispettivamente).
Cosa ti serve
-
-
Premi e tieni premuto il piccolo bottone rotondo dietro il controller Joy Con.
-
Mentre tieni il bottone premuto, fai scorrere il controller verso l'alto.
-
-
-
Continua a far scorrere il Joy Con fino a quando non è completamente rimosso dalla console.
-
-
-
Usa un cacciavite Y00 per rimuovere le quattro viti lunghe 6,3 mm che tengono fermo il pannello posteriore.
-
-
-
Usa un cacciavite JIS 000 o quello PH 000 ufficiale di iFixit per rimuovere le seguenti viti che fissano il pannello posteriore:
-
Una vite lunga 2,5 mm sul bordo superiore del dispositivo
-
Due viti lunghe 2,5 mm sul bordo inferiore del dispositivo
-
-
-
-
Solleva il pannello inferiore dal lato posteriore del dispositivo e rimuovilo.
-
[*icon_note] Il cavo di collegamento del lettore di cartucce è collegato all'altra metà della scocca di plastica impedendoti di sollevare completamente il pannello posteriore se chiuso.
-
Solleva il pannello posteriore dal fondo del dispositivo e rimuovilo
-
-
-
Con un cacciavite a croce JIS 000 o quello PH 000 ufficiale di iFixit, rimuovi la singola vite da 3,1 mm che blocca sul dispositivo il lettore di schede micro SD.
-
-
-
Con un un cacciavite a croce JIS 000 o quello PH 000 ufficiale di iFixit, rimuovi le sei viti da 3 mm dalla piastra di schermatura.
-
-
-
Usa un paio di pinzette per staccare il pezzo di schiuma sul bordo superiore del dispositivo vicino alla porta di scarico della ventola.
-
[* icon_caution] Se non riesci facilmente a staccare la schiuma, non forzarla! Potrebbe strapparsi facilmente. Sollevala cautamente da più punti fino a staccarla.
-
-
-
Inserisci uno spudger sotto la piastra di schermatura lungo i bordi.
-
Fai leva per sollevare con delicatezza la piastra di metallo e rimuovila dal dispositivo.
-
Puoi riutilizzare la pasta termica rosa se sei attento. Mantieni pulita la pasta e assicurati che faccia un contatto solido tra il dissipatore di calore e la piastra durante il rimontaggio.
-
Se devi sostituirla, consulta la nostra guida sulla pasta termica per rimuovere quella vecchia e sostituirla con una pasta termica appropriata, come la K5 Pro, durante il rimontaggio.
-
-
-
Inserisci l'estremità a punta di uno spudger per far leva e sollevare il connettore della batteria dal suo zoccolo sulla scheda madre.
-
-
-
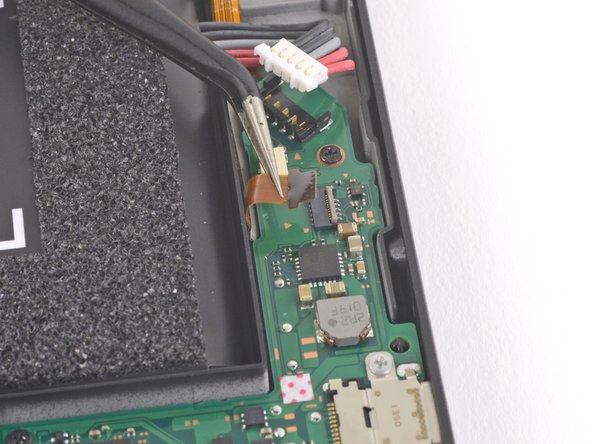
Usa uno spudger, uno strumento di apertura o le unghie per girare verso l'alto l'aletta di bloccaggio incernierata sul connettore ZIF del cavo del sensore della guida del Joy-Con sinistro.
-


Confronta la tua parte di ricambio con quella originale: potrebbe essere necessario il trasferimento di alcuni componenti o la rimozione di protezioni adesive dalla nuova parte prima di installarla.
Per rimontare il dispositivo, segui le istruzioni in ordine inverso.
Porta i tuoi rifiuti elettronici a un riciclatore certificato R2 o e-Stewards.
La riparazione non è andata come previsto? Prova delle soluzioni di base ai problemi, oppure rivolgiti alla nostra comunità Risposte Nintendo Switch per trovare aiuto.
Annulla: non ho completato questa guida.
Altre 58 persone hanno completato questa guida.
Un ringraziamento speciale a questi traduttori:
100%


Questi traduttori ci stanno aiutando ad aggiustare il mondo! Vuoi partecipare?
Inizia a tradurre ›

7 Commenti
If this was a neon Switch, this would be the rail that gets attached with the blue or the red joy con?
it would be the Blue joy con
I completed this guide, but the left joy con is still not being detected after the sensor rail was replaced with a sensor rail purchased on this site. The joy con in question will attach and sync with another console, so that leads me to believe it is a fault with the switch console itself. Is there something else that I can replace that would fix this issue?
Depending on where you get your replacement rail, it may not have the silver on the ribbon cable. No worries, as I did this repair 3 months ago (Jan) and had no issues at all.
To get the ribbon cable in place, I recommend first getting the battery wires out of the way, then slightly bending it and sliding it under that section of the Motherboard. If you do it right, the end of the ribbon cable will pop up and that can be slid into place. Took some fiddling but I eventually got it to work!
No matter what, never crease your ribbon cables!