Questa guida ha delle modifiche più recenti. Passa all'ultima versione non verificata.
Introduzione
Segui questa guida per rimuovere e sostituire lo schermo dell'iPad Pro 9.7".
Il tasto Home è associato alla scheda madre dell'iPad. Per mantenere le funzioni del Touch ID devi trasferire il tasto Home originale sul nuovo gruppo dello schermo. Questa guida include questi passaggi.
Non usare strumenti in metallo o rischi di fare dei corto circuiti e danneggiare l'iPad.
Cosa ti serve
-
-
Se il vetro dello schermo è crepato, previeni ulteriori rotture e danni fisici durante la riparazione coprendo lo schermo con del nastro adesivo trasparente.
-
Sovrapponi strisce di nastro adesivo trasparente da pacchi per coprire tutta la superficie dello schermo dell´iPad.
-
Fai del tuo meglio per seguire il resto della guida, come descritta. In ogni caso, uno schermo crepato continuerà probabilmente a danneggiarsi durante la riparazione e, perciò potrebbe essere necessario utilizzare uno strumento metallico per estrarre il vetro.
-
-
-
Tenendolo per le due linguette alle estremità, appoggia un iOpener riscaldato sul bordo superiore dell'iPad.
-
Lascia l'iOpener sull'iPad per due minuti per far ammorbidire il materiale adesivo che assicura il pannello frontale al resto dell'iPad.
I see a lot of videos that show using a heat gun on low to soften the adhesive. I know there is inherent risk with this since you could start delaminating things, but is it something that could be considered (at your own risk)? Or is it something that could have more risks than I am realizing?
Yes, you can definitely use a hair dryer, heat gun, or a heating pad. If you're using a heat gun, be careful not to overheat the display. The surface should feel slightly too hot to the touch.
-
-
-
Mentre segui le istruzioni, porta particolare attenzione ad evitare di far leva sulle seguenti zone:
-
Tasto Home
-
Fotocamera frontale
-
Fotocamera principale
Verwirrend: Es sollte heissen, dass man an den beschriebenen Stellen eben NICHT hebeln sollte.
Danke! Ich habe den Teil mit dem NICHT hebeln nochmal hervorgehoben.
-
-
-
-
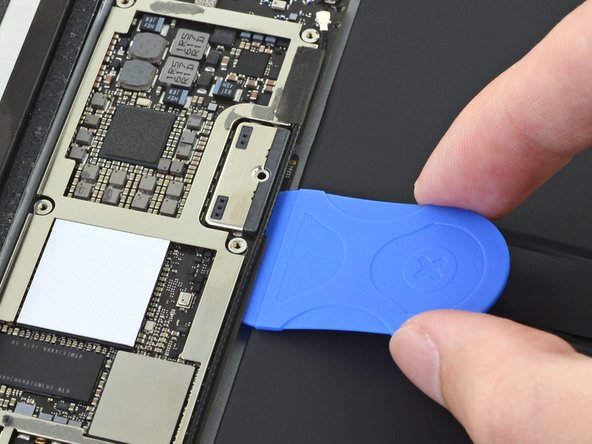
Usa i plettri per assicurarti che la maggior parte dell'adesivo sia stato tagliato lungo i bordi superiore, sinistro ed inferiore.
-
Torci i plettri sui bordi superiore ed inferiore per separare il gruppo dello schermo dalla scocca.
-
-
-
Utilizza un cacciavite a croce per rimuovere le undici viti da 1,3 mm che tengono ferma la schermatura EMI.
-
-
-
Appoggia un iOpener scaldato sulla schermatura EMI sopra la scheda madre per un minuto.
-
-
-
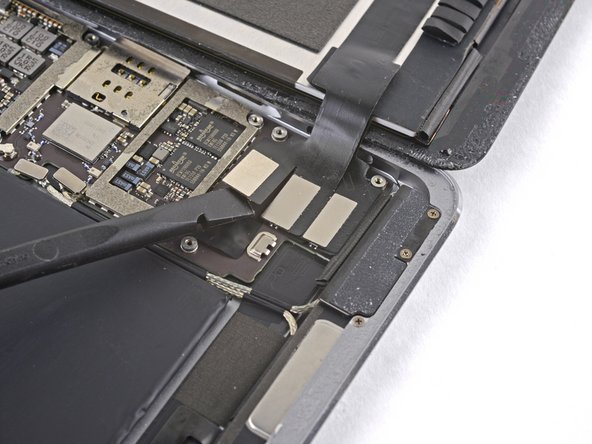
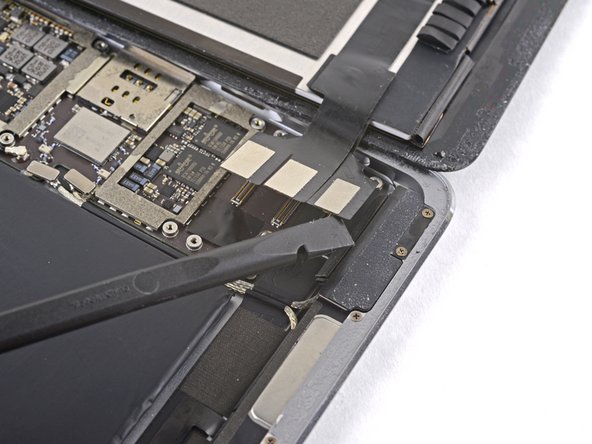
Solleva la schermatura EMI della scheda madre, iniziando dal bordo più vicino al lato superiore dell'iPad.
-
Rimuovi lentamente la schermatura EMI dalla scheda madre.
-
Rimuovi la schermatura EMI della scheda madre.
Don't peel the cover as shown from a short side. Lift the long side to avoid creasing the cover so much. This way it will lie flat when you reassemble it and not look so ugly. Also, you won't have to straighten so many creases with pliers
-
-
-
Usa un cacciavite a croce Phillips per svitare la vite da 1,7 mm che tiene fermo il connettore della batteria.
What size is this screw?
i get 1.65mm with my calipers but the 1.3s read 1.25 on my calipers too, so probably a 1.7mm
-
-
-
Schiaccia le sporgenze con delle pinze per appiattirle.
-
Ripeti la procedura per ogni sporgenza appuntita lungo i bordi della schermatura EMI.
Don't peel the cover as shown from a short side. Lift the long side to avoid creasing the cover so much. This way it will lie flat when you reassemble it and not look so ugly.
-
-
-
-
Fai scorrere il blocca batteria sotto il lato sinistro del connettore della batteria sulla scheda madre ad un angolo di 35 gradi.
-
Lascia il blocca batteria al suo posto mentre lavori.
-
-
-
Applica qualche goccia di alcol isopropilico ad alta concentrazione (90% o più alto) sotto la scheda madre a destra e sinistra del connettore della batteria.
-
Aspetta due minuti che l'alcol isopropilico indebolisca l'adesivo sotto la scheda madre.
-
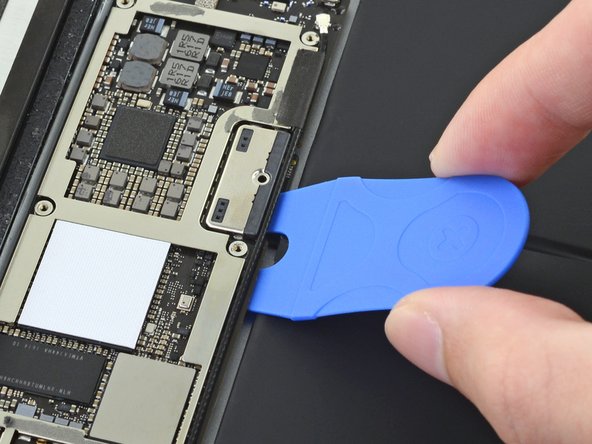
Prova ad inserire il blocca batteria. Se la scheda madre non si solleva facilmente, applica qualche altra goccia di alcol isopropilico.
-
-
-
Utilizza il cacciavite a croce Phillips per rimuovere le tre viti a croce Phillips da 1,3 mm che fissano la copertura del cavo dello schermo.
i think we need to talk about the battery situation here. apple change up the style of battery connector on this model as well as some others. if someone can add to this list and add the appropriate photos in the right spot should help someone else. the battery tabs are open towards the battery side and inserting a tool in this area can pry them open further and damage or rip off the tab. some have found that by lifting on either side of the battery tab, they would not even encounter the tabs.
-
-
-
Rimuovi la copertura del cavo dello schermo.
A tab was folded over a connector of some sort on the bottom side. I found it was a better to pull from the top to the bottom to fold the tabs slightly to remove this cover.
Actually it helps to move the cover slightly towards the bottom of the iPad as that disengages to tabs…
-
-
-
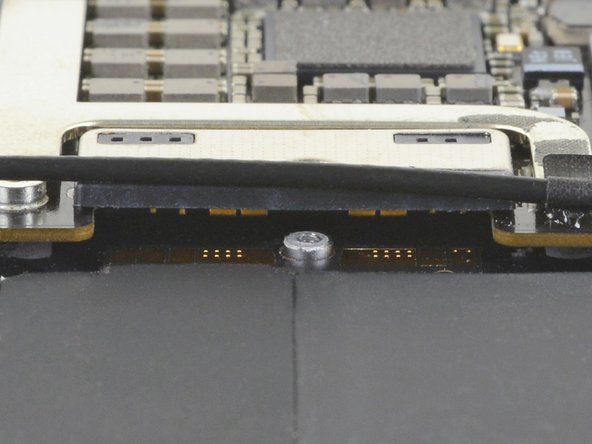
Usa la parte piatta di uno spudger per scollegare il connettore del gruppo dello schermo dalla sua presa sulla scheda madre.
-
-
-
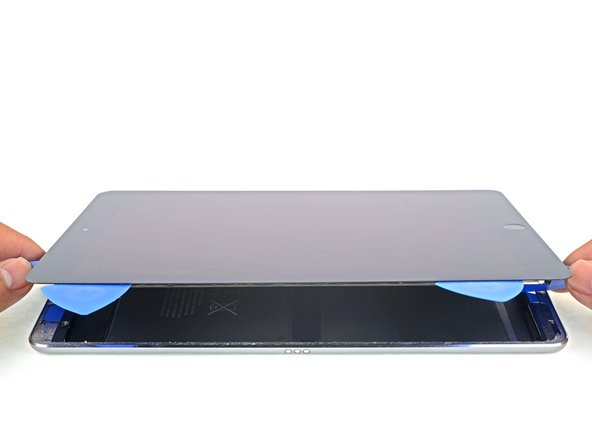
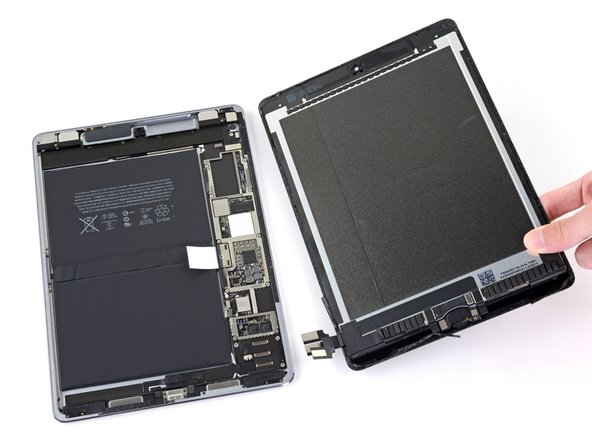
Rimuovi il gruppo dello schermo dalla cornice.
You "CAN" skip steps 41 through 98 and 102-109 if you're confident in your repair abilities and PATIENT. Lots of alcohol around all the edges of the battery, and apply heat to the back cover on one half of the battery, the slowly ease your "card under the edges of the battery. Wiggle it back and forth and add more alcohol under the edges of the battery where your working; DONT PUSH your card to hard or you will sli[p and damage components. Then do the same for the other half. When both halves are loose, fold over one end and slide the flat edge off the spudger under the area of the logic board next to the battery connector, then do the same to the other side; you want just enough of a gap under the logic board to lift the battery tab off of the post then you can remove the battery.
-
-
-
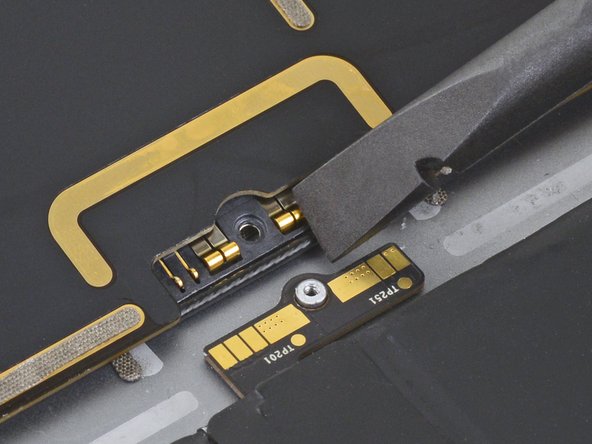
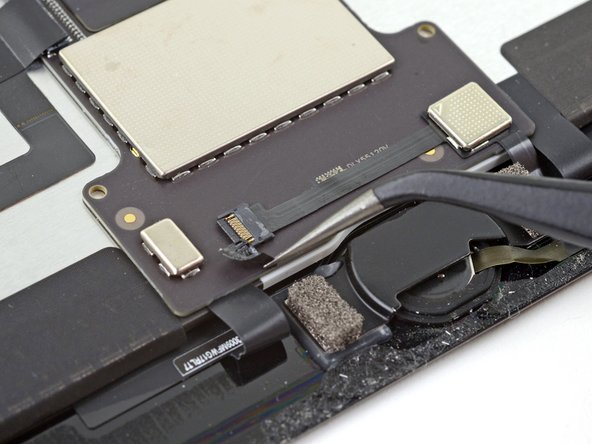
Usa delle pinzette per rimuovere il nastro adesivo che copre il connettore ZIF sopra il tasto Home.
-
-
-
Usa un iOpener, pistola termica o un asciugacapelli per ammorbidire l'adesivo sotto al cavo prima di sollevarlo.
-
In alternativa, applica qualche goccia di alcool isopropilico al cavo e aspetta un minuto per lasciar ammorbidire l'adesivo.
I used a heat gun on low air, set to 150°C, and very very gentle pressure with the tweezers, and it came out very easily and neatly.
-
-
-
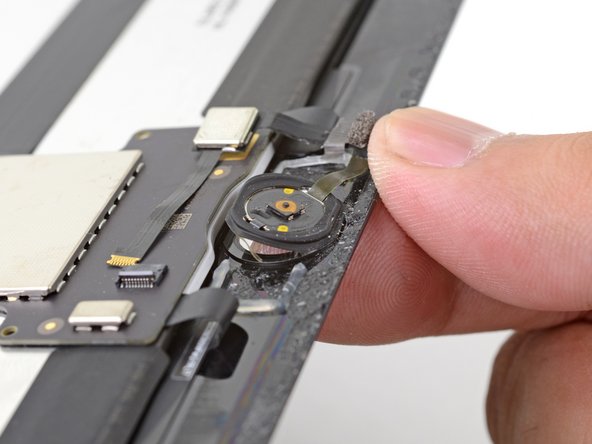
Applica qualche goccia di alcool isopropilico alla base della staffa del tasto Home.
-
In alternativa, puoi usare un iOpener scaldato per ammorbidire l'adesivo.
-
-
-
Rimuovi la copertura del tasto Home.
-
Gratta via quanto più adesivo vecchio puoi, quindi puliscilo con dell'acetone o dell'alcol isopropilico ad alta concentrazione (maggiore del 90%).
-
Fissa la copertura con colla a caldo, supercolla (cianoacrilica) o nastro biadesivo molto resistente. Assicurati che la copertura sia allineata correttamente prima di lasciar far presa all'adesivo, o il tasto Home non funzionerà quando premuto.
Would be really nice if the adhesive strip kit for the screen included the adhesive bits needed to secure the existing home button to the new screen (or a new home button to an existing screen).
One more thing about the bracket: you really need a strong adhesive when you put it back, so that pushing the button doesn’t dislodge it. If it doesn’t hold the button firmly, you can push the button out of its socket during normal use. Getting the bracket in and aligning it without accidentally sticking it in the wrong place or (much worse) sticking it to the fragile ribbon cable takes some very careful work.
This is an excellent guide, but I’d like to see maybe the first two steps of reassembly, showing how to do this correctly.
When replacing the bracket, a very slight difference in the replacement part caused the bracket to make the home button click all the time. The little white washer between the home button and the back of the glass was about 0.3 mm thicker than the original, and i had already superglued those parts together.
Fortunately, the playing card included in the kit is about 0.3 mm thick. I cut 2 small rectangles and superglued them to the feet of the bracket, so it would stand away from the home button. Then superglued the bracket on, and now it clicks perfectly. Hopefully I don't have any issues with the playing card delaminating as the home button wears, because I definitely don't know if i could get this ipad apart again (the first time was easier because the screen was already shattered).
-
-
-
Spingi delicatamente il tasto Home dalla faccia frontale dello schermo verso l'interno con la punta di un dito.
-


Confronta la tua parte di ricambio con quella originale: potrebbe essere necessario il trasferimento di alcuni componenti (come il bordo della fotocamera)o la rimozione di protezioni adesive dalla nuova parte prima di installarla.
Per rimontare il dispositivo, segui le istruzioni in ordine inverso.
Porta i tuoi rifiuti elettronici a un riciclatore certificato R2 o e-Stewards.
La riparazione non è andata come previsto? Rivolgiti alla nostra comunità Risposte iPad Pro 9.7” per trovare aiuto.
Annulla: non ho completato questa guida.
Altre 39 persone hanno completato questa guida.
Un ringraziamento speciale a questi traduttori:
100%

Questi traduttori ci stanno aiutando ad aggiustare il mondo! Vuoi partecipare?
Inizia a tradurre ›


18 Commenti
How would you re-attach that EMI shield after it has been peeled off?
Hi Garrett,
Try to straighten it as much as possible and remove any jagged edges around the edges. The screws will hold the shield in place.
I have a broken glass cover on the LCD screen on my iPad pro 9.7, is it possible to just replace the glass?
It is possible, although extremely difficult. You will need to remove the lcd/digitizer without doing any damage to the lcd. Then you need to separate the lcd from the cracked digitizer, clean the lcd, and then glue the lcd to the new digitizer. The fact that your asking this leads me to believe that you don’t have the many expensive machines and supplies to complete this correctly. I would just replace the lcd, as there is a fair chance you will damage it doing this removal anyways - depending on your skill level.
Hope this helps!
Doing a screen replacement, I followed the instructions but, it won’t come back on no picture and I don’t think its the back light because i shined a light on it and I can’t see anything. It will charge but no picture, tried the original broken screen and two others. Any Ideas?
Great writeup, clear instructions! I just finished replacing my display assembly on my iPad Pro 9.7. My glass was badly shattered and all separated when pulling with the suction cup, even though I taped it. So my screen came off in pieces and I had to separate the rest of the screen pieces from the glue along the edge with a tweezers and spudger.
After installing new display, everything works except the touch ID sensor. The new display works, the home button works as a button, just not the finger print part… The screen was very broken up with small pieces of glass all around the home button, but it did work before with the broken screen. I super glued the bracket that holds the home button in place as well, so it might be a pain to seperate again. Does someone make a replacement touch ID sensor? Or just not worth it and use the iPad as is without Touch ID? The iPad actually pops up an error on screen “unable to activate touchID on this iPad”
Worth fixing? Or just use it as is?
Congratulations on the successful repair! As noted in the introduction, the Touch ID functionality will only work with your original button, due to security reasons. It should work if you transfer it over from your old panel. If your original home button was broken, there is no DIY way to replace it to restore Touch ID functionality. You may be able to replace it through Apple, but it would be pricy.
Whether or not you want to use it without Touch ID definitely depends on personal preference and usage scenario. I would suggest giving it a week to see if you get used to it or not.
Where is the part with the glass screen replacement? Connecting the new screen and putting in the new home button?
We are currently out of stock for the replacement. To connect the new screen and home button, carefully follow the instructions in reverse.
Great repair guide. One thing though, if you have broken glass, even with taping the screen, the suction cups have a very difficult time keeping contact. This will extend the repair time. If you take your time and be very careful, you can make it happen. Also make sure to be extra careful with the display cables when reassembling. Its a real bummer to get all the way to the end and see that you damaged the cables trying to close it up.
My screen is chipping when i slide the pick into the screen. So when I go through the next time, It can’t go all the way through the screen. What do I do from there?
I’m not sure I fully understand your question. Are you trying to preserve the screen to be reused, or are you having trouble removing a chipped screen?
Will True Tone working with replaced display?
Al reemplazar la batería y proceder a cargarla con electricidad, la batería no ha excedido el 50%. ¿Qué hice mal y cómo puedo solucionarlo?
Bueno encontré un documento que decía que primero hay que descargar la batería
Perhaps a few too many steps on how to get the glass off, and not enough emphasis on what’s really difficult here, installing the old home button in the replacement screen. The big problem is that the home button is held in place by a bracket that must be very, very precisely aligned with the button underneath, or else the button won’t click. And even if the bracket and button are aligned, it’s nearly impossible to get the bracket to be at the right distance from the button. Too far, and it won’t click. Too close and it won’t click. The replacement kit does not come with the glue for this (in fact, my kit came without the promised glue strips at all, they had been forgotten, but iFixit quickly got them to me). I used the recommended two-side tape from iFixit, but that is really a kludge approach. I spent about 80% of my time on this project on the home button.
I had said It's fine as far as it goes. Thats not true. It's full of omissions, the most glaring of which is that if you block the battery as the author suggests, you run a very high risk of damaging the battery connector. If you're worried about losing data then back up your device. Otherwise, follow the instructions and be prepared to have to take out the logic board and replace the battery connector after you find that your renewed ipad won't charge its battery. Other things never mentioned are the camera bezel, which may stick to your old glass as mine did, and end up in the trash. And there is a little plastic washer that sits under the home button which will probably have to be rescued as well. All in all, you'd do better to find another instruction video. This one is pathetic.
Hi Phil,
I'm really sorry to hear of your experience. It's pretty terrible to get to the end of the repair, only to find that it didn't work. I'll take your comments into consideration and look into improving this guide more.
Covering the screen with tape proved an essential safety step with the ipad display/lcd I just replaced. The screen was so badly broken that a part of it was almost powder, but the combination of the tape and sticky adhesive residue kept most of that together, and cleanup was pretty easy as a result. One caveat, though, is that the tape will probably make the suction cup useless for pulling up on the display. It did for me, anyway.
John Lasseter - Replica