Questa traduzione potrebbe non riflettere gli aggiornamenti più recenti dalla guida originale. Aiuta ad aggiornare la traduzione o visualizza la guida d'origine.
Introduzione
Questa guida ti condurrà attraverso il il processo della sostituzione di un gruppo schermo LCD e digitizer difettoso in un Motorola Moto G4 Plus.
Questa guida riguarda la sostituzione di un gruppo schermo completo, che comprende il telaio del display. La tua parte di ricambio dovrebbe essere simile a questa. Se hai acquistato il nudo display, dovrai eseguire dei passi di smontaggio supplementari, che non sono coperti da questa guida.
Per la tua sicurezza, scarica la batteria da sostituire sotto il 25% prima di smontare il telefono. In questo modo si riduce il rischio di un pericoloso incendio se la batteria viene danneggiata accidentalmente nel corso della riparazione.
Cosa ti serve
-
-
Inserisci un'unghia o uno spudger nella cavità sul bordo inferiore del telefono, vicino alla porta di ricarica.
-
Solleva la cover posteriore dal corpo del telefono.
-
-
-
Fai scorrere fuori la scheda SIM per rimuoverla.
Tenho un Motorola g4 plus 64 G
El celular se volvía loco abriendo y cerrando aplicaciones
Ahora no reconoce la tarjeta SIM
Internet y Wasapp funciona
Alguien sabe donde lo reparan soy de Argentina Buenos Aires CABA
-
-
-
Rimuovi le 19 viti T3 da 3,1 mm che fissano il telaio centrale.
A pair of binocular magnifiers is helpful here. Also, a magnetic pickup will help pull the tiny screws out of their counterbores.
Well I'm stuck. 3 screw heads are stripped on mine, not lucky as they are two on USB port end and screw in-between two SIM slots. Phone bought new and this is 1st time screws have been touched, could see they were already stripped before getting screwdriver near them. Any tips on removing stripped screws?
Hi Mark,
I’m sorry to hear that! You can try some techniques from the stripped screw guide.
I found that a T4 driver was the correct size for the screws.
-
-
-
-
Stacca dalla batteria l'estremità della linguetta di estrazione, afferrala e tirala lentamente ma costantemente per separare la batteria dalla scocca.
Does anybody know, what the black tape covering the metal cans an the battey is made of? It seems to have a heat insulating effect.
No, but the tape completely separated from itself when I removed it. Glue separated from the backing. I figure the glue in the frame is holding it well enough.
I found prying the battery out was the trickiest part of this job. Take your time and pry with the plastic tool, working from the end away from the wires, but try not to deform the battery in the process. It does finally come out.
Hi, I cannot remove the Battery, it has too strong glue. Any Ideas?
Regards
You can try to drip some high concentration isopropyl alcohol along the battery edge to help loosen the adhesive.
-
-
-
Stacca il nastro adesivo giallo che copre la vite Torx T3 vicino allo slot per la scheda SIM.
-
Stacca il nastro di rame che copre il connettore del display.
When putting this metal tape back down. place it on the center of the connector first. Use the Spudger and GENTLY rub on the metal tape from the center out, to get the creases out of it that will appear when you take it off. By doing this, you can get it VERY flat and eliminate any creases that formed.
-
-
-
Usa uno spudger per alzare e scollegare dalla scheda madre il connettore dello schermo.
As you try to re-attach this clip, it helped me to look at it from the side (top of phone ) and look under the clip to help align the connector. It was easy to see when it did not line up and correct it so it clicked in cleanly. Same thing applies in Step 15
-
-
-
Rimuovi le due viti Torx T3 da 2,4 mm vicino allo slot della scheda SIM.
General hint in putting screws back in without stripping them. 1) put the screw back in the hold. 2) gently turn it counter-clockwise like you are loosening it again. (Do not press down on the screw, let the weight of the screwdriver be the only pressure) When you feel/hear a little click, stop. That is the screw thread falling into the correct groove. 3) Turn it clockwise to tighten the screw.. you should feel NO resistance until the screw is fully seated. If you do, repeat step 2 again until you hear/feel the drop of the screw. This works when putting in any screw, not just the ones on this phone. Repeat this same process for each screw in this step and step 4 above.
-
-
-
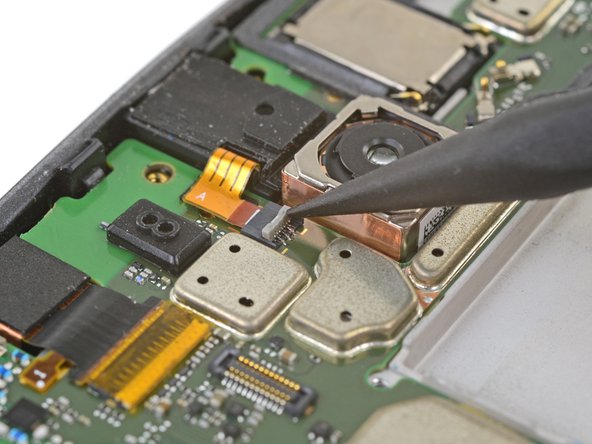
Inserisci la punta di uno spudger nell'incavo della parte inferiore della scheda madre.
-
Fai leva con attenzione per liberare la scheda madre dalla scocca e dalle clip sui bordi.
-
Usa uno spudger per spostare i cavi flessibili che potrebbero dare fastidio; accertati che tutti i moduli attaccati alla scheda madre (come la fotocamera anteriore) non siano in alcun modo ancorati alla scocca.
-
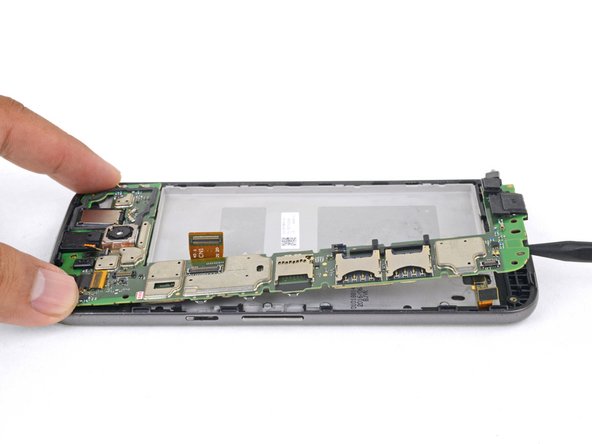
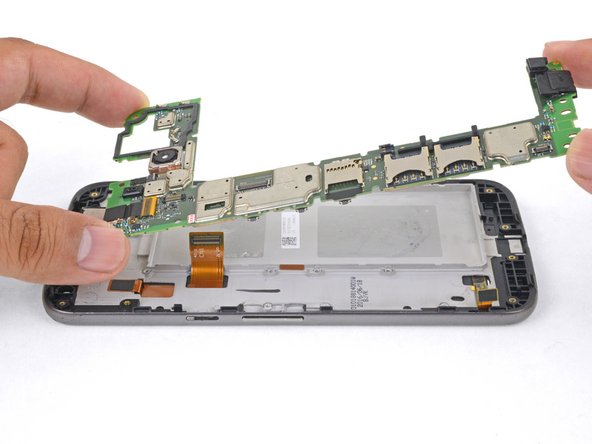
Solleva dalla scocca la scheda madre e rimuovila.
When reassembling, make sure the protective film over front camera opening is removed before putting that camera back in or you will be taking it apart again to remove it.
-
-
-
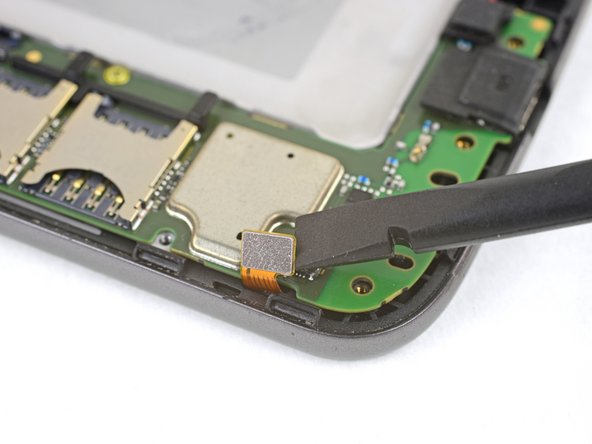
Per togliere il jack cuffie e trasferirlo sul nuovo telaio, inserisci la punta di uno spudger nella porta cuffie e spingila verso il basso per far saltare fuori il jack dal telaio.
-
Rimuovi il jack cuffie.
Unless I got a defective or incomplete replacement part (LCD screen and digitizer assembly), you must also remove the little headphone jack wire that you disconnected in step 18 and transfer it into the new assembly. It is stuck on the assembly quite well.. I used some alcohol (just like you used on the battery) to loosen the glue. It pulls straight towards the earpiece you will remove in step 22.
Wie beim Kommentar von 2018, fehlte auch bei mir das Verbindungsstück im neuen Rahmenteil, kein großes Ding, aber dies fehlt hier in der Beschreibung
-
-
-
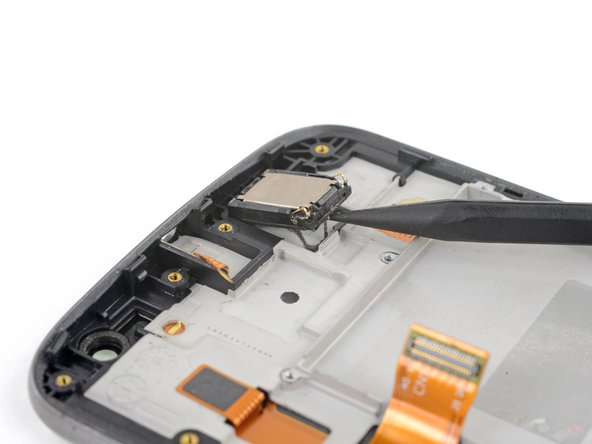
Per rimuovere l'altoparlante voce e trasferirlo sul nuovo telaio, inserisci la punta di uno spudger nella parte inferiore dell'altoparlante.
-
Fai leva per sollevare l'altoparlante voce e separarlo dal telaio.
Den Lautsprecher musste ich in meinem Fall nicht ausbauen, da ich einen neuen schon auf dem Ersatzrahmen montiert bekommen hatte
-
-
-
Rimane solo il gruppo schermo LCD e digitizer con il suo telaio.
-
Verifica con attenzione che le parti di ricambio combacino perfettamente e controlla di aver rimosso dalla vecchia scocca tutte le parti che andranno poi trasferite su quella nuova.
Vom alten Rahmen mussten noch die Buttons für Einschalten und Lautstärke rausgelöst und in den neuen Rahmen eingeklickt werden
-


Per rimontare il dispositivo, segui queste istruzioni in ordine inverso.
Porta i tuoi rifiuti elettronici a un riciclatore certificato R2 o e-Stewards.
La riparazione non è andata secondo i piani? Vai sulla nostra comunità Risposte Motorola Moto G4 Plus per trovare aiuto nella risoluzione dei problemi.
Annulla: non ho completato questa guida.
Altre 27 persone hanno completato questa guida.
Un ringraziamento speciale a questi traduttori:
93%

albertob ci sta aiutando ad aggiustare il mondo! Vuoi partecipare?
Inizia a tradurre ›

