Introduzione
Usa questa guida per sostituire un display rotto o crepato del tuo Samsung Galaxy Note8.
Prima di smontare il tuo telefono, scarica la batteria sotto il 25%. Una batteria può prendere fuoco e/o esplodere se forata inavvertitamente, ma le possibilità che questo accada sono molto più basse se è stata scaricata in precedenza.
Nota: questa guida ti spiega come sostituire solo il display mentre lasci il frame originale, la scheda logica e la batteria al loro posto. Tuttavia, alcuni schermi sostitutivi per questo telefono sono preinstallati all'interno di un nuovo frame (chassis) e questo richiede una procedura molto diversa: il trapianto delle parti interne del tuo telefono e l'installazione di una nuova batteria. Assicurati di avere la parte di ricambio corretta prima di iniziare con questa guida.
Questa guida comporta la rimozione della cover in vetro posteriore. Ti servirà dell'adesivo sostitutivo per riattaccare la cover posteriore al telefono. Se il tuo display di ricambio non è fornito di adesivo, dovrai usare del nastro per fissarlo. L'apertura del Samsung Galaxy Note8 danneggerà le guarnizioni impermeabili del dispositivo. Se non sostituirai i sigilli adesivi, il tuo telefono funzionerà normalmente, ma perderà la sua resistenza all'acqua.
Se il frame è danneggiato o piegato, è importante sostituirlo, altrimenti il nuovo schermo potrebbe non essere montato correttamente ed essere danneggiato a causa della pressione non uniforme su di esso.
La procedura di separazione del display dal suo chassis di solito comporta la distruzione del display, quindi non seguire questa guida a meno che tu non intenda sostituire in ogni caso il display.
Cosa ti serve
-
-
Spegni il tuo telefono.
-
Prepara un iOpener per ammorbidire l'adesivo sul retro del Note8.
-
Applica l'iOpener sul retro del Note8, lungo il lato del pulsante di accensione.
-
-
-
Usa una ventosa per sollevare il case posteriore e un plettro di apertura per inserirlo nella fessura che si è creata.
-
Partendo dal centro del lato, taglia l'adesivo mentre tiri sulla ventosa.
-
Fai scorrere il plettro verso l'angolo inferiore e lascialo qui per impedire che l'adesivo aderisca di nuovo alla cover.
-
Prendi un'altro plettro e fallo scorrere verso l'angolo superiore.
I used an X-acto knife with the flat blade to get it started. I tried using the suction cup - but it’s difficult to get good leverage. Once I got the cover started - I used the metal pry tool (sharpened with a dremel file) and a business card to work it open.
This is definitely the hardest part.
Once off I see all the glue on the curved part of the chassis NOTON THE BACK. Apply heat to curved edges.
-
-
-
Quando hai finito di tagliare correttamente l'adesivo di tutti i tre bordi, puoi sollevare lentamente la cover posteriore.
-
Stai attento al connettore del sensore impronte digitali quando apri il case. Dovrai forse scollegarlo come descritto nel passo seguente.
I broke the back camera cover for the NUT 8 and then I bought a commercial cover and installed it but the quality of the picture became very bad and my question is, do you know where to get the original cover at a reasonable price?
-
-
-
Stacca il sensore impronte digitali con delle pinzette.
don't skip disconnecting the sensor, even if isn't still glued to the case. it has to move away from the NFC/charging coil assembly in order to free the latter so it can be lifted away from the battery.
-
-
-
Togli il case posteriore.
How do you swap the fingerprint sensor
You can use a tweezer to swap the fingerprint sensor, you might be careful when doing the step 6, additionally, a tweezer will be helpful when reassemble the fingerprint sensor. please note that your new back cover needs to have the fingerprint adhesive on. most of the product did not have. i have get a LUVSS brand from amazon which came with all OEM adhesive and full set tools, even a B6000 glue, best option to go for replacing the note 8 back glass
-
-
-
-
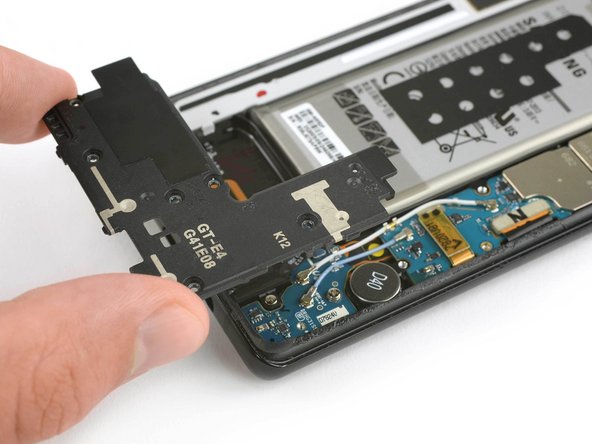
Inserisci un plettro di apertura nel bordo superiore, fra il gruppo antenna NFC e bobina di ricarica e il case.
-
Fai leva sulla parte superiore per sollevare il gruppo dal case.
-
-
-
Usa l'estremità piatta di uno spudger per scollegare il connettore della batteria.
-
-
-
Rimuovi le sei viti a croce Phillips #00 sul gruppo altoparlante nella parte inferiore del telefono.
-
-
-
Prepara un iOpener e applicalo sul display per almeno due minuti per ammorbidire l'adesivo sottostante.
-
Disponi strisce sovrapposte di nastro da pacchi trasparente sul display del Note8 fino a ricoprire l'intera superficie.
-
In questo modo, eviterai la dispersione di schegge di vetro assicurando al tempo stesso l'integrità strutturale del vetro quando dovrai forzare il distacco del display.
I'm assuming you flip the phone over so the screen is facing up before step 15 correct?
Yes, that’s correct.
OK thanks Tobias! I figured so but it doesn't hurt to check!
KDJ -
-
-
-
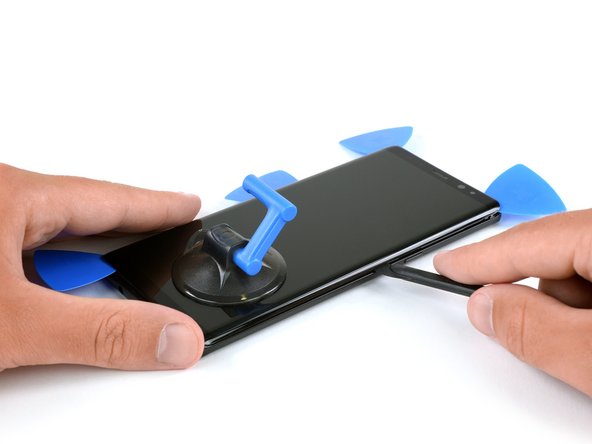
Una volta che lo schermo si presenta caldo al tatto, applica una ventosa sulla parte inferiore del telefono.
-
La ventosa potrebbe non attaccarsi se lo schermo rotto. In questo caso, cerca di sollevarlo con del nastro adesivo tenace, oppure applica della supercolla alla ventosa prima di procedere.
-
Tira la ventosa per poter inserire uno spudger halberd un plettro di apertura sotto il gruppo display.
-
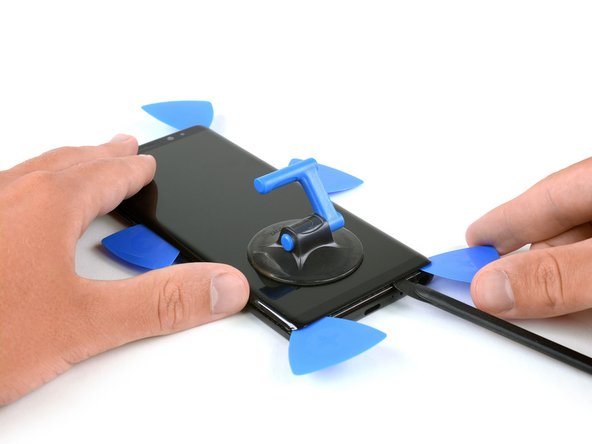
Inizia a far scorrere lo spudger halberd ( o il plettro di apertura) lungo il bordo inferiore del telefono per tagliare l'adesivo. Lascia un plettro di apertura nell'angolo per evitare che l'adesivo possa incollarsi di nuovo.
-
Continua a far scorrere lo spudger halberd o il plettro lungo il lato del telefono e quindi infila un altro plettro di apertura.
-
-
-
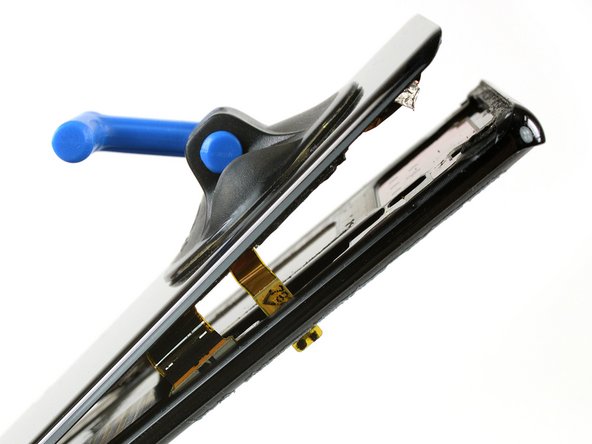
Fai scorrere lo spudger halberd o il plettro fino all'angolo superiore sinistro del telefono per tagliare l'adesivo e poter inserire un plettro per evitare che la colla possa aderire di nuovo al display.
-
Ripeti la precedente procedura di riscaldamento e taglio per le parti rimanenti del telefono. Inserisci un plettro di apertura sotto ogni angolo e su entrambi i lati del Note8.
-


Se possibile, accendi il tuo telefono e verifica la tua riparazione prima di applicare dell'altro adesivo e sigillare nuovamente il telefono.
Dopo aver applicato di nuovo l'adesivo, segui queste istruzioni in ordine inverso per rimontare il tuo dispositivo.
Il modo migliore di fissare il nuovo schermo è di usare un foglio di nastro di adesivo tagliato su misura. Applica il nastro sul retro dello schermo, poi infila con delicatezza il cavo del display attraverso il telaio. Allinea lo schermo e premilo nella sua posizione.
Annulla: non ho completato questa guida.
Altre 99 persone hanno completato questa guida.
Un ringraziamento speciale a questi traduttori:
100%

albertob ci sta aiutando ad aggiustare il mondo! Vuoi partecipare?
Inizia a tradurre ›


21 Commenti
I’m sorry, but this is just a preview question. When the guide says display, does it mean only the glass screen or the LCD and digetizer as well?
Hello Adrian Gomez. Here “display” refers to the glass, digitizer and LCD combo—those are fused together.
For this repair, do I need to buy the 230 dollar screen part as well?
This guide here is for replacing only the screen without the frame (which we currently don’t have in store). The 230 dollar part includes the frame and the according guide can be found here: Sostituzione gruppo display con il suo telaio del Samsung Galaxy Note8
Hi
I replace the new disply the camera ( front is working ) is not working I tried many things such as factory settings put it didn’t work
now I orderd a new camera hope it works or there is another way to solve it
nasser
I replaced my first cracked display screen today. Everything went quit smoothly thanks to Dominik . Thanks for the guide.
Can I purchase just a replacement front screen and digitiser (easily available on fleabay) to replace a cracked front Note8 screen?
Turns out that the screen+ digitiser are widely available without the LCF fused into them.
Thank you.
Hi ILM, separating the actual display from the front glass/digitizer is a cumbersome procedure that requires special tools. Same goes for fusing them together again. This could be done in well-equipped repair shops. Going for a combined display+digitizer assembly replacement is mostly the way to go for a “regular user” repair.
On part 19 the gold foil what is that and why have non of the parts ive bough come w it
Hi there,
Thank you for the guide and What is your opinion and recommendation on non-original (but fairly looking good)displays that we can buy online? Should we adhere to replace with original parts? What are the most possible consequences that can occur in such non-original replacements? Please share your ideas.
Hi uchira subhashana,
aftermarket screens can work well for repairs and often they are unbranded original parts. So there is nothing wrong with that. However you can’t say this in general because at the end of the day it always depends on where you buy the screen. Not all retailers are evenly reliable and you should always try to find a safe source like iFixit is. Worst that can happen with an aftermarket screen is that the new screen is not working but usually this wont harm your phone and you can send it back. This can happen with original frames as well.
will be awesome if you leave a links with all things we have to buy to do this.
Is there a safe reliable source for just the lcd/screen without the frame? A $200+ repair with 2+ hours of labor makes a hard sell.
I'm none to sanguine on the available options on amazon.
Thankyou again for the amazing guide.
Anyone have any recommendations?
Sorry for the delay, its awesome that you want to get into phone repair as it helps the environment and saves money!
https://www.megafixit.com/products/samsu...
I am repairing a note 8 myself, and will use this display totalling ~$180
Hop efully you guys can help me out, I did this procedure but when turning on the phone with the new display speaker, audio jack not working and Sim not recognized and everything was working properly before with the old screen.
Does iFixit sell display adhesive? if not where can i find some
You can use this double sided adhesive or pre-cut adhesive like this one (select different widths and pre-cut with the dropdown menu).
Is it good to use a glue or a double sided tesa tape to assemble everything back?
You might want to follow the link from two comment above for suitable adhesive :)
I used a heat gun to soften the glue - worked it around the edges, moving the heat gun quickly. As this is my first attempt, I’m still calibrating on this - but other guides mention getting the back cover hot enough so as it’s just too hot to touch. I also have a temp probe on my multi-meter, and I measured appx. 75 deg. C.
One of the other guides showed using a electronics hot plate set to 105 deg C for 60 sec.
Phil Brooks - Replica