Introduzione
Aumenta la tua memoria di archiviazione con un nuovo disco rigido.
Cosa ti serve
-
-
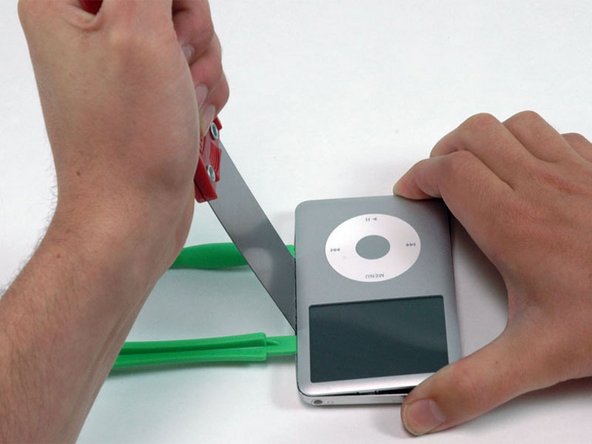
Infila attentamente una spatola metallica per circa 3 mm nella fessura tra i due strumenti di apertura, tenendola inclinata.
-
Una volta che la spatola ha superato il bordo della scocca posteriore, ruotala finché è verticale e infilala attentamente (ma con decisione), facendola ondeggiare, fino in fondo all'iPod tramite la fessura creata dagli strumenti di apertura.
-
-
-
-
Infila attentamente una spatola metallica per circa 3 mm nella fessura tra i due strumenti di apertura, tenendola inclinata.
-
Una volta che la spatola ha superato il bordo della scocca posteriore, ruotala finché è verticale e infilala attentamente (ma con decisione), facendola ondeggiare, fino in fondo all'iPod tramite la fessura creata dagli strumenti di apertura.
-
Tieni premuta con le dita la cover posteriore dietro la spatola per minimizzare la piegatura. Sempre lentamente piega la spatola come mostrato nell'immagine per assicurarti che la maggior parte dei ganci in metallo su questo lato dell'iPod siano rilasciati.
-
-
-
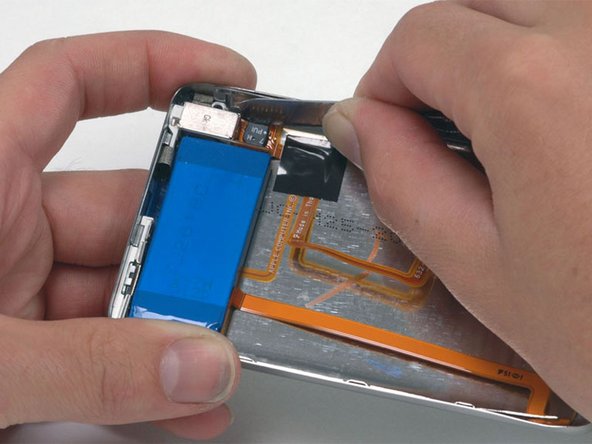
Prendi con una mano il pannello anteriore e con l'altra quello posteriore.
-
Delicatamente (DELICATAMENTE) libera i ganci restanti sulla scocca posteriore separando la parte anteriore da quella posteriore (considera il bordo inferiore dell'iPod come una cerniera), prestando molta attenzione a non danneggiare i cavi a nastro che collegano le due metà.
-
-
-
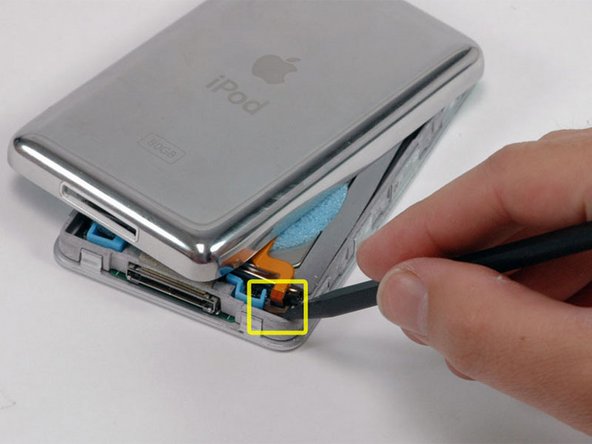
Solleva il disco rigido con una mano in modo da accedere al cavo a nastro della presa jack sottostante.
-
Usa uno spudger per per sollevare l'aletta in plastica che tiene fermo il cavo a nastro della presa jack. L'aletta ruoterà di circa 90°, rilasciando il cavo.
-
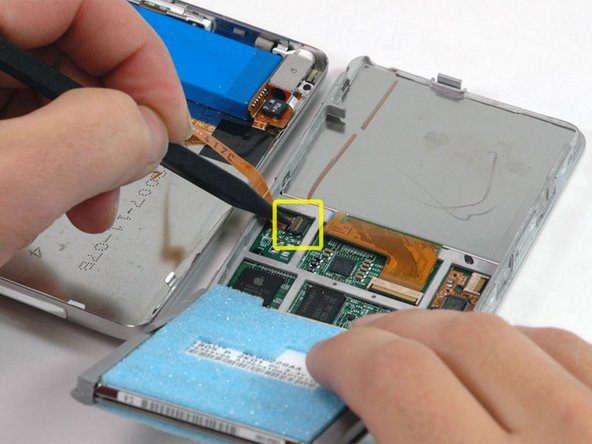
Sfila il cavo a nastro arancione della presa jack dal suo connettore sulla scheda logica.
-
Il pannello posteriore è ora separato completamente dall'iPod.
-
-
-
Ora occupiamoci di sistemare i danni fatti durante la procedura di apertura dell'iPod Classic! È molto probabile che almeno uno dei ganci in metallo della cover posteriore si sia piegato verso l'alto. Tutte queste clip devono puntare verso il basso per reinstallare la scocca posteriore.
-


Prima di richiudere la scocca, prova il dispositivo per assicurarti che tutto funzioni correttamente.
Per rimontare il dispositivo, segui le istruzioni in ordine inverso.
Prima di richiudere la scocca, prova il dispositivo per assicurarti che tutto funzioni correttamente.
Per rimontare il dispositivo, segui le istruzioni in ordine inverso.
Annulla: non ho completato questa guida.
Altre 333 persone hanno completato questa guida.
Un ringraziamento speciale a questi traduttori:
100%


Questi traduttori ci stanno aiutando ad aggiustare il mondo! Vuoi partecipare?
Inizia a tradurre ›

51 Commenti
The instructions worked like a charm. This is not for the faint of heart and requires some modicum of skill, but I saved a buttload of money by doing it myself. You will definitely need the recommended tools.
It worked like a charm... Just need to follow the instructions carefully and you can avoid to spend 200 something € to buy a new iPod!
Thanks iFixit
i couldn't get the plastic opening tool in between the 2 sections. i ended up using two razor blades instead of the plastic tools and the putty knife, i was able to replace the hard drive with very little struggle and almost no cosmetic damage(not that i care what the thing looks like)
Thanks for a highly useful guide. Slowly and methodically, using a single-bladed, razor blade, I was able to open the case, following this procedure. Patience is, indeed, a virtue, in this case.
I was able to successfully replace the hard drive and battery.
The only snag I encountered was that the headphone jack ribbon was glued to circuit board adjacent to the connector under the hard drive. (I just left this ribbon be, not wanting to risk damaging the ribbon.) It was a bit awkward straightening the case edges, but I managed.
Overall, I'd give this guide a grade of "A"....it was nearly perfect and very clear. Bravo!
Well I managed to get it apart, though it wasn't all that difficult with the right tools, but getting it back together has been a nightmare. Just saying "reverse the process" is reall not quite enough in this case. All the little pieces of shock padding keep falling off, it's almost impossible to get the two wires plugged back in as well as keeping them in place, but I got there in the end. Or so I thought . Now my ipod has no sound (except from dock output) - and on investigating I find I have severed the orange cable near the jack itself- either by bending it or catching it on something. So another part to buy. So it's a warning to be very careful.