Introduzione
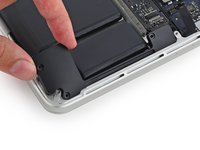
Usa questa guida per sostituire l'altoparlante sinistro.
In molti passi di questa guida l'altoparlante sarà a destra, perché il tuo laptop sarà in posizione rovesciata.
Cosa ti serve
-
Attrezzo utilizzato in questo passaggio:Magnetic Project Mat$19.95
-
Rimuovi le 10 viti seguenti che fissano il coperchio inferiore al case superiore:
-
Due viti Pentalobe P5 da 2,3 mm
-
Otto viti Pentalobe P5 da 3,0 mm
-
-
-
-
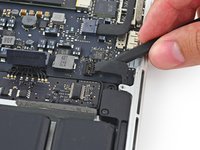
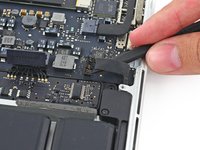
Inserisci la punta di uno spudger sotto il cavo dell'altoparlante sinistro vicino al suo connettore e sollevalo dal suo zoccolino sulla scheda logica.
-


Per rimontare il tuo dispositivo, segui queste istruzioni in ordine inverso.
Per rimontare il tuo dispositivo, segui queste istruzioni in ordine inverso.
Annulla: non ho completato questa guida.
Altre 61 persone hanno completato questa guida.
Un ringraziamento speciale a questi traduttori:
100%
Daniele Carminati ci sta aiutando ad aggiustare il mondo! Vuoi partecipare?
Inizia a tradurre ›

4 Commenti
Does anyone know the RMS/wattage of the speaker?
Excellent clear instructions. On my MacBook the cover screws were marked on the threads with white for the long ones and blue for the short. Since I couldn’t source a replacement speaker I repaired the existing one using contact glue as described by Earl Maliki on YouTube…it works; no more rattles. The sound is now lo-fi for the left speaker but good enough for speech and I never listen to music without a Bluetooth speaker. Total cost: 24 Swiss francs for a screwdriver set with a P5 pentalobe head. Much better than the 167 fr and 2 weeks in the shop I was quoted locally for repair.
Hi there,
thank you for the detailed instruction. Used it to replace rattling speakers in a “customer” laptop (I work in the Repaircafé in Bern, so not a commercial operation).
Cheers, J.
Very easy to follow instructions, the screw ID's were the biggest help, since Apple loves to rummage in their toolbox for a different one for each hole. Had a bit of trouble re-installing the speaker due to speaker cable being 'new', but with a bit of patience I got it to lie flat.