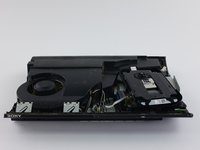
Introduzione
Se stai sostituendo l'unità di alimentazione, significa che il dispositivo non riceve energia in modo affidabile e quindi non funziona correttamente. Prima di iniziare questa guida, assicurati di avere gli strumenti adeguati (come indicato qui sotto), del tempo libero e uno spazio pulito e ordinato in cui lavorare. Durante il seguire i passaggi di questa guida, assicurati di applicare una pressione delicata sui vari pannelli o componenti, poiché potrebbero piegarsi o rompersi facilmente. Altrimenti, prenditi il tuo tempo e assicurati di leggere attentamente i passaggi mentre lavori alla sostituzione dell'unità di alimentazione!
Cosa ti serve
-
-
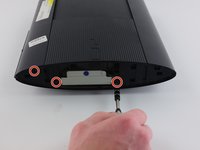
Rimuovi il coperchio laterale del vano HDD scorrendo il pannello verso il retro del dispositivo.
-
-
-
-
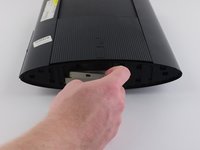
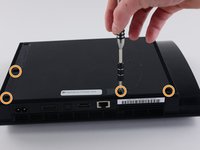
Sulla parte superiore del dispositivo, sgancia il gancio più a destra sotto il pannello frontale, solleva leggermente il pannello e applica pressione.
-
Sgancia il secondo gancio sul lato destro scorrendo uno strumento di apertura in plastica nell'area contrassegnata.
-
Scorri il pannello verso sinistra per sganciare gli altri ganci.
-
-
-
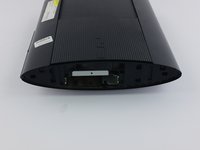
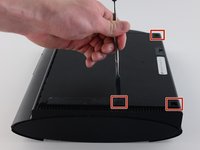
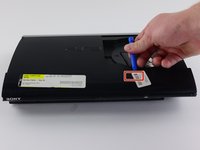
Rimuovi il pannello posteriore premendo la linguetta sul lato destro del dispositivo e scorrendo il pannello verso sinistra.
This tip and photo made me break this panel lmao there's a button top right of the disk tray you're supposed to push that not a "tab on the right side of the device" the mechanism to unlock the panel safely is in the top right of the inside of the disk tray
You cannot really even see the bottom in this photograph but it is clearly visible in step seven please before trying to remove this panel look at step seven to see the button I have described lol
-
-
-
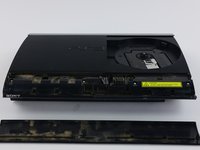
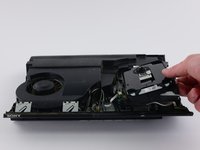
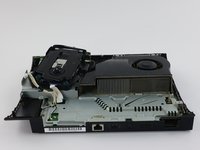
Sposta il lettore ottico di lato per scoprire una delle viti argentate da 8,8 mm.
-
Svita le due viti argentate da 8,8 mm su entrambi i lati con un cacciavite a croce #1.
be careful, the fiber-optic cables come out easily and are a pain to put back in
-
-
-
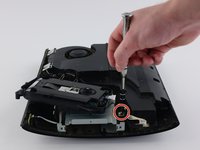
Rimuovi il cavo dalla presa e sgancia i fili dai due ganci in plastica.
-
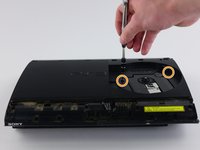
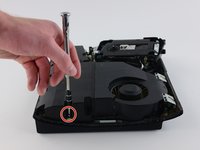
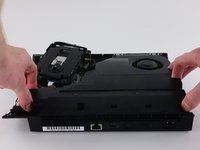
Rimuovi l'unità di alimentazione.
The left side of the PSU sits on two long metal prongs so you may need to pull a little to get it lose but you should be able to pull the whole unit in an upward motion
-


Installa la nuova unità di alimentazione. Per rimontare il dispositivo, segui queste istruzioni in ordine inverso.
Installa la nuova unità di alimentazione. Per rimontare il dispositivo, segui queste istruzioni in ordine inverso.
Annulla: non ho completato questa guida.
Altre 30 persone hanno completato questa guida.
Un ringraziamento speciale a questi traduttori:
100%

ToToMalux ci sta aiutando ad aggiustare il mondo! Vuoi partecipare?
Inizia a tradurre ›
Team

Cal Poly, Team 34-13, Maness Spring 2016 Membro di Cal Poly, Team 34-13, Maness Spring 2016
CPSU-MANESS-S16S34G13
4 Membri
24 Guide realizzate
8 Commenti
Perfect how to guide. Fixed my PS3 easily. Thanks
Great guide. However, still no power on PS3. Any suggestions as to what else may be the problem?
Peter Maher, I am in the same boat. I have no idea what the problem is. Red light in standby, but as soon as I try to power on, nothing. Same as before I did this power supply replacement. Obviously, something else is the problem. Anyone who has some insight into this please help!
Did you guys get word on the red light with no power on fix mine has the same issue.
i have the same problem as Peter Maher, the red light is in standby neither turning green on pressing nor it sounds beep on long press. dont know whats wrong. anyone has any solution to this?
thanks for guide - had a blown power unit and this was a useful guide to getting at it so it could be replaced. I couldn’t see a guide for taking the power unit apart so with nothing to lose I opened that up to see what was going on, and could see the charred remains of what I guess was a capacitor. New power unit in there now and working great. thanks
Just wanted to add: the HDD bay cover isn't on the right all the time, it varies with each unit. The side without the rubber PS logo is the bay cover.
Yash - Replica
I just wanted to add that the above is not correct either
My PS3 Super Slim Mdel No. CECH-4004A has the removable PS logo rubber seal on the left side while the HDD is housed behind the right side (with no rubber PS logo seal)
Eoin - Replica
My p3 just went off it goes on but then it just shut down
Chadley Abrahams - Replica