Introduzione
Segui questa guida per sostituire la cover posteriore del tuo smartphone Nexus 6P. In fase di rimontaggio applica del nuovo adesivo dove necessario.
Cosa ti serve
-
-
Con uno strumento estrazione SIM tira fuori e rimuovi il vassoio della scheda SIM.
-
Usa un iOpener per ammorbidire l'adesivo sotto il piccolo coperchio di plastica sulla parte inferiore del telefono.
-
-
-
Inserisci un coltello fra il telefono e il coperchio di plastica. Solleva il coperchio finché riesci ad inserirci un plettro di apertura.
-
Fai scorrere il plettro di apertura sotto il coperchio di plastica per tagliare l'adesivo.
How I did it was to heat the plastic to around 65C (150F) with a hair dryer, then managed to get one of my metal prying tools in and under the edge to pull it up.
Request to give some specification/link to the knife used in this process. I dont want to buy a knife too thick for the job. Thanks in advance.
Hi onkararadhye,
the knife used in this process was from the Technician's Razor Set in our shop.
The Ifixit knife has a curved sharp edge. I used this edge in the middle of the outer long side of the lower cover and pushed it straight down. The natural curve in the now softened plastic allowed it to buckle/bend a little further. I then slowly rolled the top edge of the knife out and away from the phone. There was then sufficient gap to insert a Pick. Heat it again with the IOpener and then slide the Pick further in and along from end to end.
The bottom edge of the panel is the easiest place to pry the knife into. I used the heat pad first and then hair dryer. There is a solid backing under the panel as well so no worries on getting the knife in. Edge of knife instead of tip will prevent you from mangling the panel. Get the panel lifted up enough to pry a pick in between the bottom of knife and phone case and continue trying to get 2-3 picks in along the bottom. Work slowly, none of these steps will go quickly.
-
-
-
-
Usa un iOpener per ammorbidire l'adesivo sotto il coperchio di vetro sulla parte superiore del telefono.
-
Inserisci un coltello fra il telefono e il coperchio di vetro. Solleva il coperchio finché riesci ad inserirci un plettro di apertura.
Used a fan on high heat. Worked great.
A heating pad works well for these steps
This has to be the hardest part. I really did not want to damage the glass. My phone has had a rough life and there is some minor damage despite having a double layer cover. I decided to prise the glass off from the end opposite from the camera after many unsuccessful attempts from near the middle. With the knife I was able to scrape the metal edge near the end of the glass cover - keep the blade facing out. With the metal out of the way the knife tip was able to get under the glass followed by a Pick. I heated it all up again with the IOpener heat tube. Using reflected light keep an eye on the bend in the glass. If you can see a bend then slow down and let the glue separate. The reward for patience is unbroken glass.
-
-
-
Fai scorrere il plettro di apertura sotto il coperchio di vetro per tagliare l'adesivo sottostante.
-
Solleva il coperchio di vetro.
I had a really hard time getting under the glass using the iOpener. I just don’t think it got hot enough to really loosen up the adhesive. So, I got my wife’s hair dryer and used that. I put it on the highest heat and held it to the glass for a couple minutes. That loosened it up pretty well and I was able to get enough space to put in a prying pick. Once I got one of those in it was pretty easy.
The way I did this bit was to heat the glass up to around 70C (160F) with a hair dryer, then use a razor blade to get in under the glass, then used a playing card and pushed that along underneath the glass to seperate the glass from the body. I started with my razor blade at the curved edge of the glass on the side of the phone, rather than at the straight edge at the top as they show here, because it was a bit easier for me.
Nothing else in my toolkit had a fine enough edge to get in under that glass except for a razor blade. The gap is very small.
The good news is that my phone works fine. And it now has some battle scars that make it look like I repaired it. Let’s be honest: bragging rights are half the reason we tried this instead of buying a new phone anyway. My camera and flash still work, though the latter needed its lens glued separately.
The bad news is that I broke my glass. I started from the corner away from the camera, and about halfway along the width of the phone, the glass utterly shattered. It stayed together, so its coating worked. I used some scotch tape to further control the shards, and i slid a small flathead along under the top and bottom edges to scrape the glue. I think that would have been my technique in the first place if i had x-ray vision. I also would have started camera-side.
I think my mistake was not maintaining heat while prying. The glass started hot, but when it broke it was barely warm to the touch. I think If I had kept it hot, it would have been more flexible.
Best of luck, everybody.
Go slow and it’ll work out. I used hair dryer in combination with the heat pad. Glass panel has some flex but not a lot. I used hair dryer at first to gently warm the glass and prevent heat pad from possibly shocking glass (may not be necessary but added 1-2 minutes). There will be some location around the panel to use the knife as a pry bar against the case/glass. Placing the phone face down on a silicone baking mat will provide a heat proof non-slip surface to keep your 2 hands on the phone. Only places you should be careful is at the camera and the flash. Flash area has a plastic add on the back of the glass that recesses down into the phone and prevents knife or picks from sliding in there. It’ll come up, just takes a while. Probably 20 mins for just this step.
-
-
-
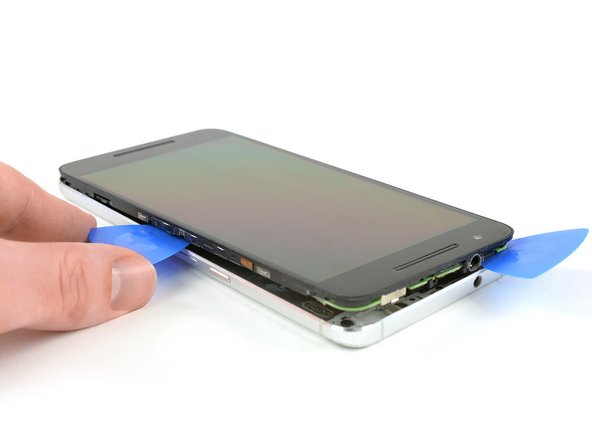
Inserisci un coltello fra la cover posteriore metallica e il vetro frontale per creare una fessura. Inserisci un plettro di apertura in questa fessura e fallo scorrere verso l'angolo superiore destro.
-
Inserisci un secondo plettro di apertura e fallo scorrere verso l'angolo superiore sinistro.
-
Fai scorrere i plettri lungo i lati per sganciare le clip di plastica che fissano il case posteriore al telaio centrale.
-
Rimuovi la cover posteriore.
There is a black plastic band around the front glass. So stick the razor between the metal back and outside of the black plastic that is around the front glass. If you look closely at the first picture you can see the black plastic strip outside of the front glass. If you stick it between the black plastic and screen you could leave the mid frame in the metal case and only lift up the the glass and screen.
Definitely try to get the knife as close as possible to the aluminum body. It will spare you damage to the plastic band… wish I would have read the comment before trying this myself… ah… and don’t get tricked by a possible space between the display and the plastic band it looks tempting to put the knife in there however that will possibly damage the plastic band. That’s where I thought I could get in between the display and the body and did damage my plastic seal. Btw, I got my device open from the left side away from the power and volume buttons.
I couldn’t even find room for the knife, ended up using a suction cup to lift the bottom left corner enough to get a plastic shim in. Worked around from there. Damaged a good deal of the plastic around the edge trying to get the knife in—would recommend just using a suction cup.
Blow dry the viser and stick an exacto knife under it. Gently pry. The bottom plastic is the same process, it is more difficult.
Easyway to push the unibody/screen apart is pushing hard on the fingerprint reader. No bending/scraping. Going between the screen and body with a pick or blade is stupid.
If you DONT put the 5 screws back in, it makes future servicing easy. The device has dovetail joints that will snap into place and still hold everything together. The phone is easy to bend/shatter anyways. This kind of gives you a removable back.
That is a terrific suggestion and it’s what I’ve done. Put the cover back on and guess what, those six screws aren’t even needed.
In fact, thank you all for your input. (I echo Alexander Haase above; there’s no real need for a blade when separating the front.)
Also, am I the only one who found the “iOpener approach” more effective than using a hairdryer? I don’t have an iOpener and I used one of those blue gel ice/hot packs. Simply placing it on the target area may indeed not be enough, but I covered my hand with a towel and kept it firmly pressed against the surface for a couple minutes. The visor then came off very smoothly on prying, with all the adhesive stuck only on one side.
Never was there the slightest chance of either part cracking or warping. The operation is far less scary than (and certainly not as Difficult as) the guide would suggest.
I had a lot of trouble with this, and the trick that worked for me was to do something similar to Alexander Haase above (minus the suction cup, I couldn’t get my suction cup to stick well enough to pull up the glass enough for a gap).
The bottom left corner of the phone - at least on mine - seemed to have the biggest gap and be most the ameanable to prying open. I used a razor blade and pushed it in at the very corner (as close as you can to the aluminium, so that you don’t wreck the plastic band around the glass), then jimmied up the glass with the blade until there was a gap. I placed a plastic prying tool / guitar pick in the gap, and pushed it around the edges to seperate the clips.
I tried to use the suction cup method, but ended up separating the glass from the phone. The glass cracked and now my screen is broken.
Same here, separated screen glass, now is damaged. WTF!
Well I wish this guy had been a little more detailed in where to pry and how the friggen screen just separates and the fact you need to slide the picks pointing more down than in or your going to spilt the screen apart. Now I have a brand new broken phone with custom shattered screen, a brand new replacement battery and a bunch of overpriced brand new ifixit tools I can use as paper weights. Thanks guys.
Bottom left of phone also worked for me. Read notes about going between black plastic and metal, not plastic and glass. Use suction cup on top of glass to pull up steadily as you work knife edge (not tip) in between the metal and screen assembly. snap joint is located about 1 inch up from bottom left corner. Work on the left side first so that when you lift off back, you are putting less stress on the buttons.
-


Per rimontare il tuo dispositivo, segui queste istruzioni in ordine inverso e applica del nuovo adesivo dove necessario.
Per rimontare il tuo dispositivo, segui queste istruzioni in ordine inverso e applica del nuovo adesivo dove necessario.
Annulla: non ho completato questa guida.
Altre 11 persone hanno completato questa guida.
Un ringraziamento speciale a questi traduttori:
100%


Questi traduttori ci stanno aiutando ad aggiustare il mondo! Vuoi partecipare?
Inizia a tradurre ›


Un commento
The first picture of Step-6 is very misleading when looking at guitar pick.
By mistake, I pulled apart my front glass from digitizer by taking the pic as reference.
For the heat gun users — any approximate temperature, and distance from phone, to not damage it?
Kamal - Replica
Hi Kamal,
my advice is the be very, very gentle with a heat gun. Especially the small plastic cover at the bottom end deforms within seconds. Try the lowest heat you can, with a good distance to the cover. Then try to remove the cover. If it doesn’t go off, lower the distance of the heat gun to the phone and try again and so on. I recommend to rather pry a little bit more than to use to much heat. If the cover deforms you’ll need a new one.
Dominik Schnabelrauch -
Is their a particular time i should have my heat gun on it like for ex: 10 secs
PlayStation Studios - Replica
Hi,
there’s no particular time but I advise you to go only for a couple of seconds and then try to remove the plastic cover. If you can’t manage to remove it, repeat the heat gun process and so on. Under strong heat the plastic cover deforms very fast and is not usable anymore.
Dominik Schnabelrauch -
Hi,
I used a hair dryer (exhaust air about 60°C) instead of a heat gun: this temperature was sufficient to soften the glue. The plastic and glass cover could be removed without damage.
Daniel Demuth - Replica
The Ifixit SIM removal tool is a bit rough for the 6P SIM eject opening I suggest a small paper clip and its easier for aged fingers to use.
Terry Ess - Replica
The IOpener may need to be applied more than once in cold weather. Even for a first time repairer it is possible to remove the small lower rear cover without damage.
Terry Ess - Replica