Introduzione
Sostituire il case superiore richiede la rimozione di quasi ogni componente del tuo MacBook Pro. Dovrai anche trasferire il trackpad originale sul tuo nuovo case superiore.
Cosa ti serve
Panoramica Video
-
-
Rimuovi le dieci viti seguenti:
-
Tre viti con testa a croce Phillips #00 da 14,4 mm
-
Tre viti con testa a croce Phillips #00 da 3,5 mm
-
Quattro viti con testa a croce Phillips #00 da 3,5 mm con spallamento
-
-
-
Usa l'estremità di uno spudger per rimuovere il connettore della batteria dal suo zoccolo sulla scheda logica.
-
-
-
Usa il bordo di uno spudger per scollegare il connettore della ventola dalla sua presa sollevandolo dalla scheda madre.
-
-
-
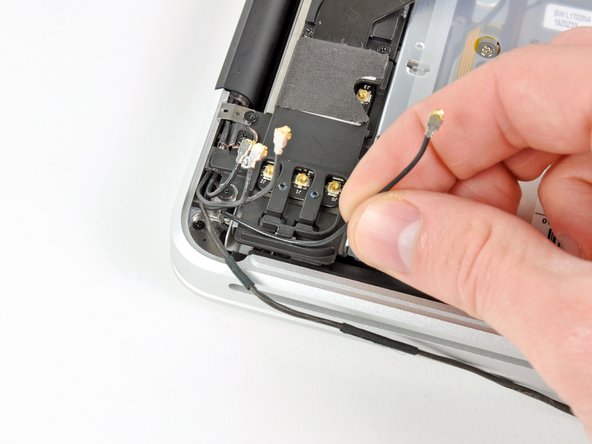
Usa la punta di uno spudger per tirare il cavo dell'altoparlante/subwoofer destro fuori dalla sporgenza di bloccaggio in plastica integrata nella scocca superiore.
-
Tira il cavo dello speaker destro verso l'alto per scollegarlo dalla sua presa sulla scheda madre.
-
-
-
-
Stando attenti ai diversi connettori vicino ai bordi, solleva la scheda madre dal bordo vicino al lettore CD.
-
Senza piegare la scheda, rimuovila dalla scocca superiore, stando attento al cavo flessibile della scheda di alimentazione che potrebbe impigliarsi nella scocca superiore.
-
Rimuovi la scheda madre.
-
-
-
Svita le seguenti viti:
-
Una vite Tri-point da 5,6 mm
-
Una vite Tri-Point da 13 mm
-
-
-
Prendi il case superiore con la mano destra e ruotalo leggermente verso il bordo superiore dello schermo in modo che la staffa superiore dello schermo superi il bordo del case superiore.
-
Ruota leggermente lo schermo lontano dal case superiore.
-
Solleva lo schermo ed allontanalo dal case superiore, stando attento ad ogni staffa o cavo che potrebbe impigliarsi.
-
Resta solo il case superiore.
-
-
-
Svita le quattro vivi a croce Phillips da 1,2 mm evidenziate in rosso.
-
-
-
Infila attentamente il cavo del tackpad originale nella sua fessura nel tuo nuovo case superiore.
-
Usa una mano per tenere fermo il cavo del trackpad mentre infili le due alette di bloccaggio nel bordo esterno del trackpad sotto il coperchio del case superiore.
-
Tira il cavo del trackpad mentre lo appoggi nel suo alloggio nel tuo nuovo case superiore.
-
-
-
Stingi le due viti esterne sul bordo interno del trackpad e controlla l'allineamento sull'esterno del case superiore.
-
Se l'allineamento ti sembra buono, avvita il resto delle viti a croce Phillips sul bordo inferno del trackpad.
-
Prima di rimontare la tua macchina, controlla che la vite centrale sia ancora avvitata in una posizione che faccia cliccare il trackpad correttamente.
-


Per rimontare il tuo dispositivo, segui le istruzioni in ordine inverso.
Per rimontare il tuo dispositivo, segui le istruzioni in ordine inverso.
Annulla: non ho completato questa guida.
Altre 131 persone hanno completato questa guida.
Un ringraziamento speciale a questi traduttori:
100%
Daniele Carminati ci sta aiutando ad aggiustare il mondo! Vuoi partecipare?
Inizia a tradurre ›

12 Commenti
This is a great guide. Just replaced my keyboard after a spill. It's definitely a harrowing experience, especially getting all those 67 microscopic screws holding the keyboard against the top side. But if you sit down with approximately 2 beers (wouldn't recommend more or you'll probably start making mistakes), it's a perfectly manageable 3-4 hour experience. Just take it slow!
If I replace just the keyboard, are there any steps that I can skip?
Just finished replacing the top cover assembly. The biggest problem I had was re-inserting the ZIF connectors for the keyboard and backlight. There isn’t enough room for my fat fingers to line up the cable with the socket. The angled tweezers applied carefully (don’t want to puncture or rip the cable) and a little help from a spudger made it happen. When switching the cases check carefully for “missing” parts. Besides the trackpad, the upper case I got from iFixit lacked the center support bracket for the optical drive and logic board, the little screw bracket for the bottom case and the antenna stuck to the case behind the right speaker. The antenna is a little fiddly because it’s stickied to the case and there’s not much room to pry it out without bending and possibly damaging it.
All that said, it wasn’t a particularly difficult job, just labor intensive. And the wife’s reaction to getting her business computer back without buying a new one was worth it.
Just finished this and the only things I would add deal with the metal plate that hold the power meter button in is not mentioned and luckily I was able to slide the cable under the logic board and make the connection. otherwise it would be good to add this step before you re insert the logic board. Also the black and orange rubber part that is the bottom of the hard drive mount. They just lift out of the old case and slide into the new case. And there is a metal piece below the speaker that needs to be transferred as well.
Otherwise great guild.
I just replaced the keyboard with all those pesky screws. But all is working again. I missed the part in replacing the keyboard itself in the first place. You need to have the sheets in the right order and in the right orientation. Also does it need removal of the stiffening bar that run along the keyboard. I forgot when I removed it, so I was a bit puzzeld when to put it back. Would be nice to add those steps also to this otherwise perfect guide!