Questa traduzione potrebbe non riflettere gli aggiornamenti più recenti dalla guida originale. Aiuta ad aggiornare la traduzione o visualizza la guida d'origine.
Introduzione
Usa questa guida per sostituire un case posteriore piegato o danneggiato, oppure cambialo per motivi estetici. Il case posteriore funge da chassis per l'intero telefono, quindi la sua sostituzione comprende la rimozione di tutti i componenti dell'iPhone.
Puoi usare questa guida anche per rimuovere le parti seguenti:
- Staffa IFC
- Supporto Loudspeaker
- Supporto microfono
- Clips del pannello frontale
Cosa ti serve
-
-
Spegni il tuo iPhone prima di iniziare lo smontaggio.
-
Rimuovi le due viti Pentalobe P2 da 3,4 mm sul lato inferiore dell'iPhone, vicino al connettore Lightning.
-
-
-
Se non disponi di un Anti-Clamp, segui i prossimi tre passaggi per utilizzare una maniglia a ventosa.
-
Applica del calore moderato sul bordo inferiore dell'iPhone utilizzando un iOpener o un asciugacapelli per circa un minuto.
This is important. I’ve serviced a lot of iphones/ipads for my family as a hobby in the past.
The adhesive was so tight, I cracked the screen trying to pull it/pry it off.
I highly suggest heating at least the bottom edge enough to soften the adhesive
I would suggest that you are not shy with the hairdryer. A high heat on the bottom of the phone for at least a minute, if not more, if required.
-
-
-
Applica una ventosa nell'angolo inferiore sinistro del gruppo display.
take out screws first!!
Make sure you use the right screw driver tip for i phone 6s Plus, which is the P-2. If the screw will not come off once is lose, try using a magnet.
My cracked screen prevented the suction cup from sealing. SOLUTION: With a piece of clear packing tape across the screen, the suction cup will seal and pull.
I broke my iphone screen in the first step!
Ok - just got my battery replacement kit and even got the opening kit for added insurance just in case. Settled down to startwork after carefully cleaning my (immaculate) screen - no scratches or anything, with rubbing alcohol, removing screws and warming with a hair dryer, only to find the suction cup provided in the kit is worse than useless! It won’t stick to the screen well at all. When it does - it pops off at the lightest pull :-( Now what do I do to get this started?!
-
-
-
Tira la ventosa con una pressione forte e costante per creare una piccola fessura tra il pannello anteriore e il case posteriore.
I had a shattered front glass panel so I could not get the suction cup to seal properly. I tried a couple of different ways to get good suction but to no avail. I eventually used a Stanley knife to pry up the corner so I could get the spudger into the opening.
A really high quality packing tape over the entire screen will usually be enough to use the suction cup on a shattered screen.
djwooten -
This was by FAR the most difficult part of this whole thing. I confess the spudger was not cutting it so I used a butter knife to get into the small opening first, then used the spudger to go around the screen.
Hey everyone, if you never have done this part before be aware there is an extremely strong adhesive around the lip of the screen and once again is extremely strong. I had to get a friend to insert the pry/pick into the small gap while I used one hand to brace the phone down and the other to pull the suction cup without it digging into my hand. Go slow, it took me 5 tries because I didn’t realize how strong the adhesive was.
I also had a badly cracked lower screen - that glass was actually threatening to pull off the phone in chunks during this step, even with packing tape. Resorted to @j2arch’s tip and inserted a utility knife vertically into the seam between the display and phone body. Was able to lever the glass enough to get the spudger in there.
I have replaced sevrel screens for my sister in law and my niece. The packing tape has worked every time and that’s with it Shattered and pieces already falling out. You have to make sure the packing tape goes to the edge of the screen but doesn’t touch the frame. I have the plier like screen remover and use that it is much easier to remove the screen by your self with that tool. I also have the little finger suction cup that comes with the kit here. I bought the plier suction cup tool When I had to replace the screen that had the pieces of the screen missing and I don’t regret spending the extra money for that it has made a world of difference. I do this as a hobby it’s not a job for me. The electric divide repair kit from Lowe’s is also a very good kit to help. If you’re only going to do it once the kit that comes with the package is a great deal from ifixit. Well worth the money to spend the little extra to get the kit if you all ready don’t have the tools.
If you try to use the spunger near the home button and try to pry it can crack your screen. This happened to me.
Same thing happened to me. This should be a big warning in these steps. If you have a small to moderate crack in you screen, but you weren’t planning on replacing the screen at the same time as another repair inside, there’s a risk of damaging the screen further and making it inoperable.
DW7ACCT -
I found it easiest to use two suction cups. One on the front as directed, and a second one on the back. Give the spudger to your assistant, and have them slip it in place while you pull the display from the case.
I gave up with the suction cup as it wasn't working for me with a cracked screen. Having heated the bottom of the phone with a hair dryer with a high heat for a good minute or so, I used a safety scraper (essentially a razor blade in a holder) along the bottom of the phone to separate the screen from the body of the phone. I used the scraper vertically between the bottom of the screen and the phone body and levered it sufficiently so that I could fit the spudger between the screen and the phone body. My experience when I first used the spudger around the frame was that the cracks in the screen caused the screen glass to separate from the frame, so I had to re-do it and ensure that the screen frame was separated from the phone body.
Safety scraper:
-
-
-
Il posto più sicuro da dove cominciare a far leva è l'intaglio nel pannello anteriore sopra il jack cuffie.
-
Mentre continui a tenere tirata la ventosa, inserisci la punta piatta di uno spudger nella fessura tra lo schermo e il case posteriore, direttamente al di sopra del jack cuffie.
This was by far the hardest part of the repair for me. Getting leverage while finding a way to prod with a spudger is a challenge in coordination. I used a second spudger with point holding the phone down by the headphone jack, with the other end of the spudger anchored to my desk.
For me this was the most time consuming task. I used a hair dryer for heating. I found a very tight adhesive. For a moment I thought of abandoning my efforts and take the assembly to a professional repairman. But as they say, patience is a virtue.
After fiddling for about 20 minutes, I achieved a barely noticable opening. So I decided to change the strategy. Instead of applying heat all over the base, I preceeded with small steps with heat concentrated near the opening. I applied intense heat only for about 15 to 20 seconds and immediately working with spudger. It took about an hour to completely open the case. It worked.
Thanks for reading.
- Mr Gamma
I also struggled with this step. Lots of heat, 3 different suction cups, I finally could see a small gap... much too thin to fit even a piece of paper into. A video on another site said it was the easy way. I used a sharp craft knife barely into the seam between metal and glass and pried slightly. And it started up. Still a pain freeing the rest of the adhesive. Perhaps the adhesive really sets up over the course of 5 years? I have it hinged open now, so onto the next steps.
-
-
-
Fai ruotare lo spudger per allargare l'apertura tra il pannello frontale e il case posteriore.
just changed the screen, but due to the tape along side the screen , it is best to heat a little so the glue losses and you can get the screen off better, like indicated
-
-
-
Tira la sporgenza sul lato superiore per rimuovere la ventosa dal pannello anteriore.
Remember to apply the screen gasket on the re-assemble. The gasket is provided in the kit but not mentioned here on the instructions.
There’s a link to the entire gasket replacement procedure in Step 21.
-
-
-
Afferra con delicatezza il gruppo display e sollevalo verso l'alto per aprire il telefono, usando le clip nella parte alta del pannello anteriore come una cerniera.
-
Apri il display a un angolo di circa 90° e appoggialo contro qualche cosa per tenerlo sollevato mentre tu lavori sul telefono.
-
Usa un elastico per tenere il display in una posizione sicura mentre lavori. In questo modo eviterai di forzare i cavi del display.
if the display cables are damaged how can you tell ?
In theory, I like the idea of propping up the screen with a rubber band and box/soda can like this, but after ripping the FaceTime camera cable twice, I realize that this method puts too much stress on the cable because it places the screen so far back. Even in this photo, you can see that the cable is taut. I’d recommend just holding the screen with your free hand to put the least amount of stress on that cable as possible.
-
-
-
Rimuovi le due viti Phillips che fissano la staffa del connettore della batteria alla scheda logica:
-
Una vite da 2,9 mm
-
Una vite da 2,3 mm
FYI - I used some blue painters tape wrapped around a piece of cardboard to hold the screws and brackets in place, in order, so they did not get lost. Some of those screws are MICROSCOPIC so be careful!
I also suggest having very good lighting, even a camping headlight for hands-free well lit work space. You will thank me later :-)
Use the bit labeled “PH000”.
PH000 bit just wants to free-spin in the 2.3 mm screw. no bite in the head at all. had no difficulty removing the 2.9 mm screw with the same Phillips. had to abandon battery replacement effort.
For this part, neither PH000 or Y000 worked. Technically, it’ll set you back 31$ because you will need the PH00 screwdriver for this part, and the part where you need to open the screen. They have ph00 screwdrivers in every hardware store and even ifixit.com. just know that they put the wrong screwheads for you
Do not lose track of which hole these screws go into. They MUST be put back into the correct hole that they came out of. If not, you will get the dreaded “long screw damage” on the mainboard, and that will be the end of the show.
Just remember where these screws go, and it will be fine.
Ended up employing a Philips #0 from a regular jeweler/precision kit on the 2.3mm screw. Bits seem a bit off for this step.
-
-
-
Rimuovi la staffa del connettore della batteria.
Does it matter if the brackets arent put back in the phone? I bought a used phone and brackets are missing. Thanks!
Auch die Abdeckung ist angeklebt. Also mit etwas Vorsicht und Geduld rangehen.
If you have forgotten your High School German -
The cover is also glued. So take some care and patience.
My bracket actually has a black wire connected on the underside that is attached to the metal bracket (with screw) below it in the picture. I decided to leave it on and just move it to the side.
-
-
-
Spingi indietro il connettore della batteria per evitare il rischio di contatto e quindi di alimentare l'iPhone mentre ci lavori.
When putting the new battery in, make sure to line up the plug and not to the top of the battery… our battery was smaller so the plug would NOT have lined up if we used the top of the battery. ALSO, the plug was NOT 90 degrees so we had to finagle the plug. Also, make sure there is a clear CLICK when you plug in the connector or it may not work. Ours went in but guess didn’t go far enough so we had to take the screen off and push it harder until we heard the “click” then it worked fine.
-
-
-
Rimuovi le seguenti viti a croce Phillips:
-
Tre viti da 1,3 mm
-
Una vite da 1,6 mm
-
Una vite da 3,0 mm
I really don't see value in removing screen use box and rubber band keep at 90 degrees.
I leave screen on as well for this. - Tho I prefer a 45 degree lean.
Thor -
I just changed my battery and also left the screen attached. I was lucky enough to get all 3 adhesive battery strips out clean so I didn’t have a struggle with the battery coming out. If I was going to need to get rough with it I was going to take the screen off at that point.
To keep track of screws, draw a quick outline of the display cable bracket/cover, with five dots where screws should be. Drop the screws on the corresponding dot. Helps if you use magnet pad.
Better yet, print out the pictures from the iFixit website, and use clear tape (“Scotch tape”) to TAPE the screws onto the place in the picture where they belong.
Tom -
Which screwdriver from the kit do I use for which screw?
I made a mistake and unscrewed the screw just north north west of the one circled in yellow. Of course I lost the screw. Can anyone give me any guidance about this? what does the wire connected to it do? What is the size of the screw, in case I have to replace it?
P.S. This is another reason to consider the possibility of NOT removing the screen just to replace the battery: removing the screen presents a additional possible headache, especially for people like me with bad eyesight who probably shouldn’t be doing this in the first place.
It is a 1.4 mm Phillips screw holding the NFC bracket in place.
I didn’t think this was necessary, bit I see it relieves stress on the front-facing camera and sensor cable connector; I did not disconnect the display connector nor remove the display screen.
I second this finding. I too did not remove the screws nor the bracket. The cables look a bit stretched, but certainly not strained.
-Gamma
This step of separating the two parts of the phone deserves careful consideration. In my case, I had propped up the display assembly with a box and rubber bands. However, only 2 of the battery adhesive strips came off easily. The effort to remove the battery with the display assembly attached was not a good move on my part. I jarred the ear speaker cable and after reassembly I had no camera or working ear speaker. Taking off these 5 screws and removing the three cables is not difficult. My suggestion: is you have ANY trouble removing the 3 battery adhesive strips, STOP, separate the two components, and then continue with the battery removal. Don’t struggle removing the battery with the display assembly attached. (I replaced the ear speaker cable, and all is working now)
Thanks for this tip! I am having a really hard time removing this plate because one of the screw heads are stripped. So I’ll try removing the battery adhesive strips first to see if I can get the battery out without removing the screen.
Use dixie cups and label them for each part you take out. You can stack the dixie cups to keep them in order.
OMG…. SO excited! It works! Seems that missing screw wasn’t an issue. The reason I’m so excited is, I’m a senior and have bever attempted anything like this before and was worried I’d mess it up, or it just wouuldn’t work for whatever reason. I know I never would have tried if it weren’t for finding this site, the great service, parts to do it and the videos/guides. Thank you so much ifixit. :-)
-
-
-
Usa uno strumento di apertura in plastica per staccare il connettore del cavo della fotocamera anteriore e del sensore.
FYI, in the video she uses the spudger for this but I think either one will work.
I don’t recommend using the spudger for this as you can do more damage that way. I scratched the black square thing underneath.
-
-
-
Usa uno strumento di apertura in plastica per disconnettere il cavo del digitizer facendo leva verso l'alto dal suo zoccolo sulla scheda logica.
“When reconnecting the digitizer cable, do not press the center of the connector. Press one end of the connector, then press the opposite end. Pressing in the center of the connector can bend the component and cause digitizer damage. “
The following note above was so helpful. I was speeding through the process of getting things back together, since it seemed easy to connect the digitizer cable, but I kept pushing it in the middle and I wouldn’t connect. Until I read through this step and realized it was easier if I would’ve connected one side and then the opposite side right after.
Don’t be too shy when pushing the ends of the digitizer connector back to place. If it does not connect properly, you might face the “half backlight” problem, even if you did not kill any LCD filter. Also check carefully, that you don’t clamp parts of the sticky sealing material placed around the connector inside the connection area.
This part was a very frustrating experience for me. I thought that my replacement screen was just poor quality, as it worked when it wanted to work. Pressing home/power repeatedly sometimes brought it back, charging to 100% also brought it back. The actual problem was that it is very easy to get some of the gasket material caught in the connector, which I couldn’t see until I used my jeweler's loupe. I used 91% alcohol to carefully clean all of this off until all pins were shiny, and it took about 6 tries to get it right. However, the screen’s been running well for 2 days now. I already bought another screen replacement which I have for a spare as it was 100% not the problem.
I followed all the steps, so the sound is missed. What could be happened? thanks a lot. Fabio Balbino
-
-
-
Scollega il cavo del tasto home/sensore delle impronte facendo leva verso l'alto dal suo zoccolo sulla scheda logica.
How much is this to replace?
And where could I buy from?
You can buy these at iFixit: iPhone 6s LCD and Digitizer - Original LCD
After finishing the assembly I got the message “Touch ID cannot be enabled on this phone”. I found this connector was loose. Plugged it back in and that fixed it.
Thanks for the tip. Same thing happened to me, some leftover adhesive was in the way!
Always make sure to disconnect the battery before you do any work on the phone replacing any parts the digitizer or anything. And before you start make sure the phone is turned off you don’t want any power surges. If you also have a static electricity bracelet that also is a plus to use but isn’t a necessity just a nice piece of mind. Some cases you do need to use one so you don’t discharge static electricity to an electrical component and mess it up.
What is the cable and how is it connected/fixed to the motherboard between the bottom socket and the screw hole.
Mine came loose somehow?
I figured out my own question its the Wi-Fi diversity antenna cable. But how is it connected/secured to the motherboard?
i pressed on the center of the digitizer connection. and the bottom half of my screen didnt work. i then took that same front panel assembly and tried to install it on another old iphone 6s+ and i had the same issue.
can i still fix it?
what exactly is broken now?
@mynameisoli Honestly this just sounds like a defective screen to me, but it’s hard to say for sure. Look closely at the connector at the end of the ribbon cable and check it for damage. If it’s slightly bent/curved, all the pins won’t make good contact in the socket. You can try bending it back so it lays flat, but you have to be very careful not to damage the connector or contaminate the pins with skin oils, so it’s tricky—and it may be harder to return as “defective” if you mess up the connector. So try this at your own risk. Apart from that, I would just return it and try a different display. Good luck!
The 6s plus screen repair kit i bought has the wrong size cable here on the replacement part. SOL.
I changed the battery on my iPhone and put all together again and charged it. When I pressed the home button the lock screen with my picture appeared and when I pressed it again the screen with the digits from 0 to 9 appeared. I was asked to enter my passcode, but when I did that nothing happened, the phone did not open.
What could be wrong? Is the home screen cable not fully connected or what could be the reason for this?
-
-
-
Rimuovi il gruppo display.
For instructions on home button swap out to the new screen you just installed, go here
Do you know whether the adhesive contributes to waterproofing, or just for stability/adhesion?
@kitabel The iPhone 6s case isn’t waterproof, so I don’t think adhesive around the display is contributing anything other than stability. The 6s series does have some water resistance, but it’s mostly internal and not something Apple advertises.
If you have a replacement adhesive for the display, you may need to install it before reconnecting cables to the components. If the adhesive wraps all the way around the display, it will be impossible to install it once the display is reconnected.
These instructions worked great for me. Thank you!
-
-
-
Stacca tutti i pezzi di nastro adesivo che coprono le viti della staffa della fotocamera iSight.
If like me you are only wanting to clean out the speaker, you do not need to do this step. You can skip to step 50
Mine had no tape there
-
-
-
Rimuovi la staffa della fotocamera iSight.
When replacing the bracket be sure to get the other end of the NFC bracket included with the right hand screw.
-
-
-
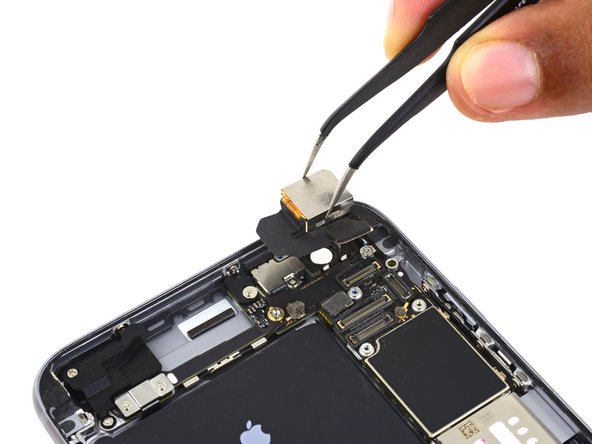
Scollega il connettore della fotocamera iSight dal suo zoccolo sulla scheda logica.
If necessary, the sticky patch on top f the connector should be removed. Helped my case a lot :)
-
-
-
Inserisci uno strumento di estrazione SIM nel foro nel vassoio della scheda SIM.
-
Premi per espellere la SIM.
-
-
-
Rimuovi la singola vite a croce Phillips da 1,4 mm che fissa la staffa di supporto dell'NFC.
The silver end of the NFC bracket goes here. The gold floppy end goes under the camera bracket.
-
-
-
-
Rimuovi la staffa del cavo del controllo audio.
Wo kommt den der “6 s Plus Bluetooth Flex” überhaubthin bitte ?
Also "das = https://www.ebay.de/itm/123934065844
-
-
-
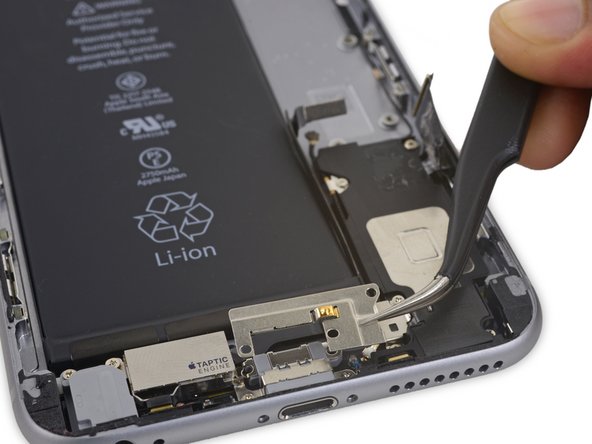
Disconnetti il cavo dell'antenna cellulare staccando il suo connettore sollevandolo dal proprio zoccolo sulla scheda logica.
how do you plug this cable back in? any tips for lining up with the socket? i can't get it to stay :(
Hold the cable with your tweezers and line the connector up over the socket as perfectly as you can, and then press straight down on it with the flat end of your spudger. Should snap into place with a bit of force.
My problem when I pull the cable in the socket i shocked bot of them pull togeher the cable and the socket in the logic board the small circle i cry how to fix pleasss help mee
The cable broke instead of coming out of the socket. Oh well. GG
My phone doesn't have a cable running here
-
-
-
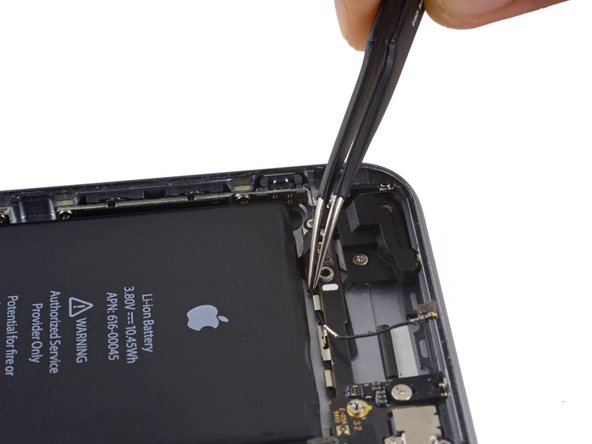
Disconnetti il cavo flessibile del pulsante di accensione dal suo zoccolo sulla scheda logica.
Don’t forget this guy when you’re putting it back in! you’ll have to undo a bunch of screws
-
-
-
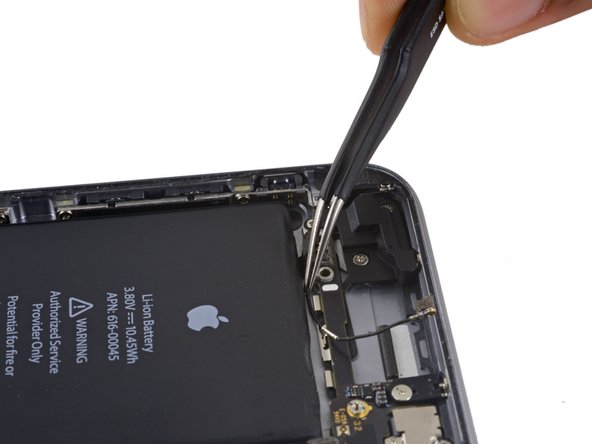
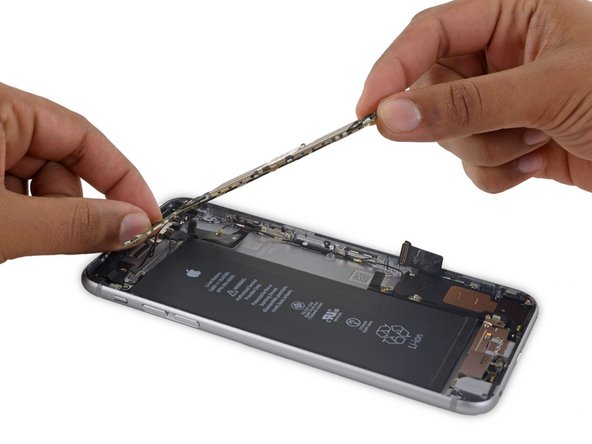
Scollega il cavo di interconnessione dell'antenna con il connettore Lightning sollevandolo dalla scheda logica.
-
-
-
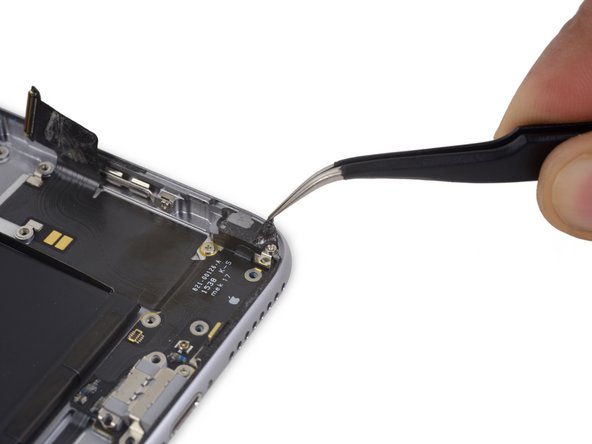
Usa l'estremità piatta di uno spudger per scollegare il cavo flessibile del connettore Lightning dalla scheda logica.
-
-
-
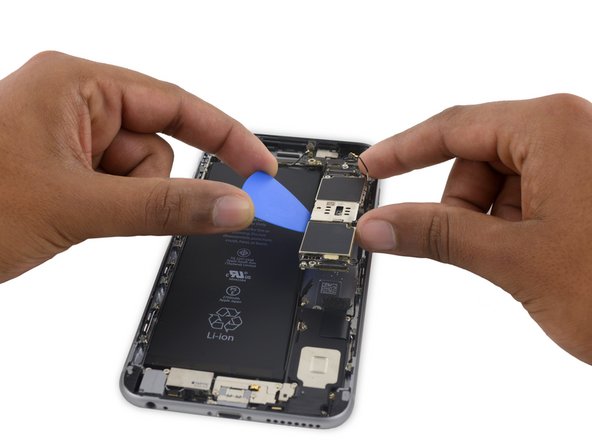
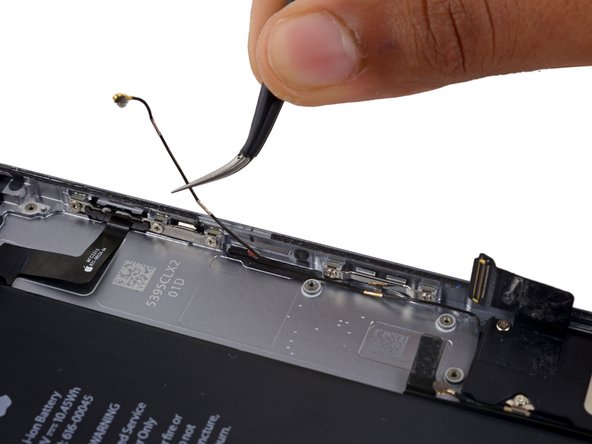
Sfila il cavo di antenna dalle due clip sul bordo destro della scheda logica.
This is super vague. Doesn’t explain exactly HOW to remove the cable from the clips, like it does in step 44. Slightly damaged my cable because I didn’t know how to remove it or the nature of the clip.
-
-
-
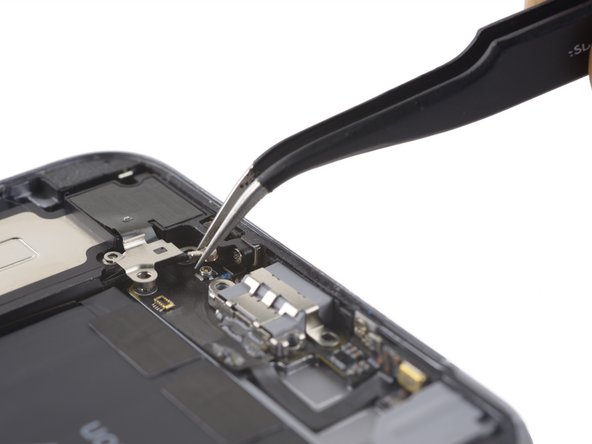
Rimuovi le seguenti viti:
-
Una vite a croce Phillips da 1,3 mm
-
Una vite a croce Phillips da 2,6 mm
-
Un distanziale a vite da 2,2 mm
Use can use a spudger in a pinch to dislodge the 2.2mm standoff screw. This was the most difficult screw in the phone. A Phillips bit will not work.
-
-
-
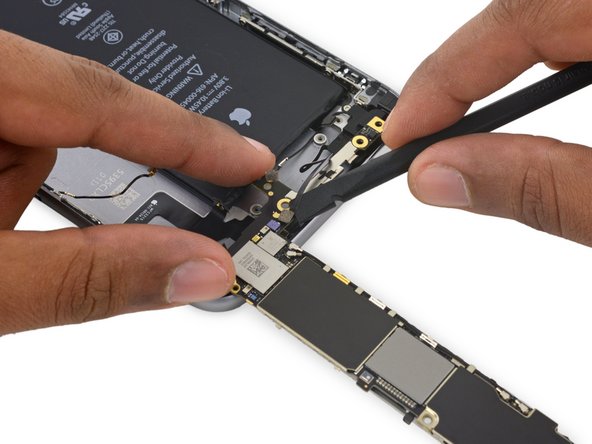
Continua sfilando il cavo dell'antenna cellulare liberandolo dalla seconda e terza clip della scheda logica.
-
Usa l'estremità appuntita di uno spudger per staccare con delicatezza il cavo dell'antenna cellulare dalla clip centrale sulla scheda logica.
My clip in the middle is not removing no matter how hard i pry or what i do, any help??
-
-
-
Posa delicatamente la scheda logica in posizione capovolta, con la sua parte superiore che rimane ancorata al case posteriore dell'iPhone.
-
Usa l'estremità piatta di uno spudger per disconnettere il cavo di antenna Wi-Fi/Bluetooth dal suo zoccolo sul retro della scheda logica.
Ugh, the socket connector separated from the back of the rigid cable. Two wires are still attached to the socket connector, but I’m guessing I’ll need to purchase a replacement WiFi/Bluetooth antenna cable at some point. I hope you sell these too?
**Update** I used the tiniest drop of super glue with activator on both the connector and cable. It seems to be holding! Will reassemble and see if it works. Lucky for me, you sell the replacement cable for $14.99 if my cheap bastard fix fails :)
**Update #2** Using super glue on the upper left wi-fi connector seems to have worked, both my bluetooth and wi-fi are working well post-repair.
-
-
-
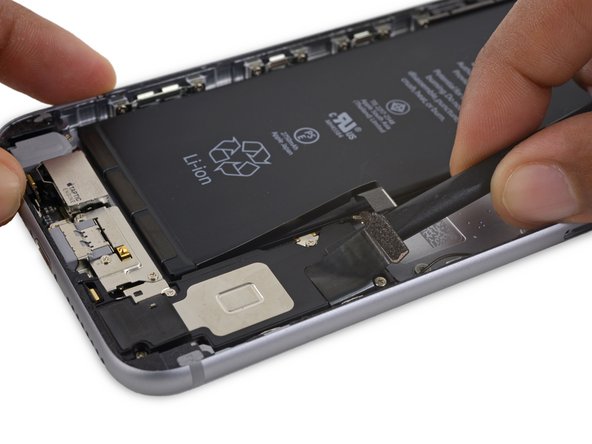
Usa l'estremità piatta di uno spudger per staccare dall'altoparlante il cavo flessibile del connettore Lightning.
-
-
-
Sfila il cavo dell'antenna Wi-Fi diversity dal suo astuccio di gomma.
-
Se lo sticker che indica i danni da infiltrazione d'acqua rende difficile sfilare il cavo di antenna, tira delicatamente indietro lo sticker per favorire l'accesso.
This step isn't necessary. You can leave this cable in place.
yes totally unnecessary to remove this or the board at all.
-
-
-
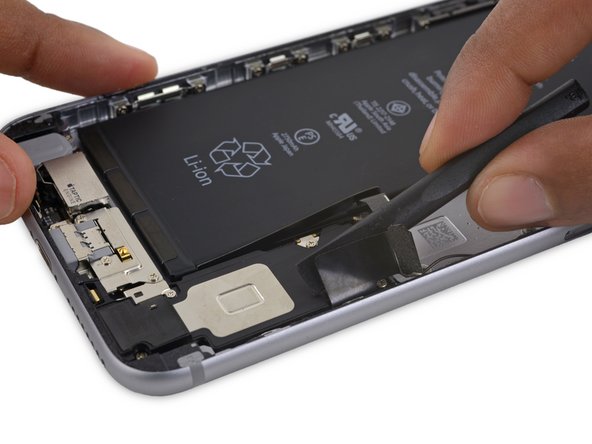
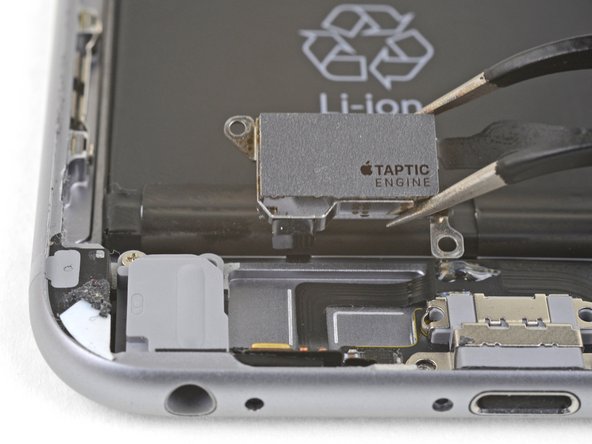
Usa la punta di uno spudger per scollegare il cavo flessibile del Taptic Engine dal cavo flessibile inferiore.
Maybe it would be best to have people remove the screws first? Otherwise prying the flex cable (which is very thin and not super flexible) may result in it breaking from the Taptic Engine. Just a thought.
The cable is plenty flexible, hence the name. ;) Remove the screws first if you like, but there’s no harm in doing it this way.
can i remove the lighting connector without steps 27 to 35?
-
-
-
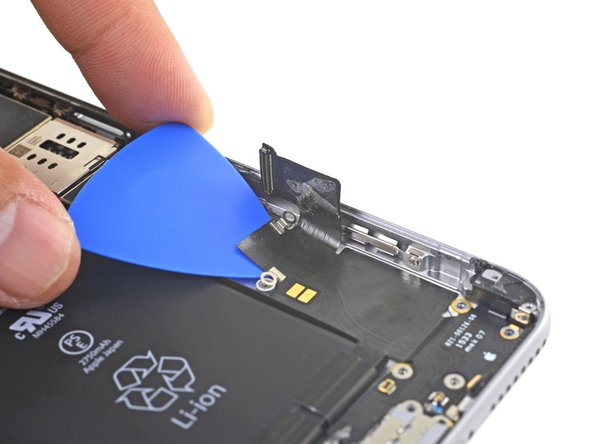
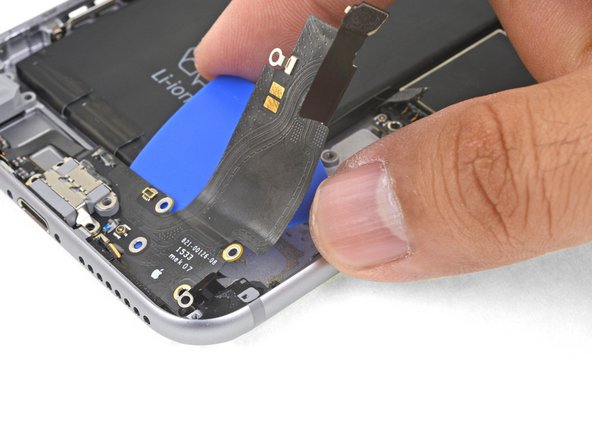
Prepara un iOpener e disponilo sulla parte inferiore del telefono per ammorbidire l'adesivo che tiene in posizione il cavo flessibile del connettore Lightning.
-
Lascia ammorbidire l'adesivo per circa un minuto prima di rimuovere l'iOpener e continuare la procedura.
-
-
-
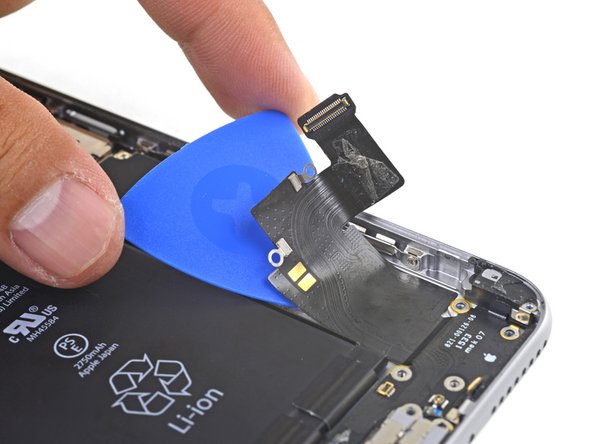
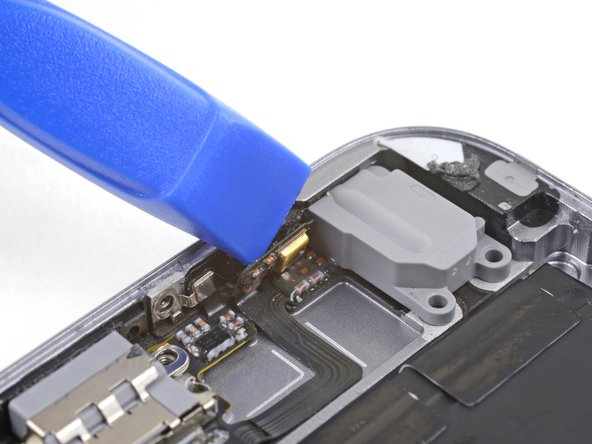
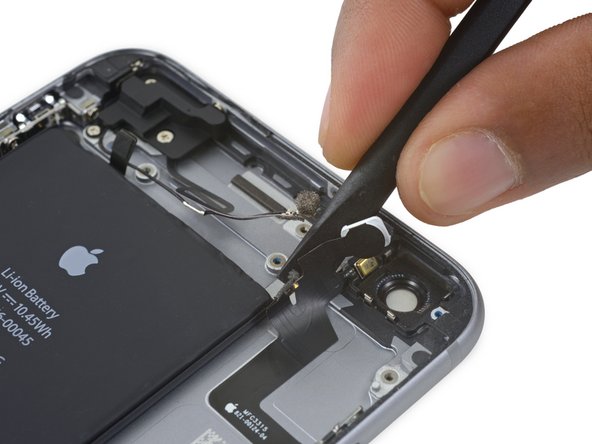
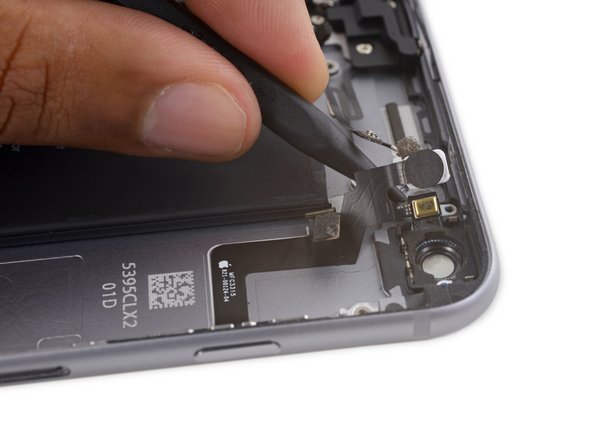
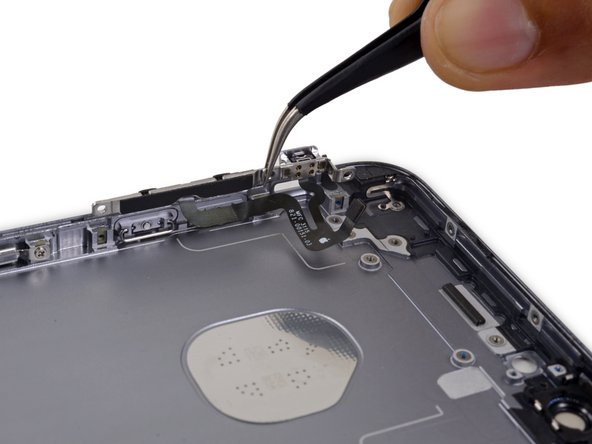
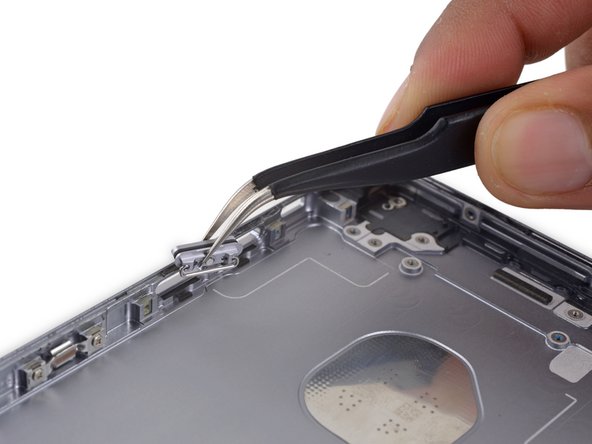
Usa un plettro di apertura per staccare il microfono di sinistra dal bordo del case posteriore.
make sure you don’t remove the little black plastic part that goes between the microphone & case, it was firmly attached to the left microphone.
The instructions don't mention it, but the photo shows the microphone by the headphone jack also being eased back, which we did have to do; agree with Rhonda's comment, and separating those parts took persistence.
-
-
-
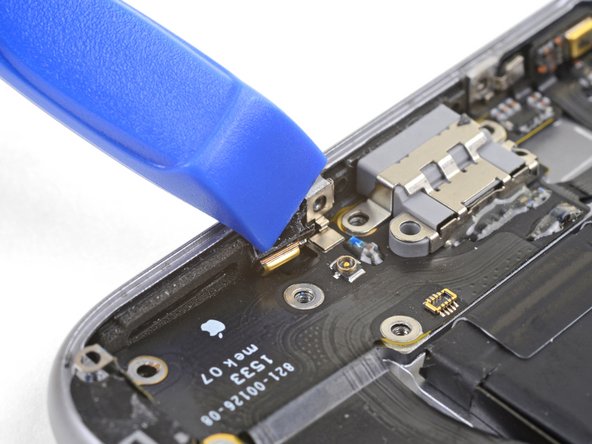
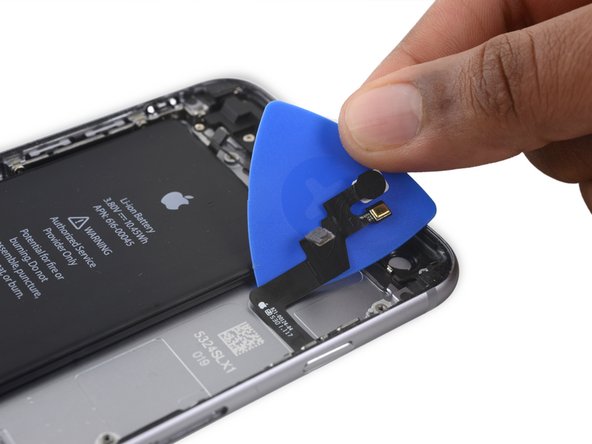
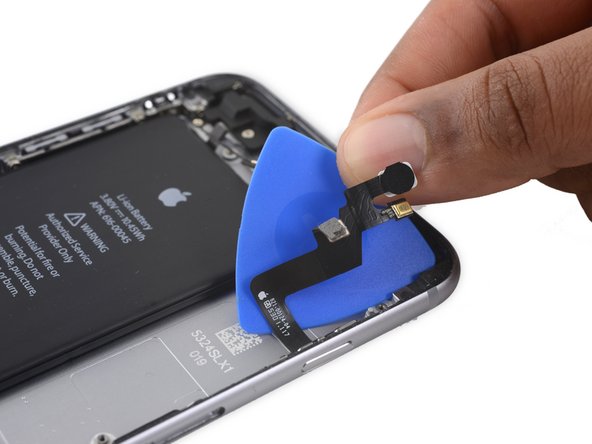
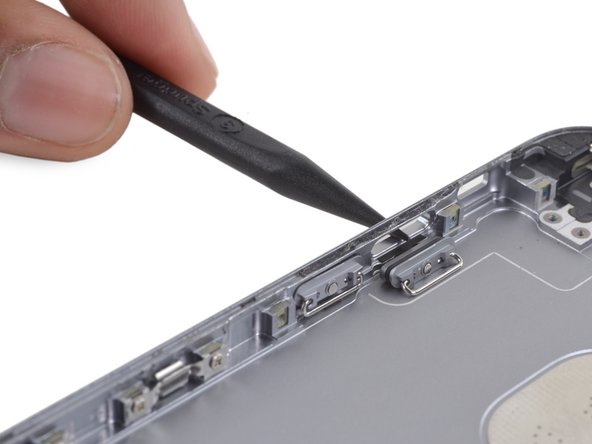
Infila la punta di uno spudger nella presa jack e muovilo leggermente per liberare la presa dal bordo inferiore della copertura.
The Spudger really works well to align the new headphone jack up when reinstalling the new lightning connector assembly
-
-
-
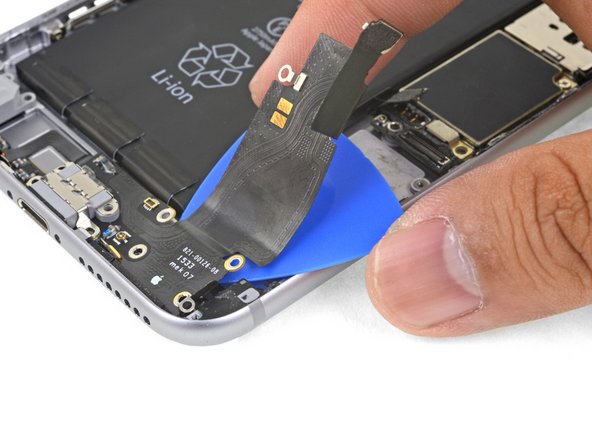
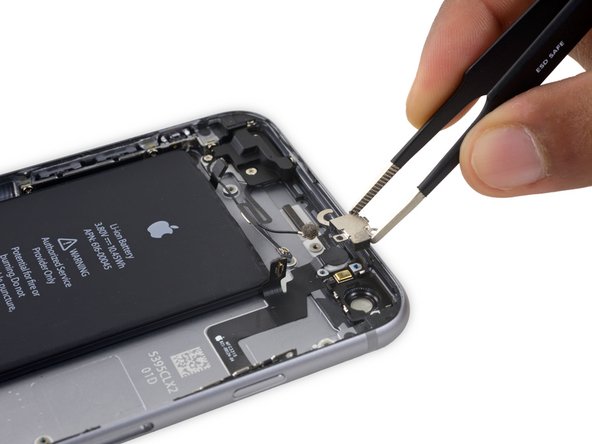
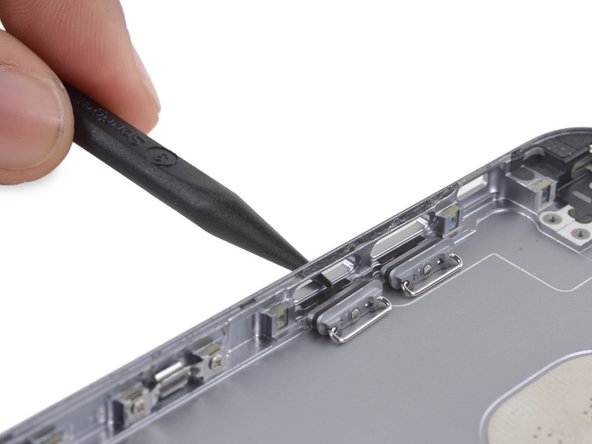
Rimuovi il gruppo della presa Lightning.
-
Se la tua componente di ricambio non include la guarnizione della presa jack, usa le pinzette per rimuovere la guarnizione dalla parte originale e per trasferirla su quella nuova.
-
Prima del rimontaggio, usa uno spudger per rimuovere tutto l'adesivo rimasto sulla copertura posteriore. Puoi usare dell'alcool isopropilico ad alta concentrazione per aiutarti nella pulizia.
Save the sealant rubber from the jack and the lighting connector if the new one does not have it.
-
-
-
Rimuovi le seguenti quattro viti Phillips:
-
Tre viti da 2,0 mm che tengono in posizione la staffa del pulsante di accensione
-
Una vite da 1,3 mm al di sopra della staffa del flash e del microfono
-
-
-
Spingi delicatamente fuori dal suo alloggiamento nel case posteriore la cover del pulsante di accensione.
-
-
-
Rimuovi le seguenti viti a croce Phillips che tengono in posizione l'antenna cellulare:
-
Una vite da 2,7 mm
-
Una vite da 1,7 mm
-
Una vite da 1,3 mm
You need to remove a black sticker to reveal the 1.7 mm Philips screw (Orange circle on the picture).
-
-
-
Prepara un iOpener e applicalo sul retro del case posteriore, direttamente sopra la batteria. In alternativa puoi applicare calore usando una pistola termica o un asciugacapelli.
-
Dopo circa un minuto, gira il telefono e usa una scheda di plastica per rompere e raschiare l'adesivo rimasto.
-
-
-
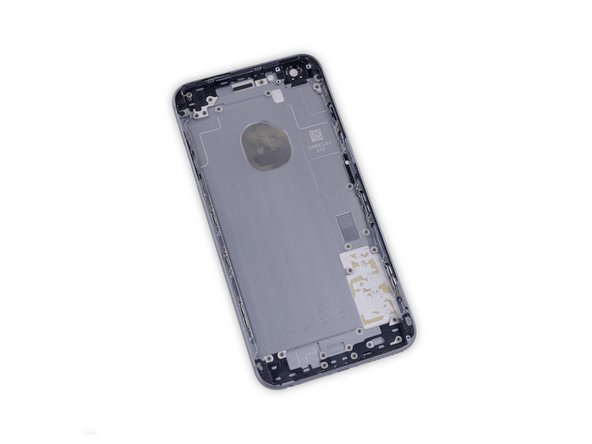
Rimane il solo case posteriore.
At this point please check your replacement case and the left over case. Check if the brackets/clips on the sides are present on the replacement case. If not, remove from the left over case and transfer them to the replacement case. You will need these brackets/clips in order for the screen to sit tight on the phone.
-


Per rimontare il tuo dispositivo, segui queste istruzioni in ordine inverso.
Per rimontare il tuo dispositivo, segui queste istruzioni in ordine inverso.
Annulla: non ho completato questa guida.
Altre 38 persone hanno completato questa guida.
Un ringraziamento speciale a questi traduttori:
94%

albertob ci sta aiutando ad aggiustare il mondo! Vuoi partecipare?
Inizia a tradurre ›

6 Commenti
Absolutely brilliant clear instructions
i like a challenge !
whomever wrote this instruction is a star
many thx
chris
Wow Evan! This is Ashwin from bellarmine. This was done really well and it came in handy, thanks for the contribution!
perfect step by step guide.
Took me 3 hours to swap the cover.
only think that missed is the application of the adhesive for the battery and the screen.
thanks mate!!
My iPhone 6s Plus I am still rocking but its very old now and as such a back of case that was really scratched up so I got a new back case, followed this guide, took my time, about 3 hours but now I have a phone that looks like the day I brought it many years ago. I can see me using this until it completely dies now.
Thanks Evan for you detailed, easy to follow guide :)
Make sure you use the correct screw driver tip to remove these screws, which for the iPhone 6s Plus is the P2, otherwise you may strip the tip of the screw making it 10 times harder to remove. If once the screw is lose, it will not come off, use a magnet to remove it.
Miguel Perez - Replica
If I do it by myself, will it damage the water resistant strip?
I know iphone 7 have it ,but I am not sure 6s plus have it.
Ganqian Zhu - Replica
iPhone 6s has an adhesive gasket under the display, similar to the iPhone 7—however, it doesn’t add much in the way of waterproofing since the 6s has non-sealed openings in other parts of the phone. Water resistance on the 6s is primarily internal (seals around the logic board connectors, etc.). It may still be worthwhile to replace the adhesive on the 6s in order to help keep the display firmly seated so it doesn’t move/wobble at all under pressure, but the phone will continue to work fine whether you replace the adhesive or not.
Jeff Suovanen -
Salve nella procedura iniziale di smontaggio display con la ventosa non è menzionato il fatto di scaldare i lati del display per “ammorbidire” la striscia che incolla il display alla scocca.
Non è necessaria la cosa o è consigliabile ?
grazie
Hello, in the initial disassembling procedure with the suction cup, it is not mentioned how to heat the sides of the display to "soften" the strip that glues the display to the body.
Is not the thing necessary or is it advisable?
thank you
Daniele - Replica
You’ve probably received your answer by now but for future enquirers, it does help the process of taking the screen off if heat is applied to the screen. If you have a hair Dryer use that on a low setting to heat the edges of the screen until it’s almost too hot to touch then slip very thin metal spudger around the edge to cut the adhesive. The carefully lift the screen with the help of the spudger and continue with your repair
Cheers Wayne
Wayne Lyell -
How do I know that the Battery has ZERO Charging Cycles on it when it arrives ? Is there a (downside) to Higher Capacity batteries ? It is INCREDIBLY DIFFICULT to maintain a “Zero Chinese Products Lifestyle”, so how do I know that I’m not getting a deficient Chinese battery, potentially a refurb. battery ?
integritybuilders - Replica
When your repair is complete, you can use coconutBattery to check your new battery stats and cycle count. (A properly tested battery may already have a charge cycle or two on it.) Avoid higher capacity batteries on iPhones—they’re generally either gimmicks, unsafe, or both. As far as the quality of the part, that comes down to how much you trust your supplier and whether they guarantee the product.
Jeff Suovanen -
So I need to empty the battery to zero percent?
johnpatrickanat - Replica
Below 25%, exactly as stated in the instructions. There’s no benefit to draining it further than that, and in fact you’ll slightly shorten the service life of the battery by draining it all the way to zero. Follow the instructions exactly as written—if you go off-script, you’re a lot more likely to break something.
Jeff Suovanen -
So my screen shattered completely and the screen first had colored lines on tge while right side then it went out completely. If i get an lcd and digitizer replacement I'd that oing to fix it
shellietheleo - Replica
I would initially recommend a well-lit, comfortable area and placing the screws on a white piece of paper with the screw sizes written down (apparently there are magnetic mats, also). Also, I found placing the phone on a paper towel is good so that if a screw is dropped, it will lessen the likelihood of bouncing away.
Lou Fazio - Replica
I recommend that, before you even lift a screwdriver or plug in the hair dryer, get a piece of paper and a pencil. As you unscrew and remove the parts, write the size and/or number for that step and put them by their label. I also used a microscope to identify the screw heads (I'm 75 and my vision is not what it used to be). Laying them out in order, I just went backwards when putting them all back in. I used an anti-static cleaning cloth instead of paper, but I should think they both will work.
N.B.: my kit had a nice pretty blue plastic sheet with a black outline on it. It was only when I put the whole phone back together and was packing up the supplies and tools that I realized it was a replacement gummi seal. A LABEL WOULD BE VERY USEFUL HERE!
I am a retired engineer, and aside from the size of the bits and bobs, it was a piece of cake! Thanks...you saved me $75!
P. Roberts - Replica