Introduzione
Segui questi passi per sostituire la batteria in uno dei tuoi auricolari Samsung Galaxy Buds. Le foto di questa guida riguardano l'auricolare di destra, ma la procedura è identica per entrambi i dispositivi.
I Galaxy Buds hanno una classificazione di impermeabilità IPX2, il che significa che sono resistenti agli spruzzi. Al termine di questa riparazione, saranno meno resistenti, quindi datti da fare per sudare poco!
Cosa ti serve
-
-
Inizia togliendo l'estremità "alare" in gomma dell'auricolare:
-
Afferra l'estremità (dove c'è la scritta "R") e tirala delicatamente verso l'alto fino a farla scivolare fuori dal dispositivo.
-
-
-
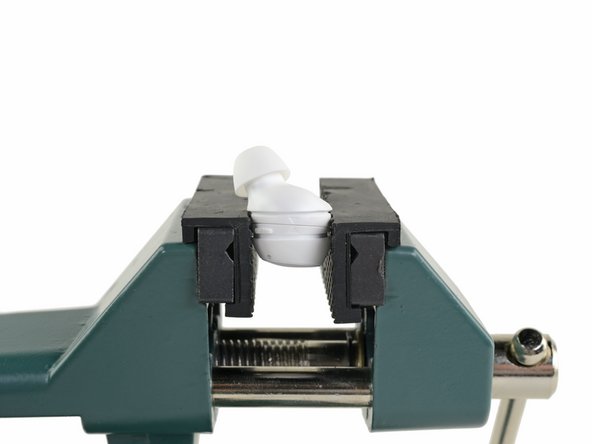
Disponi orizzontalmente il bud in una morsa con le ganasce gommate o in una pinza piatta.
-
Applica una pressione costante uniforme su ciascun lato dell'auricolare lungo la giunzione principale dell'involucro (la giunzione tra le due frecce). La pressione dovrebbe bastare ad avviare il distacco tra le parti.
You can avoid vise-marks if you use a plastic opening tool, I was able to do it pretty easily. First I applied pressure with my fingernail which created a slight rift, at which point I realized I had a plastic opening tool, so I was able to use that to pry the halves apart, and hold the small opening with my fingernail while I ran the plastic opening tool along the rest of the seam.
-
-
-
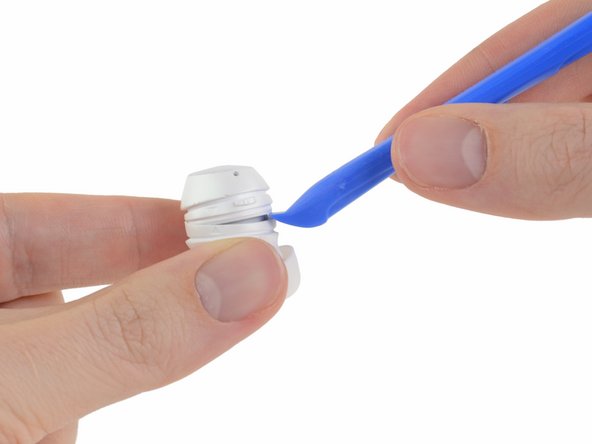
Una volta creata una fessura, separa delicatamente le due metà del dispositivo con uno strumento di apertura in plastica.
-
Può rendersi necessario far passare lo strumento di apertura attorno l'intero auricolare. Prenditi tutto il tempo necessario e fai del tuo meglio per non deformare la plastica.
-
Rimuovi con attenzione la metà superiore del bud.
-
-
-
-
Usa uno strumento di apertura in plastica per staccare e rimuovere il coperchio a forma di mezzaluna sulla faccia superiore dell'alloggiamento della batteria.
Hi...
My galaxy buds two pro having issue its damaged by some heavy objest fell one thats buds..now its not working coud you please help me to solve that
-
-
-
Il fondo dell'alloggiamento della batteria dei fori, che ti permettono di spingere fuori la batteria. L'estremità piatta di uno spudger si adatta perfettamente all'apertura più ampia, indicata qui in rosso.
-
Inserisci l'estremità piatta di uno spudger (o un altro strumento di apertura in plastica) nel fondo dell'alloggiamento della batteria e spingi fuori dall'altro lato la batteria stessa.
-
-
-
Rimuovi la batteria dal suo alloggiamento.
Gracias por la información, me gustaría saber en donde se consiguen esas baterías, gracias
My right side shows it's charging but doesn't power on is it a touch issue or battery
-


Per riassemblare il tuo dispositivo, segui i passi descritti in ordine inverso. Usa del nastro Tesa per riattaccare le parti che non si incollano con l'adesivo originale residuo.
Per prestazioni ottimali, calibra la batteria appena installata: caricala al 100% e poi mantienila sotto carica per almeno altre due ore. Quindi usa il telefono finché non si spegne a causa della batteria esaurita. Per finire, carica la batteria ininterrottamente fino al 100%.
Porta i tuoi rifiuti elettronici a un riciclatore certificato R2 o e-Stewards.
La riparazione non è andata secondo i piani? Vai sulla nostra comunità Risposte per trovare aiuto nella risoluzione dei problemi.
Annulla: non ho completato questa guida.
Altre 38 persone hanno completato questa guida.
Un ringraziamento speciale a questi traduttori:
100%

albertob ci sta aiutando ad aggiustare il mondo! Vuoi partecipare?
Inizia a tradurre ›

20 Commenti
How to fix not working mic on my galaxy bud
Requiere un cambio de pieza electronica correspondiente al microfono, ya que pudo haberse mojado
My Galaxy buds had the newer CP1254 A3 battery. My Buds were purchased new in August 2019.
My earbuds touchpad is not working after take shower , can you help how can i repair it
Where can I buy a replacement battery in Cape Town South Africa . Its a varta 3.7 v coin battery
With step 8 be careful because the plastic is VERY thin and easy to bend but apart from that it is very easy to do and well worth a try.
Excelente explicación, pude cambiar la batería de mis audífonos.
is the battery CP1254 and LIR1254 interchangeable? Notice the screenshot of the repair guide is CP1254 with 3.7v and the replacement battery in the part list is LIR1254 that’s 3.6v.
Hi CK,
Yes, the two are interchangeable! CP most likely stands for Varta's "Coin Power®" name, while LIR likely stands for a more generic "Lithium Ion Rechargeable".
In case if anyone run into the same issue as I did. After I replaced the battery, the touch control and mic wasn't working until I went to the Galaxy Wearable app and reset the earbud. Also, on the Galaxy Bud+, you don't need to open up the earbud like in this instruction. You can quite easily pry it open with your finger nails.
Hi Patrick, I noticed you have the Galaxy Bud + I have these too, did you use the LIR1254 battery in this? I noticed some steps were a little different but I cannot seem to source a CP1454 battery to replace the earbud and was hoping the LIR 1254 will work in it's place?
Sabrina -
Worked great, thanks a lot. I had the feeling it went even easier with the Galaxy Bud+.
@arthurshi Hey Arthur, I ordered LIR1254H battery but when I got to the battery inside the earbud it was a Varta CP1454 A3... I'm waiting for the LIR1254 to be delivered, but will this work? Should I try it? I don't want to fry the earbud
What is the correct charging voltage and battery model number for the Galaxy Live Buds? I bought an extra pair that were sitting for an extended time (couple of years in an unopened box) went to give them to my GF when her other buds died and I cannot get the brand new never previously used or opened buds to charge because they must be in a LVC (low voltage cutoff state).
Thoughts?