Introduzione
Usa questa guida per sostituire una batteria morta o usurata del tuo Galaxy A50.
Se la tua batteria è gonfia, prendi adeguate precauzioni. Per la tua sicurezza, scarica la batteria da sostituire sotto il 25% prima di smontare il telefono. In questo modo si riduce il rischio di un pericoloso incendio se la batteria viene danneggiata accidentalmente nel corso della riparazione.
In fase di rimontaggio, ti servirà dell'adesivo di ricambio per riattaccare alcuni componenti.
Cosa ti serve
-
-
Inserisci uno strumento di estrazione SIM, una punta cacciavite per estrazione SIM o una graffetta raddrizzata nel piccolo foro sul vassoio SIM sul lato sinistro del telefono.
-
Premi con decisione per espellere il vassoio.
-
Rimuovi il vassoio della scheda SIM.
-
-
-
Per prima cosa, spegni il telefono.
-
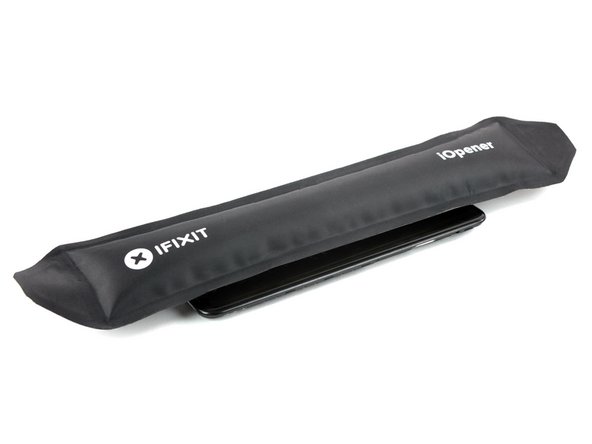
Scalda un iOpener e applicalo sulla cover posteriore per ammorbidire l'adesivo.
Überhitzen das Gerät nicht, das AMOLED-Display und der Akku sind sehr hitzeempfindlich.
Nur ein kleiner Tippfehler-Hinweis: (Überhitze das Gerät nicht)
OK, korrigiert. Das kann übrigens jeder machen, iFixit ist ein Wiki.
VauWeh -
how long should the heat pack be used for?
The heat pack is in the wrong position in photo - the glue that you are heating is actually all around the edge of the phone!
-
-
-
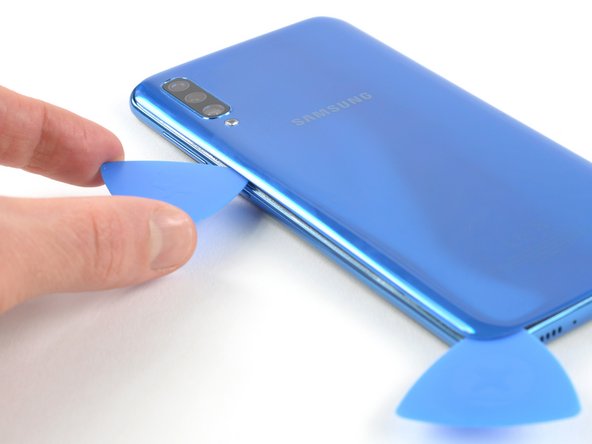
Inserisci un plettro di apertura dal lato inferiore del telefono vicino alla porta USB-C.
-
Fai scorrere il plettro di apertura fino all'angolo inferiore sinistro.
It would be much better to attempt the opening from the top of the phone as there is a delicate flex PCB antenna at the bottom just where you stick the pick in that can get damaged.
Wish I would have read your comment before, since I destroyed that cable while opening my phone... It's a cable for microphone, speaker and headphone jack. Replacing it was a real pain because it's glued but luckily I was able to find a spare.
H.W -
-
-
-
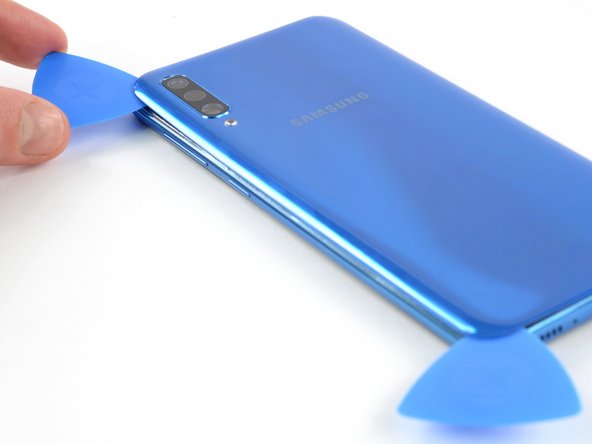
Inserisci un quarto plettro di apertura sotto l'angolo superiore destro della cover posteriore.
-
Fai scorrere la punta del plettro di apertura lungo il lato del telefono fino all'angolo inferiore destro per tagliare l'adesivo.
-
Lascia il plettro di apertura nell'angolo inferiore destro per impedire che la colla possa riattaccarsi.
-
-
-
Rimuovi la cover posteriore.
Very straight forward and simple replacement to do with the right tools, I used my hot air gun work station so this might have been alot easier for me then someone without one? Hair dryers work too, just in case a hot airgun station is not available to you dont worry you can do this repair without, but some form of heat will make life alot simpler :)
-
-
-
-
Rimuovi le 13 viti a croce Phillips #00 lunghe 4 mm.
To separate the screen from the mid-frame a few pointers I picked up from a video
1. use a hard pry tool such as iFixit Opening Tool
2. start on a long side about quarter way down from corner
3. work around the frame careful not hook the button assembly -
-
-
Usa uno spudger per scollegare la batteria sollevando il connettore dal suo zoccolo.
-
-
-
Usa l'estremità piatta di uno spudger per sollevare e disconnettere dalla scheda madre i cavi di interconnessione e dello schermo.
-
-
-
Applica dell'alcol isopropilico sotto ogni angolo della batteria e lasciagli diversi minuti di tempo per consentirgli di penetrare e indebolire l'adesivo.
-
In alternativa, applica un iOpener riscaldato sullo schermo direttamente dietro la batteria per due minuti per ammorbidire l'adesivo. Ripeti il processo se necessario.
Pro tip. i Highly recommend that you decharge the battery 100% before you even try to touch the battery. Reason is these kind of batterys do not like to be bend og damaged at all. If the battery is charged and you bend it, it can burst into flames or even explode, if you hear a hissing sound or see smoke instant push the phone away from you.. in worst case it can send out a 30cm burning flame or maybe it just make smoke and nothing happen.. So always drain the telephone of power before you try to remove the battery… Example turn on wifi and make it stream a movie or something until it run out of power is an easy way to do this ;-) No matter what i recommend to use safety glasses just in case. PRO tip.. in general if you repair any machine with a battery disconnect it and make sure it has no power.. A car battery is safe, but the kind in some electronic devices are not.. so make sure battery has no power.!!!!
-
-
-
Inserisci una scheda in plastica sotto il bordo inferiore della batteria e quindi spingilo con delicatezza sotto la batteria.
-
Continua a far scorrere la scheda di plastica sotto la batteria per separare l'adesivo.
Pro tip. i Highly recommend that you decharge the battery 100% before you even try to touch the battery. Reason is these kind of batterys do not like to be bend og damaged at all. If the battery is charged and you bend it, it can burst into flames or even explode, if you hear a hissing sound or see smoke instant push the phone away from you.. in worst case it can send out a 30cm burning flame or maybe it just make smoke and nothing happen.. So always drain the telephone of power before you try to remove the battery… Example turn on wifi and make it stream a movie or something until it run out of power is an easy way to do this ;-) No matter what i recommend to use safety glasses just in case. PRO tip.. in general if you repair any machine with a battery disconnect it and make sure it has no power.. A car battery is safe, but the kind in some electronic devices are not.. so make sure battery has no power.!!!!
-


Se possibile, accendi il dispositivo e collauda la tua riparazione prima di installare l'adesivo sostitutivo e sigillare nuovamente il telefono.
Fissa la nuova batteria con adesivo pretagliato o nastro biadesivo. Per posizionarlo correttamente, applica il nuovo adesivo nel dispositivo negli stessi punti della scocca dove c'era il vecchio e non direttamente sulla batteria. Premi con fermezza la batteria nella sua posizione.
Per rimontare il tuo dispositivo, segui queste istruzioni in ordine inverso. Applica del nuovo adesivo dove necessario dopo aver pulito le aree interessate con alcol isopropilico (concentrazione oltre 90%).
Per prestazioni ottimali, calibra la batteria appena installata: caricala al 100% e poi mantienila sotto carica per almeno altre due ore. Quindi usa il telefono finché non si spegne a causa della batteria esaurita. Per finire, carica la batteria ininterrottamente fino al 100%.
Porta i tuoi rifiuti elettronici a un riciclatore certificato R2 o e-Stewards.
La riparazione non è andata come previsto? Prova delle soluzioni di base ai problemi, oppure rivolgiti alla nostra comunità Risposte per trovare aiuto nella risoluzione dei problemi.
Annulla: non ho completato questa guida.
Altre 40 persone hanno completato questa guida.
Un ringraziamento speciale a questi traduttori:
100%


Questi traduttori ci stanno aiutando ad aggiustare il mondo! Vuoi partecipare?
Inizia a tradurre ›


15 Commenti
Great guide.. One tip… ALWAYS make sure to decharge the battery so it have no power before you do anything… example turn on wifi and stream a movie and when phone is out of power you can remove the battery.. never bend it, use heat, use fluid to desolve the glue behind battery.. never cut/damage or bend the battery and use safety glasses just in case. Battery in a mobile phone is NOT a toy
Teşekkürler. Çok açıklayıcı ve anlaşılır biçimde hazırlanan değerli bir rehber olmuş. Gerçekten başarılı.
My a50 just got a black screen, I have tried the forced reboot for a couple of time it opened but returns to black screen, now I can't open it with force reboot, is this battery or something else
I have same problem in same time. On the screen, I only have a circle charging sign, but not a percentage of battery charge when it's charging normally. I think the battery's dead.
Hi Allan, It's difficult to remotely identify what's wrong with your A50. Let us know what the reason is if you can figure it out.
Perfecte handleiding! ik heb deze gevolgd en binnen een uurtje was mijn telefoon voorzien van een nieuwe batterij.
Kleine opmerking nog, bij de stappen 9-13 moet je de openingsplectrum wel een beetje schuin naar beneden houden zoals duidelijk te zien is in stap 9/ Als je hem iets vlakker houdt zoals ik eerst deed dan gaan de klemmetjes niet los.
Hi @Gertjan, we’re happy to hear that your smartphone is up and running again. Thanks for your feedback!
Can I use iPhone adhesive strips to hold down the new battery?
Sure, you can use them for your Samsung as well. Good luck with your repair :).
Clear and informative instructions that are well illustrated. They enabled me to make a successful replacement of the battery. Thank you!
الله يبارك ماشاء الله
i had the same problem too, i replace it with a new battery and now i got a new problem that give a temperature icon when i connect it to the charger ???
When refitting the back cover, what adhesive is used? Step 19 says to remove any remaining adhesive -- does that include whatever was used to hold the back cover on originally?
Yes, I bought pre-cut adhesive with the new battery. Removing old adhesive was really a pain in the a**. If anyone have any tips on how to remove old adhsive easily, I'd be happy to hear. i used IPA and lint free cloth, but it was a ton of scrapping and a lot of mess.
H.W -