Introduzione
Segui questa guida per rimuovere e sostituire la batteria esausta in un Motorola Moto Z2 Play. Se la tua batteria è gonfia, prendi le precauzioni appropriate.
Prima di iniziare, scarica l'app Rescue and Smart Assistant per eseguire il backup del tuo dispositivo e diagnosticare se il problema è di natura software o hardware.
Attenzione: A causa del forte adesivo che tiene fermo lo schermo, lo spazio minimo peer inserire i tuoi strumenti e il calore elevato richiesto, c'è una buona probabilità di danneggiare accidentalmente lo schermo mentre lo rimuovi. Se vuoi riutilizzare lo schermo, presta estrema attenzione mentre scaldi ed inserisci gli strumenti per separare lo schermo dal resto del dispositivo.
Cosa ti serve
-
-
Scalda i bordi dello schermo del tuo Motorola Moto Z2 Play per 2/3 minuti con una pistola termica. Imposta la temperatura a 85° C e stai attento non tenere troppo la pistola su un solo punto per evitare di danneggiare il pannello LCD. Lo schermo dovrebbe essere molto caldo, ma non doloroso da toccare. Riscalda se necessario.
-
-
-
-
Trova il cavo a nastro in basso a destra nel telefono.
-
Se presente, rimuovi il nastro Kapton (arancione) che copre il connettore del cavo.
-
Solleva verso l'alto la piccola linguetta di blocco sul connettore ZIF e utilizza delle pinzette per far scivolare il cavo dritto fuori dalla sua presa.
-
-
-
Usando delle pinzette, rimuovi il nastro arancione disposto in basso a destra del telefono.
-
-
-
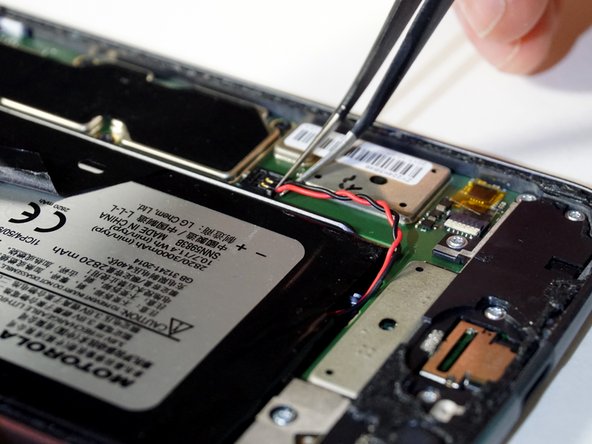
Stacca il cavo rosso e nero della batteria sollevandolo con delle pinzette.
What if the whole black box came off. I think i broke it! :( is this fixable?
-
-
-
Solleva il nastro nero e fai scorrere una scheda di plastica sotto la batteria.
-
Allinea la scheda parallelamente al lato lungo della batteria e sotto di essa.
-
Incunea la scheda ancora più sotto la batteria.
-
Solleva verso l'altro la scheda per favorire il distacco della batteria dall'adesivo.
-
-
-
Solleva la batteria per rimuoverla completamente dal dispositivo.
Why can't they just go back to the phones where you can snap off the back and simply replace the battery? I'm afraid to do it myself and Verizon won't do it for me. Now I have to find someone whom I will have to pay to replace a battery. This is ridiculous. It should not be so difficult to replace a battery and I should not have to jeopardize my phone to replace a battery. Why? Sorry, I just needed to vent. I miss simplicity.
I agree
I agree with both of you guys, but it’s the breaking point between performance, convenience, and safety. Older phones had batteries with hard protective casings that wouldn’t leave them vulnerable to pocket-fire if your keys jammed the battery.
Unfortunately, with phones getting more powerful(requiring a higher-capacity battery), AND slimmer, the protective casing for the battery is literally the casing on the phone. Look at the battery above; it could easily be pierced and dangerously vent.
I’m with you in wishing I could just pop a spare in, but those days have passed. =/
I suggest NOT to do this. Followed the directions exactly, with the slight deviation of my cable into the battery crumbling so I carefully pulled out the lose pieces with the tweezers and had NO problem putting it back together. My phone was WORKING with the exploded, puffy battery with NO deficits. Now? No charging (but checked it with the multi-meter so I know it is not the fault of the new battery). Only reaction I get is the phone making a vibrating sound when I plug it in to charge. Will NOT turn on. Will NOT react. F*CKED.
Without knowing what I was getting into I ordered a replacement battery, toolkit, and screen adhesive. Thanks to this guide I was actually able to remove the screen, replace the battery, and get it sealed back up relatively easily. Definitely nerve-wracking as I haven’t attempted anything like this before, but my phone was at the end of the battery life so I figured why not give it a shot.
Thank you for the easy instructions!
i followed the guide step by step, but unfortunately i touched the lcd in one place ... with the result that the screen went KO can i fix it somehow?
-


Per rimontare il tuo dispositivo, segui queste istruzioni in ordine inverso.
Dopo aver completato questa guida,calibra la batteria appena installata.
Per rimontare il tuo dispositivo, segui queste istruzioni in ordine inverso.
Dopo aver completato questa guida,calibra la batteria appena installata.
Annulla: non ho completato questa guida.
Altre 37 persone hanno completato questa guida.
Un ringraziamento speciale a questi traduttori:
100%


Questi traduttori ci stanno aiutando ad aggiustare il mondo! Vuoi partecipare?
Inizia a tradurre ›

Team

Cal Poly, Team S19-G5, Livingston Winter 2018 Membro di Cal Poly, Team S19-G5, Livingston Winter 2018
CPSU-LIVINGSTON-W18S19G5
4 Membri
30 Guide realizzate
11 Commenti
Great instructions, clear and concise.
thank you
so now that I've heated the adhesive to get the screen off do I need to apply new adhesive? or simply reheat it?
Hi Eli,
The most ideal option would be to replace the adhesive. This ensures the best chance for your phone to stay sealed. You can re-use the existing adhesive and it may work well enough for awhile.
Pretty good guide altogether. The only thing I’d add is some more detail on the heating phase, as far as temperature, adhesive depth, strength etc. Don’t want someone putting a heatgun on max temp and using it on their screen for 3 mins, ya know?
Thanks for making it really straightforward though.
Total fail. Used an iOpener but could not judge how hot it needed to be to soften the adhesive nor how firmly it can be pried/pulled without damage. Ended up with multiple internal cracks in the screen. Tried finishing the repair anyway, couldn’t tell how far the flat-flex cables needed to be inserted into their sockets to make a good connection. Pix in the guide are not clear enough to tell, and I neglected to take my own photos.
Oh well, so much for repair. Kid got a new phone out of the deal, the Z2P is headed for the landfill.
Finished the guide , battery works well, only problem I encoutered was my own hastines with prying the screen out. On the right side near the fingerprint sensor i went too deep with the pryer and tore the flex cable. Now I am waiting for the new one. So I’ll update when it comes and I change it.
Can the battery be replaced with a larger one or is it too tight.
Great guide - thank you 😊