Introduzione
Usa questa guida per sostituire la batteria agli ioni di litio del Motorola Moto G5 Plus. Con l'uso quotidiano, una batteria durerà 18-24 mesi prima di perdere apprezzabilmente capacità. Se la tua batteria non tiene più la carica oppure causa spegnimenti improvvisi, puoi seguire le istruzioni qui sotto per riportare il tuo telefono a un buon funzionamento.
Prima di smontare il telefono, scarica la batteria sotto il 25%. Una batteria agli ioni di litio carica può incendiarsi e/o esplodere se forata accidentalmente.
Se la tua batteria è gonfia, non scaldare il tuo telefono e prendi adeguate precauzioni. Se necessario, puoi usare un contagocce o una siringa per iniettare alcol isopropilico lungo i bordi del display per ammorbidire l'adesivo.Le batterie gonfie possono essere pericolose, quindi indossa occhiali protettivi e usa la dovuta attenzione; se non sei sicuro di saper eseguire la procedura, porta la batteria da un professionista.
Cosa ti serve
-
-
Usa una punta cacciavite per espulsione SIM, uno strumento di espulsione SIM o una graffetta per rimuovere dal tuo telefono la scheda SIM.
-
-
-
Prepara un iOpener e scalda il telefono lungo il suo bordo sinistro per circa due minuti oppure finché non è lievemente troppo caldo per essere toccato. Questo aiuterà ad ammorbidire l'adesivo che fissa il display.
Heat not only along the phone’s left edge, right?
I used two suction cups on the screen. Just above the finger print reader and the other near the top. Then used my heatgun set at 390 degrees. Low speed and had the wide, flat blade attachment so the heat spread to a narrow/wide area. Heated the left edge from corner to corner, then pulled up on the suction cups until I could work in a plastic triangle guitar-like-pic under the screen. Continued to heat and add another pick around the screen . Do not rush and take your time. Got the screen off and didn’t damage the adhesive too bad. Was able to reuse it. Once reassembled, I heated the screen around the edge and rubbed with a plastic tool to make sure the adhesive was working. So far so good with the adhesive. Good Luck!
-
-
-
Fai riferimento alla seconda e terza immagine per familiarizzare con la larghezza dell'adesivo applicato attorno ai bordi dello schermo.
2mm ONLY on the SIDES of the display. The top can have adhesive as far as 10mm from the edge, and at the bottom as much as 12mm. And there’s no way to cut this adhesive with the tools at 45 degrees. Once the left side is open, carefully insert the tool a little further at a time on the top and bottom, whilst attempting to keep a little pull force on the suction cup. Hard to do, and almost inevitably the on-off button will be hit at some point unless you’re really careful. The adhesive pieces are quite tough, and I used a tiny scissors to cut some of the adhesive “ropes” when the case was far enough open. A highly detailed photo of the adhesive locations top and bottom (and on both parts) would help here. This is likely the most difficult step (well, don’t know for certain, ‘cause I haven’t got further yet…), and warrants better photos and explanation IMO.
-
-
-
Applica una ventosa al display, vicino alla parte mediana del bordo sinistro.
-
Tira la ventosa applicando una forza abbastanza decisa e costante per creare una piccola fessura tra il gruppo schermo e il case posteriore.
-
Se il display non si stacca nemmeno applicando una forza notevole, applica dell'altro calore per ammorbidire ancora l'adesivo e riprova. L'adesivo si raffredda rapidamente, quindi può essere necessario scaldarlo ripetutamente.
-
-
-
Continua a tagliare l'adesivo nei lati superiore e destro del telefono.
Pues se me fastidia la pantalla al hacer esto
This is a great guide except for one thing. My screen works fine but it is separating from the phone on both sides. I need to remove it just enough to clean up the old adhesive and reattach. The instructions on repeating the steps in reverse order to replace the screen doesn't help with getting the regluing right, what kind of glue or double sided tape to use, etc …
-
-
-
-
Una volta che hai tagliato tutto l'adesivo, apri delicatamente il display sollevandolo dal bordo sinistro.
-
Metti il gruppo schermo a un angolo di 90° contro una scatola per evitare che i cavi del display e del sensore impronte digitali possano piegarsi o stirarsi.
-
-
-
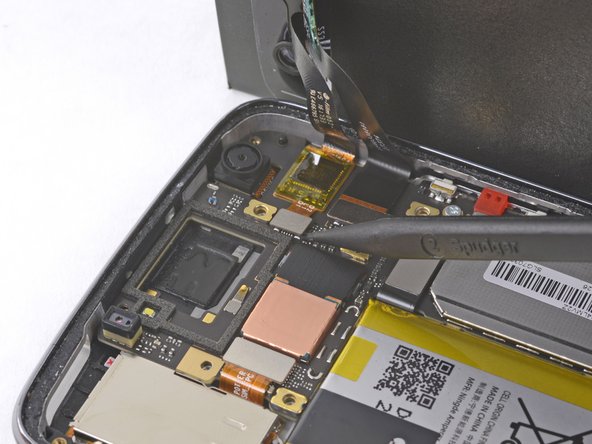
Rimuovi l'etichetta gialla che copre due delle viti a croce Phillips nere al di là dell'altoparlante voce.
Attention must be paid not to lose the small rubber gasket around the proximity sensor - I found it best to collect it with all the screws of the midframe and reinstall it at the end during re-assembly.
-
-
-
Rimuovi le seguenti viti a croce Phillips dal telaio centrale:
-
Sedici viti nere da 3,8 mm
-
Tre viti cromate da 2,4 mm
Esa placa se levanta por el otro lado, por donde estan los botones de volumen por ahi se puede levantar de una mejor manera.
-
-
-
Inserisci l'estremità piatta di uno spudger tra il telaio centrale e il bordo sinistro del telefono e fai leva con delicatezza per sganciare le due clip che tengono in posizione il telaio stesso.
-
-
-
Rimuovi il gruppo schermo dal telefono.
If your digitizer appears to be "dead", power down the phone (which you can't because the digitizer is dead) and disconnect the battery connector by prying the connector up out of its socket (with something NONE conductive like your spudge tool) for few seconds. (It does not "slide" out, but pries straight up.) This will FORCE a cold boot and initialize the digitizer WITHOUT a factory reset, preserving all setups and all your files. :-)
-
-
-
Stacca dalla parte superiore della batteria la linguetta nera di estrazione e tirala con forza in modo costante per rompere l'adesivo che tiene in posizione la batteria.
You don't even need to remove the battery! You can just leave it glued in and pop out the motherboard from around it.
-
-
-
Se la tua linguette di estrazione si rompe o si l'adesivo è troppo forte per rompersi, usa un plettro di apertura per far leva delicatamente sotto la batteria ed estrarla dal case.
In my case the battery was very securely attached to the case. The only way I managed to get it out was by inserting one of the picks pointy-edge in on the same side where the pull tab is located. Even then, I bent the battery slightly and fully agree with the suggestion of not reusing it.
-
-
-
Una volta che la batteria è libera, toglila dal telefono.
-
Rimuovi qualsiasi parte rimasta di adesivo dal telefono e ripulisce l'intera area sotto la batteria con alcol isopropilico.
-
Applica alcune nuove strisce di adesivo pretagliato o di nastro Tesa.
-
Tieni premuta con fermezza in posizione la nuova batteria per 5-10 secondi.
It would be nice to have some instructions on how to use the adhesive sticker. I finally just kluged it on, then saw there was a double part to the blue shield, with part of the adhesive cut so that it can go behind the ribbon cables.
Hi Robert,
Thanks for the suggestion! I’ll add some more instructions on how to apply the battery adhesive.
Why won't anyone show a back door removal? Yes it's difficult, but you won't damage the display and other components between you and the battery. I did this procedure and I damaged the display, and when it was all put back together the proximity and fingerprint sensors didn't work, and the phone has a big bulge in it where before there was none. Yes it was operator error (me), but I'm not retarded and I had the proper tools. It could save much frustration and money if someone would show a back door removal for battery replacement on these phones (moto g5 plus, moto g6, moto g7). Thanks!
That’s an interesting idea! I’m not certain if the you can get in from the back panel, as it is attached to the frame and seemingly screwed in from underneath the display. But, I may be wrong!
Hmm, no mention of:
1. take the (black on mine) battery-removal/grab-able tape section off the old battery and install it on the new one in the appropriate place. Otherwise gonna be much harder to remove the battery next time. Too late for me.
2. what to do about the little foam-tape sections around the top and bottom of the phone between the screen and the interior cover plate. I’m just gonna leave ‘em in place, as I can’t see how you could effectively mimic the original factory stuff with the tesa tape.
3. how to install the perimeter seal. I saw on a you-tube that you should cut the “cable” side of the perimeter strip off of the rest of the sheet and to install that piece (must align very carefully with tape guides) before attempting to install the screen and its cables.
OK, correction on the perimeter seal; here’s how it should be done (don’t cut anything; ignore my comment item 3. above):
1. The perimeter seal is a sandwich of 4 layers, the translucent white release sheet, the adhesive layer (black), a removable release layer (turquoise) that matches almost exactly the shape and configuration of the adhesive layer, and then the positioning sheet (also turquoise). 2. BEFORE the internal frame/cover/whatever-it-is to be installed, BEFORE the screen ribbon cables are installed, the perimeter seal must be installed.
3. Remove the translucent white release sheet. VERY carefully align the entire rest of the sandwich over the open rear frame ledge (with battery already installed). Notice that where the frame ledge is a bit fatter at the upper corner, so is the seal width. The entire positioning sheet can fit just inside the edges of the rear frame when it is positioned properly. Start at the bottom and fit it very lightly into position (too hard—>it will be stuck). cont.
continued from above:
4. when the whole thing is fit properly into place, you can remove the entire positioning sheet—just peel it up. Note that it’s a bit tricky at the top where the rear camera and light protrude. But there is a tab in this area in the positioning sheet to pull up the positioning sheet and better allow for fitting the seal into place along the top.
5. At this point the seal should be properly positioned around the entire perimeter. Note that there is still the final release part of the sandwich still on top. Woo-hoo! You can now press that down with a tool so the seal is well-attached to the rear frame. Leave this in place until you’re ready to install the screen permanently.
6. When you’re ready to install the screen, THEN remove this final release and carefully fit the screen into position. And, yes, I’ve left out a LOT of steps between item 5. and 6. in this list. Those things are more straightforward and are just reversing what you did to disassemble. You’re welcome.
-


Per riassemblare il tuo dispositivo, segui i passi descritti in ordine inverso.
Dopo aver completato questa guida, calibra la batteria appena installata.
Porta i tuoi rifiuti elettronici a un riciclatore certificato R2 o e-Stewards.
La riparazione non è andata secondo i piani? Vai sulla nostra comunità Risposte per trovare aiuto nella risoluzione dei problemi.
Annulla: non ho completato questa guida.
Altre 45 persone hanno completato questa guida.
Un ringraziamento speciale a questi traduttori:
100%


Questi traduttori ci stanno aiutando ad aggiustare il mondo! Vuoi partecipare?
Inizia a tradurre ›

19 Commenti
I agree with Andy. Tutorial is perfectly explained, but construction design obviously is to avoid buyers change without risk of damage in comparison like other phones like Moto G 2nd version or Nexus 4 which are not piece of cake however is not to difficult. I hate that mind of developers trying to fix on design “battery for life of device”. That is the issue. Almost the problem is the battery. No matter how much well it is, continue being the critical lifetime part. Must need replaceable for users.
I personally wish phone makers would stop doing this crud, the battery is the least of the worries and should be easily replaceable, likely folks will want to upgrade to a new phone before battery is “dead” and more likely you will have to buy a new screen because of how fragile they make these things especially the new fad of ALL GLASS design >:(…wish moto would not advertise any water proof of any sort, just had my moto G4 Play die because of a small bit of water getting on the screen, now have to buy a brand new one, there goes over $400 down the drain….got so mad I beat the crud out of it smashed it right to bits when it refused to power on at all after drying out in dry rice for a few days, but at least it had an easy to remove battery with nowhere to buy a $20 battery for less then $90 (ship and tax)
The article is great, but I wouldn’t go through such torture. And the cost to have a repair shop do it might be 40% of the price of a new phone. I agree with Andy and Zacarias. This practice of non-replaceable batteries, claiming that this design is “waterproof” and makes the phone slimmer, is all just a racket. I kept my Samsung S3 with replaceable battery for four years, and only gave it up because it couldn’t take the Android updates anymore. Now only LG sells phones with replaceable batteries, but the LG phone I tried was a piece of junk. It looks like I’ll just have to replace my Moto phone every two years now. That’s unfair.
Totally agree to comments by Claude. Real Water sealing is not being achieved by making batteries non replaceable. Now nano coating technology is there to make circuits water repellent. So water sealing is no longer an excuse for manufacturers. Hard to replace battery is just planned obsolescence.
Rineez -
Ok. It was stressful, but thanks to author and Moto G5 Plus Replacement Battery Kit I managed to get my phone back to full power again. One small note: Step 11 show flat side of spudger, but it was too tight to fit spudger there. I end up using iFixit Opening tool and opening picks. Except of that - everything was quite clear. Still scary as heck to cut the glue around the screen, but clear and reassuring that everything is gonna be ok :)
my phone is motto g5s plus, there is any significant difference from the one from the guide motto g5 plus ?
Emil, the battery replacement procedure for the G5s Plus is similar, but slightly different! You can find the guide for that repair here: Moto G5s Plus Battery Replacement
Brilliant write up. Thank you.
Where can I get the adhesive to reattach the screen? I’d like to get a pre-cut sheet that’s the right shape instead of fiddling with super thin tape.
You can find replacement display adhesive here: Moto G5 Plus Display Adhesive. Definitely easier than fiddling around with Tesa tape!
Had two issues with the repair: With opening I found myself picking in between the backlight and the LCD instead of behind the LCD and the midframe Now I have a few dust particles between there.
And concerning the midframe: Wow that is fit in thight! I found it easier to open it by picking from the plastic at the right side at both the top and the bottom of the phone.
For the second half of removing the battery I found it easier to drip a bit of alcohol on the end of a spudger and then pick between the battery and the frame.
Great instruction for the G5 s Plus. Took about 1 1/2 hours but easy to do.
Thank you for the magnetic bits.
I used the same glass glue, just put the heating pad on to soften and bingo..
Calibrated the battery as instructed..
Thank you!
Frank Haas 1-7-2020
Some instructions on replacing the adhesive would have been nice, but I got it done anyway.
Thank you for this guide. This revived my Moto!
The process is easier than it looks at first glance.
moderate difficulty? not at all. I repair phones for a living this is a difficult repair
I bought this kit because I had an excellent experience replacing a HDD on an older iMac with iFixit support a few years ago. Unfortunately, I underestimated the skill necessary to accomplish this battery replacement. Specifically, I could not get any edge of the ‘guitar picks’ between the display and the body of the phone as shown in the photographs. I cannot understand how that could work. They seemed too thick. I resorted to a razor blade and playing cards and ended up destroying the display thereby rendering the phone unresponsive to input. For anyone contemplating this operation, here are my thoughts: if you do not have prior experience opening phones, I would avoid attempting to do this unless you are prepared to buy another phone. If I knew then what I know now, I would have shopped for a good power pack to recharge my phone away from home and kept that up until the the short life span of the battery necessitated buying a new phone.
If you are just a little bit skilled or working with hands it should not be hard to do this, just be patient.
one thing:
on last step when you put new battery in be super careful where you put cable from new battery, it can be CUT of with that small metal near it. Just put it as it is on image (old battery) and it should be fine.
anyway, my 6 years old phone is like new :)
thank you