Introduzione
Usa questa guida per rimuovere in sicurezza la batteria incollata del tuo MacBook Pro con l'aiuto di un kit da sostituzione batteria iFixit. Il prodotto antiadesivo nel tuo kit iFixit scioglierà l'adesivo che fissa la batteria, permettendoti di rimuoverla facilmente.
Il prodotto antiadesivo iFixit è altamente infiammabile. Questa procedura va eseguita in un'area ben ventilata. Non fumare e non lavorare vicino a una fiamma libera durante la procedura.
Per ridurre il rischio di danneggiamento, accendi il tuo MacBook e lascia che la batteria si scarichi completamente prima di iniziare la riparazione. Una batteria agli ioni di litio carica può creare un incendio pericoloso e incontrollabile se viene forata accidentalmente. Se la tua batteria è gonfia, prendi adeguate precauzioni.
Nota: il solvente usato per sciogliere l'adesivo della batteria può danneggiare alcuni tipi di plastica. Segui tutte le istruzioni e stai attento quando applichi l'antiadesivo.
Cosa ti serve
-
-
Accendi il tuo Mac e apri Terminal.
-
Copia e incolla il seguente comando (oppure digitalo esattamente) in Terminal:
-
sudo nvram AutoBoot=%00
-
Premi [return]. Se richiesta, inserisci la tua password di amministratore e premi di nuovo [return]. Nota: il tuo tasto return può essere etichettato anche come ⏎ o "enter."
-
sudo nvram AutoBoot=%03
-
-
-
Spegni e scollega dall'alimentazione il tuo MacBook Pro prima di iniziare.
-
Usa un cacciavite Pentalobe P5 per rimuovere le sei viti che fissano il coperchio inferiore:
-
Due viti da 6,2 mm
-
Due viti da 5,3 mm
-
Due viti da 3,4 mm
Before any repair is carried out that involves removing the bottom case, the machines auto-boot function has be disabled. This can be disabled via the terminal command “sudo nvram AutoBoot=%00” once the repair has been completed the auto-boot function can be re-enabled via the vermin command “sudo nvram AutoBoot=%03”.
I recommend that you have an organizer tray for all the small parts, and label it in advance with the numbered “step” associated with each removal of screws and other parts. It really helped me when I needed to put everything back in reverse order, after the new battery is glued in place.
Finished the repair last week. Some key comments that helped me:
- Step 12, Robert
- Step 13, MikeG1
- Step 13, Rick Jaffe (take a photo when disassembling)
Also added some own comments on Steps 15, 18, 22
-
-
-
Applica una ventosa al coperchio inferiore vicino alla parte anteriore-centrale della MacBook Pro.
-
Solleva la ventosa per creare una piccola fessura tra il coperchio inferiore e lo chassis.
To replace the bottom just line it up just like it came from the factory. Make sure it clears the display connectors. And press firmly down until the clips connect to the bottom again.
-
-
-
Inserisci di nuovo il tuo strumento di apertura sotto il bordo anteriore del coperchio inferiore, vicino alla sede di una delle viti di fissaggio in posizione più centrale.
-
Imprimi allo strumento una torsione decisa per sbloccare la terza clip che fissa il coperchio inferiore allo chassis.
-
Ripeti questa procedura vicino all'altra vite in posizione centrale per far scattare anche la quarta clip.
My 3rd and 4th clips released simultaneously with clip 1 and 2.
Therefore I was looking to do something which had already been accomplished.
yeah be sure not to bend those clips by the display bottom. You pull towards yourself to get it off
-
-
-
Tira con una certa decisione il coperchio inferiore verso la parte frontale del MacBook (allontanandolo dall'area delle cerniere) per separare l'ultima delle clip che tengono in posizione il coperchio stesso.
Difficult to explain clearly, but worked easily for me by gripping the adjacent bottom and top corners then pulling in opposite directions, rather than trying to grip the hinge corner which is too narrow to afford a strong grip.
This helped me. It needed more force than what I expected. Basically grab the corner with 6.2mm screw with one hand and the cover of that same corner with the other. Then pull the cover and push the laptop. Careful, it pops off with force!
I initially tried shifting the whole panel off the front after using the separating tool to make some space at the back where the hinges are. I only had luck when I pushed the panel back to it’s normal state and using the separating tool again to open the front, then getting my fingers underneath the slide it off the front was easy. I guess the lesson is to not use the separating tool to “push from the back“.
This step really through me through a loop. My last two MBP were a 2011 and 2013 and on those the bottom just lifted off when you removed the screws. The clips and this sliding lock design added in the 2017 model was frustrating the first time. I was following a youtube video first and he did not explain the sliding part at all. I should have come here first, this guide explains it pretty well. The second time I opened my 2017, I kept an “opening pick” between the bottom panel and the body on each side, and used my two smallest screwdrivers as levers in both “front” corner screw holes. Used the same method without the picks to put it back together at the end. Wayyy easier that trying to grip the panel or laptop body. Just make sure the screwdrivers/pins that you’re using as levers are small enough to be loose in the screw holes and have room to move
I used a pick underneath one of the back corners and nudge it (push down and towards the front - to get it off the hinge). This will make it easier to do the same for the other corner. The lower case will move off the middle plastic L-clips (which you will see after you inspect it.) Cheers! =)
I have found that your iFixit blue pry tool is excellent at giving me leverage to slide the bottom case forward to release it from the internal clips.
-
-
-
Rimuovi il coperchio inferiore.
I used the green prying tool in the air gap at the rear to nudge the bottom forward.
That is far easier and more reliable.
David. I agree. I've found the blue iFixit prying tool most helpful. I place it with the curve of the tool around the hinge and move the bottom case towards the front to release it from the slide-in clips. I consider myself to have pretty good grip strength but I have had some bottom cases that just wouldn't budge until I used this method. Scott The Mac Doctor
Like Dave and "themacdoctor" said, this job is MUCH easier if you use a spudger or similar tool to gently push the cover away from the air gap, at the rear of the laptop. Once you do this, you've loosened clips that are on the inside of the bottom case. This is much easier than tugging on the case itself.
-
-
-
Stacca con cura il grande pezzo di nastro adesivo che copre il connettore della batteria, sul lato della scheda logica più vicino alla batteria.
-
Rimuovi il nastro adesivo.
once the tape's back in place, it doesn't look tightly attached. not sure, did I do something wrong here or it should be so.
The tape will likely not adhere as well as when it came out of the factory. This isnt an issue! As long as the tape is in place when the lower cover is put back on the device you should be good to go.
The underside of the tape is not uniform. Therefore, pay attention to which direction it is placed by looking at the underside when you remove it. Possibly mark one edge so that you can replace in the same direction during reassembly.
Mark one of the tape’s edges and, upon removal, stick it down with the same orientation. The first time I was inside the MacBook Pro (to upgrade the SSD) I failed to do this, and spent almost 30 minutes trying to get it back like it had been. Making a photo also helps.
-
-
-
Stacca con delicatezza il piccolo pezzo di nastro adesivo che copre il connettore dati della scheda batteria.
-
-
-
Usa l'estremità di uno spudger per sollevare la piccola linguetta di fissaggio nera che fissa il cavo al suo connettore.
-
-
-
Stacca il cavo dati della scheda batteria facendolo scorrere fuori dalla sua sede.
-
Fallo scorrere parallelamente alla scheda logica, in direzione del cavo.
The little tab that you pull back on, at least in my cable, was simple glued onto the rest of the cable. I tried to carefully remove the cable, and the tab came off. I did not have flat tweezers in the ifixit replacement kit and did not want to pinch the cable with sharp instruments. Therefore, be extremely careful when removing the tab as it is difficult to reattach the cable without it.
-
-
-
Piega indietro il cavo dati della scheda batteria in modo che non dia fastidio.
The new battery I received did not come with the battery board data cable, so I had to remove the existing one and transfer it. The lock at the smaller end is the same mechanism as the one at the end shown in steps 11 and 12, but smaller (and harder to see. It helps to gently straighten the left end of the cable before trying to insert it in the end of the replacement circuit board.
I can corroborate MikeG1’s comment. My battery came without the long data cable as well. I had to remove it from the fried battery. Plastic lock tab mechanism on the ZIF connector is smaller. My inspection microscope helped to transfer the cable to the new battery board. Thanks Mike!
Likewise - the new battery came without a data cable. The cable was successfully removed from the old battery assembly and installed on the new battery, but it was tricky and nerve-racking (the cable is delicate and the connectors are very small) without instruction provided! The instructions should be updated to highlight the missing cable possibility, and provide information/illustration on transferring the cable.
In step 13, notice the amount of the data cable that sticks out of the connector. When moving this cable to the new battery, it is difficult to tell how far to push the cable into the connector or when it is fully inserted because the cable is so bendable.
AMEN!! This was the hardest part of the ENTIRE process! Hard to know when the small end of the cable was “fully” inserted. Cable is SOOOOO delicate!
my old battery was working but could not hold a charge very long so I replaced the battery and now my mac does not recognize the new battery. Thought it was a bad battery at first but I purchased a new batter and still the same problem, My mac will work off power outlet but does not register it has a battery at all now. I tried putting my old battery back on but i damaged the very small clip when i slid out the flex cable so its gone now. Could this cable be at fault? I don/t know what else it could be, i only messed with the battery.
I have this same problem! Did you figure out what the issue was? Do I need a new flex cable?
I am having the same issue as Leo. After install. Is there a way to identify the fault?
Although the rest of fixit manual on this is excellent, this step is woefully lacking and the fact that the replace “kit” doesn’t have the Battery Board Data cable included makes the replacement kit significantly lacking (especially compared to other kits and instructions I’ve used before from them)
-
-
-
-
Usa un cacciavite Torx T5 per rimuovere la vite a ciambella da 3,7 mm che blocca il connettore di alimentazione della batteria.
When the battery management “BMS” circuit board is re-installed, loosely install the two 3.7 mm screws, put a spudger on the left side of the BMS board to wedge theBMS board to the right then tighten the two 3.7 mm screws. The reason for doing this is that the two power traces on the board may not make physical contact with the battery connector (connector at where the spudger is on step 15). One clue that you didn’t have physical contact is if you reinstalled everything but there is no power unless the AC supply is plugged in (with battery meter on the top at 0%). This was what happened to me. The reason is that when you bend the battery connector in step 15, it’s no longer in alignment with the traces on the BMS board and hence, you have to shift the BMS board to the right to compensate. Once I did this, voila 64% power.
-
-
-
Usa uno spudger per sollevare con delicatezza il connettore di alimentazione della batteria e disconnettere così la batteria stessa.
-
Solleva il connettore a un'altezza sufficiente perché resti separato dalla sua sede. Se dovesse fare contatto accidentalmente nel corso della riparazione, il tuo MacBook Pro potrebbe danneggiarsi.
On disassembly note the position of the connector before you lift. It has two gold-plated connections on the underside. On reassembly these need to make contact with the matching battery board connectors. Bending the connector out of the way deformed it a bit, and on reassembly I could see that the connectors didn't align well with the board's connectors. I needed to adjust the battery board position to the left a bit by loosening the 3.1 mm screws in step 23. Possibly this could be the reason why some people report that new battery is not detected.
-
-
-
Utilizza un cacciavite Torx T5 per rimuovere le due viti da 2,1 mm che fissano la staffa del connettore del cavo del trackpad.
-
-
-
Prepara un iOpener e posizionalo sopra il cavo a nastro del trackpad per circa un minuto, in modo da ammorbidire l'adesivo che fissa il cavo a nastro del trackpad alla parte superiore della batteria.
-
Se non disponi di un iOpener, usa invece un asciugacapelli per riscaldare il cavo. Il cavo dovrebbe essere caldo, ma non troppo caldo per essere toccato. Fa' attenzione a non surriscaldare la batteria.
-
-
-
Usa un cacciavite Torx T5 per rimuovere le due viti da 3,1 mm che bloccano la scheda della batteria.
-
-
-
Inserisci l'estremità piatta di uno spudger sotto la scheda della batteria sul lato più vicino alla scheda logica.
-
Solleva la scheda della batteria fino a un angolo di circa 45°. Se necessario, alza il connettore di alimentazione della batteria per lasciare più spazio alla scheda.
A ce moment là, il faudrait déconnecter la nappe de données de la carte de la batterie et la mettre de côté
At this point I Jump to step 30 . I do not use the liquid adhesive remover method. I use a silicone rubber kitchen food scooper. The scoop end is a soft, silicone rubber material with a beveled edge. The handle is a hard plastic. This tool I’ve used in about 50 retina battery swaps. No floss, credit cards or metal spatulas for me.. The angle of the ends and the rubber pliability combined with the hard plastic handle is ideal. After a few repairs you will get better at it. Be careful when applying pressure or leveraging to get between battery and base. You don’t want to slip & “overshoot” the scoop end into the logic board. EASY DOES IT…Save yourself the mess of applying the liquid. I can remove a battery in 10 minutes. Here’s the link to this tool that I found in my GF’s kitchen:
This and the dental floss are great ides that I wish I'd seen before following the method in this guide even though it worked, I think there are better ways.
Amazon says these are no longer available, no idea if or when they will be again.
You can order a single scooper from amazon.
google: Tovolo Mini Scoop and Spread Tool
etcremer -
-
-
-
Per proteggere il display, disponi un foglio di stagnola tra il display e la tastiera e lascialo lì mentre lavori.
-
Inoltre, disponi una carta assorbente direttamente sotto l'area del trackpad per assorbire l'eventuale antiadesivo in eccesso.
-
-
-
Ora che il tuo MacBook Pro è stato preparato per l'intervento, è ora di preparare anche te.
-
Indossa occhiali protettivi quando maneggi e applichi l'antiadesivo (gli occhiali protettivi sono inclusi nel tuo kit).
-
Non indossare lenti a contatto senza gli occhiali protettivi.
-
Anche i guanti protettivi sono inclusi nel tuo kit. Se ti preoccupa un'eventuale irritazione alla pelle, mettiti subito i guanti.
Wenn das Trackpad ausgebaut ist, kann man den alten Akku auch ohne Klebstoffentferner relativ gut auslösen.
-
-
-
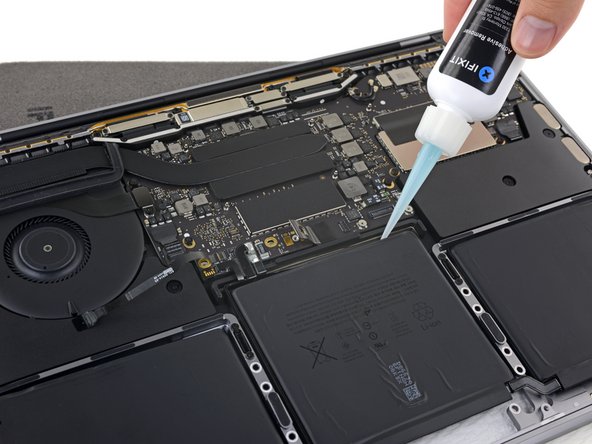
Tira via il cappuccio nero di gomma dalla tua bottiglia di antiadesivo.
-
Usa delle forbici per tagliare la punta ancora sigillata dell'applicatore.
Au moment de ma commande le kit complet avec le dissolvant ifixit n’était pas disponible, mais seulement la batterie sans accéssoires, j’ai utilisé quelques gouttes d’acétone à la place. la battéerie originale s’est décollée sans difficulté à l’aide d’une carte de credit
Can I use isopropyl or ethanol instead?
Petite astuce après une réparation fructueuse : pour simplifier cette étape, munissez vous d’un dissolvant fourni ou non, prenez les élastiques de masques chirurgicaux et imbibez le avec le dissolvant. À l’aide de cures-dents, l’insérer entre le châssis et la batterie puis faire un mouvement d’aller et retour tout en avançant au fur et à mesure que la batterie se décolle. Cette astuce m’a fait gagné beaucoup de temps et elle permet de ne pas endommager la batterie lorsque de son extraction. Plus sur, plus rapide et plus facile !
A little tip after a successful repair: to simplify this step, take the surgical mask elastic bands and soak them with solvent. Using toothpicks, insert it between the frame and the battery then move back and forth while moving forward as the battery comes off. This trick saved me a lot of time and avoids damaging the battery when removing it. Safer, quicker and easier.
The glue remover is a mix of Acetone and Isopropyl alcohol I believe.
The adhesive remover they are currently selling does not need to be cut open, it is black and already has a small hole. Check yours before you cut off something you don't need to.
A little warning for those of us who don't know a lot about acetone. DO NOT spill any on any finished wood. It will take the finish off of a wood surface faster than you can wipe it off. It won't harm clothes surprisingly, but your hardwood floor or wood table are not going to look great if you spill this on them.
I ordered just the battery, and successfully used "Goo Gone" to loosen the adhesive. I found it useful to place the plastic card along the edge of the battery, then dribble the Goo Gone on the card (when runs down the card to the edge of the battery). In my computer the adhesive is in three strips running across the length of the cell, each strip is about 1/4" wide
-
-
-
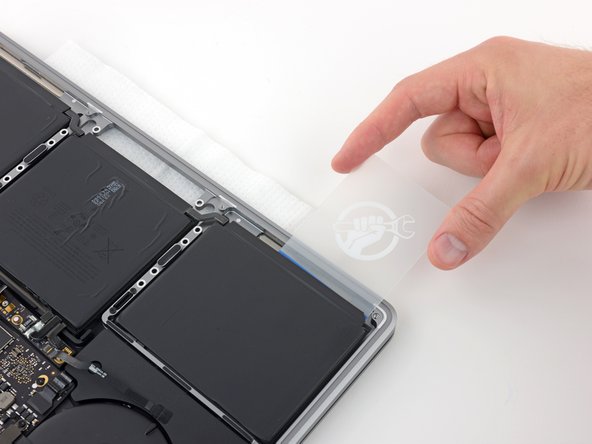
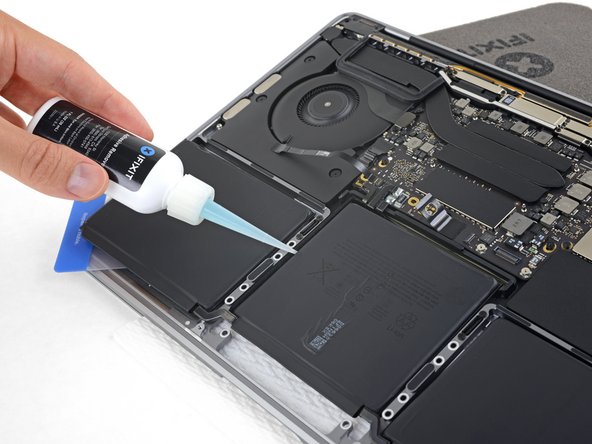
Dopo che sono trascorsi 2-3 minuti, fai scorrere una scheda di plastica sotto il bordo della cella della batteria dove hai applicato l'antiadesivo.
Agreed, hardest step. “Several drop” was not enough, I had to add more twice, so take your time.
Just like on the picture, the corner close to the track pad seem to be a weak point, strat pushing the corner of the plastic card there.
There is a metal lip that blocks you from pushing it in. I recommend you start from the corner with the lifted metal part. (top left corner of battery in picture)
the adhesive is in three 'bands' running parallel to the front of the computer. my method was to insert the card part way, then drip the adhesive onto the card and let it slide down to where the card met the adhesive. this seemed to work best. it seems unlikely that the adhesive will run all the way to the rear adhesive when you apply it from the front.
-
-
-
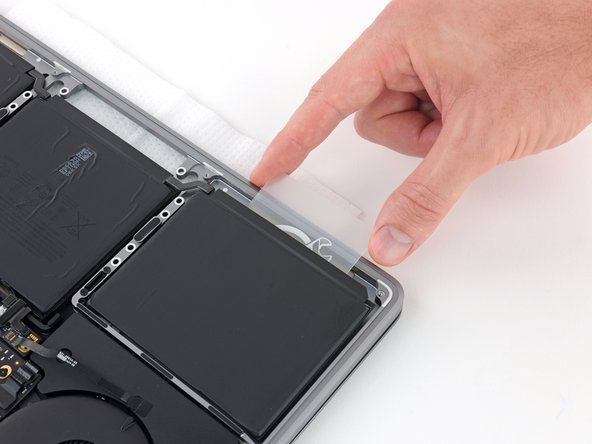
Spingi con cautela più in profondità la scheda di plastica sotto la cella della batteria per rompere l'adesivo che tiene in posizione la cella stessa.
They are RIGHT, let the acetone do the work. It did need more than a few drops, but not much more. Wait 3 min, apply again. Wait 3 min again. Then take the card and aim the point of the card toward the middle of the adhesive. Wiggle wiggle wiggle moderate pressure. It will penetrate the first strip and then work it left and right. Repeat for the next two strips.
-
-
-
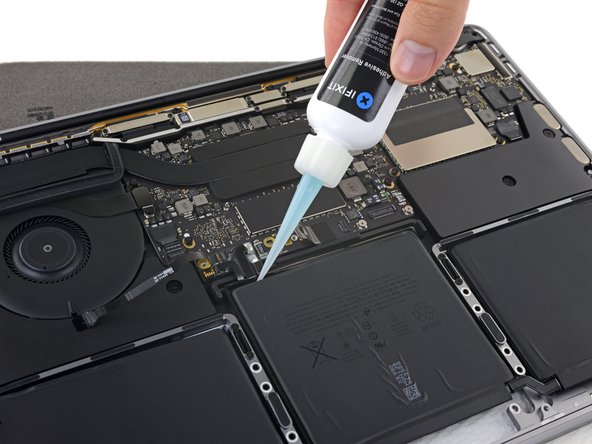
Per separare la cella centrale della batteria, per prima cosa rialza il bordo posteriore del MacBook Pro e fallo star su con un pezzo di espanso o un libro in modo che l'antiadesivo possa scorrere via dalla scheda logica.
-
Applica poche gocce di antiadesivo lungo il bordo posteriore della cella della batteria.
-
-
-
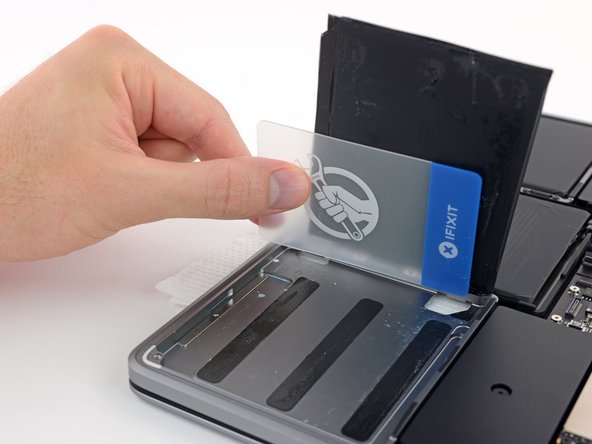
Fai scorrere una scheda di plastica sotto uno dei bordi laterali della cella centrale della batteria.
-
Può essere di aiuto torcere leggermente la scheda per aprire una piccola fessura tra la cella della batteria e il case del MacBook Pro.
I don't see how starting from the side is even possible, it's too steep and the card is not flexible enough.
I started from the top. To do so, I had to lift the battery control card (step 24) enough to be able to put the power connector (step 15) back below it. That way I could slide the card all the way.
Because of the way the tutorial describe it, I was conservative on the quantity of remover. That may be why this step was not easy.
-
-
-
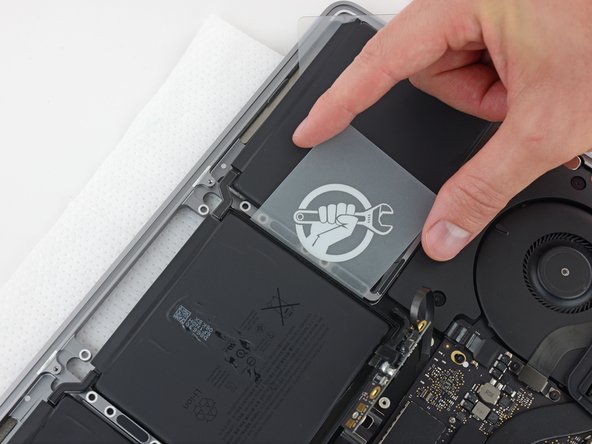
Solleva e rimuovi la batteria.
-
Con un po' di fortuna, dovrebbe essere possibile tirare via ogni striscia di adesivo con le dita.
-
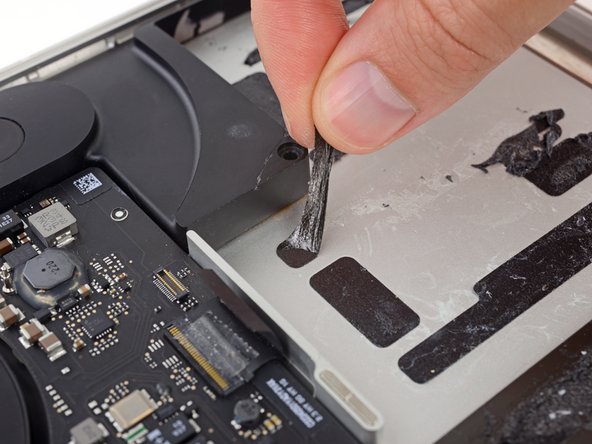
In caso contrario, bagna ogni striscia di adesivo con un po' di antiadesivo per 2-3 minuti e poi grattala via con uno strumento di plastica. Può essere richiesto abbastanza lavoro, quindi cerca di avere pazienza.
-
Ripulisci la scocca da ogni traccia di antiadesivo rimasta e lascia al tuo MacBook Pro qualche minuto perché possa asciugarsi.
-
Calibra la nuova batteria appena installata: carica al 100% e tieni in carica almeno altre 2 ore. Stacca il cavo e usa il laptop per farlo scaricare. All'avviso di batteria in esaurimento, salva il lavoro corrente e tieni acceso il MacBook finché non si iberna perché scarico. Aspetta almeno altre 5 ore, poi carica senza interruzioni fino al 100%.
Hi Jeff,
Thank you for the great instructions! With a piece of dental floss it goes even better. Also it’s good to explain to shift the back cover out after removing the bolts. At the moment to put in the new batteries it’s the best to tighten the batteryprint first and at last to fix the batteries. Put three pieces of plastic under the batteries to prevent fixing too early to the bottom.
Frans.
Thanks for your comment! It was really essential since dropping the battery in the case without its control card being attached could have resulted in the impossibility to connect it.
I had a non-ifixit battery replacement fail due to battery wiring (flat coated copper) touching the sharp edge of the case aluminum. Eventually vibration caused the insulation to wear off and short the middle cell to the case. Failure after a couple weeks.
Tuto au top.
J’ai remplacé la batterie de mon MacBook Pro en suivant à la lettre ce Tuto.
Un grand merci.
Overall good guide. The battery removal was by far the most difficult and time consuming.
It's important to understand stand that the battery is separate from the mother board so you can get somewhat aggressive when removing the old battery without worrying about damaging it.
As a general rule do not be rough with a lithium battery unless you like out of control lithium fires. It is best to use plenty of solvent and be as careful as possible while removing the old cells.
Also a good idea to discharge the battery fully before working on it.
I'm also one of those that just can't stand the idea of using solvent to do the job. FYI, I used a bent and 'sharpened' plastic card, much like a credit card, to carefully separate the battery from its adhesive. I was even able to get the center section out by working the card in from the sides (mostly from the right side, as I'm right-handed), so I didn't have to remove the trackpad assembly. I figured there are huge risks in however we do these complicated jobs, so I'm more comfortable with the risks associated with my technique than the ones associated with the solvent technique. And the bonus is that I finished in less than an hour!
I've done enough of these battery replacements now that I'm confident about dealing with the fussy little ribbon cables and their connectors, which is an added bonus when tackling a newer model like this.
Good luck to all who are taking this on for the first time! Take your time, read all the way through before starting, and be sure to read all the comments throughout!
Can someone clarify the statement "Wait at least 5 hours, then charge your laptop uninterrupted to 100%." in this last step"? It does not state this in the directions I received on a small card with the battery replacement, nor does it in the Conclusion below.
I followed this guide to replace the battery in a Mid 2017 MBP. The original was stuck at 0% even after 3 hours on charge even though the cycle count was 2 digits only.
I dry tested the replacement battery first. It had 38% charge. I left it plugged in and it reached 100% fine. The next day, I stuck the new battery down and low and behold now the machine won't power up.
I reconnected the old battery and the machine powers up ok. I tried reseating the connections 3 times with the new battery and it still won't power up. I've tried an SMC reset too. So I'm guessing it's a faulty new battery. Either that, or the rumours that Apple are deliberately locking out non-genuine Apple parts is true.
Trouble is, this seems to be quite a common scenario with this model.
I just did a battery replacement and after 3-4, SMC resets, checking all connections inside, etc. I cannot get my laptop to show a battery is even installed. I doubt it is a bad battery but as Cool_Breeze suggests, can anyone confirm this may be an Apple "block"? So frustrating!
Bonjour, ils indiquent que je n’ai pas de batterie, quoi faire ?
Merci
Referring to the messages from Cool_Breeze and Karen.
Does this battery replacement technique still work or have Apple somehow 'blocked' it?
Thanks
I don't recommend to calibrate the battery at the end and even Apple do not recommend to calibrate since a decade. It seems the battery is already calibrated with 2 cycles already. I followed your calibration tutorial and my new battery lost 6% health statut... Probably because of letting cels at 0% during 5 hours.... It's totally a non sense!!!
-


Confronta la nuova parte di ricambio con la parte originale: potrebbe essere necessario trasferire i componenti rimanenti o rimuovere le protezioni dell'adesivo dalla parte nuova prima dell'installazione.
Per riassemblare il dispositivo, segui i passaggi precedenti in ordine inverso.
Per prestazioni ottimali, calibra la batteria appena installata: caricala al 100% e poi mantienila sotto carica per almeno altre due ore. Quindi usa il dispositivo finché non si spegne a causa della batteria esaurita. Per finire, carica la batteria ininterrottamente fino al 100%.
Porta i tuoi rifiuti elettronici a un riciclatore certificato R2 o e-Stewards.
La riparazione non è andata come previsto? Consulta il nostro Forum Risposte per la risoluzione dei problemi.
Annulla: non ho completato questa guida.
Altre 144 persone hanno completato questa guida.
Un ringraziamento speciale a questi traduttori:
100%


Questi traduttori ci stanno aiutando ad aggiustare il mondo! Vuoi partecipare?
Inizia a tradurre ›

26 Commenti
Cela peut paraitre impressionnant mais si vous suivez à la lettre ce guide de démontage / remontage, vous y arriverez ! Patience et motivation seront déterminantes !
Make sure when removing the battery with the adhesive and card that the card goes about 2-2.5 cm into the battery (underneath) because there is a cut out in the metal preventing you from pushing underneath the battery thinking it is very strong adhesive when it is not. Also when lining up the battery connector make sure that is lined up and able to fit before making the adhesive stick. One last tip is to make sure the trackpad is aligned before completely screwing in.
All valid great tips
This tip about the cutout in the metal under the battery is very true for the two batteries on the side. Luckily, under the side batteries, the metal is smooth under the corner close to the middle, so I recommend starting with the card there and getting the card far enough under the battery to get past those cutouts before moving it to the side.
Hi,
ich habe den Akku nach dieser Anleitung getauscht, jedoch wird der Akku nicht erkannt…kann mir jemand helfen?
hallo,
hat es sich für dich gelöst? Wenn ja, dann wie?
Ich habe das Macbook-Model A1708? Wüsstest du ob es für dieses Model auch funktioniert?
Gruß
dilber -
The battery removal process is well written and follows all of the steps accurately. Pay attention when going through steps 10-13. The battery board data cable connector will need to be removed, since these are the steps to replace the battery (duh). This cable is a bear to put back in place. Please note how the cable comes out and replace exactly the same way.
The biggest issue I have with these instructions is there is 1) no video and 2) no reverse explanation on how to put it all back together. I completed all the steps for my daughters computer, but this is not for the faint of heart or those that do not have steady hands. Hoping everything works correctly as I just completed the job, right about 2 hours (the majority reinstalling the battery board data cable connector).
Good luck and CHEERS.
I want to mirror the attention to 10-13. Clicking the very small release on the data cable connector is easy not to see. That was my area of challenge. I was able to do better with jewelers glasses.
Ditto to all of this.
There is no real mention of how to disconnect the battery board data cable connector.
— There’s a step about removing the cable from the main board, right by the larger “Pancake screw”, but only a passing reference to an even smaller connector, so the cable can be re-used, as it does.
THE BATTERY BOARD connector, as @dhinderman stated, is quite tiny. I found that if I used the angled tweezers to grab the cable close to the connector and pushed the flat lead into the slot, I then could use the flat end of the black “pick” tool to push the miniscule locking hasp back (away from the cable) and click-lock it flush to the board.
THE MAIN BOARD connector is 25% bigger, and was part of the original disassembly instructions. In fact it was those instructions that helped me understand how to work with the battery-board connectior.
I’d ADD, as a clear instruction step, that this critical, skinny flat cable, needs to be removed from the battery board, and how to do it.
weebeast -
I added a few comments throughout that will hopefully make it easier for others. But on a whole, this worked beautifully. The pictures were extremely helpful. I suggest that anyone about to do this procedure not only read through it, but also read through all the comments before starting. I not only used the guide, but I used the ifixit replacement battery kit which came with everything I needed…except for flat tweezers. Completely successful!
Hola, ¿es posible que funcione la mac book pro sin batería?
Tengo una mac cuyas baterías se incharon, pero la computadora sigue funcionando normalmente.
Ya que actualmente la computadora no se mueve pues pensé que si le remuevo la batería seguirá funcionando. ¿Es posible esto?
It is possible for a macbook pro to work with the battery removed?
Great guide thank you. I posted a video of my process doing this repair if anyone is interested in some extra visuals. It is a time lapse but you can see what I’m doing.
Mein 2.ter Akku den ich nach euerer Anleitung ausgetauscht habe. Top Beschreibung / Anleitung. Ohne den zickigen Akkukleber hätte ich die Anleitung in 20 Min. geschafft und dann noch 10 Min. um das alles wieder zusammenzubauen. Für das entfernen des Akkus und die Klebereste habe ich doch zusätzlich ca. 30 Min. benötigt.
Great documentation! An extra point of advise is take your time when removing / adding the battery connector cable. Cable and connector ends are delicate. You could run into a problem it them connector ends bend. Thanks for the documentation!
This is a great guide. I used it on a 2017 A1708 after also replacing the keyboard. (I wish there were a guide for replacing the keyboard, as that is one major challenge!) The problem now is that the battery will not charge. It ran of battery power till it used up it’s initial charge and now will not run without the charger. I fear damage to the charging circuit. IN final assembly I arced/sparked between the ground of the trackpad cable connector and the P2616 component right next to it. Bad order of operations, I know, and not good. But I cannot figure out if that component is even in the charging circuit. Any ideas? Also, the MacOS reports the batter condition as 0 charge and normal.
I also wanted to add that the MBP 2017 Fn keys that I bought was a refurbished unit. The battery was never great.
I wanted to share the process that got me to just replace the durned battery already….
— After the original battery degraded enough, I got to a point were I basically had to keep it on power, then… a further issue where the SSD was not recognized on boot. Somehow I voo-doo’d my way through with SMC and PRAM resets. Literally 5-10 boots if lucky to get the unit to recognize the SSD and boot off of it. This was cause for concern, of course, but I’m an I.T. Consultant and this ain’t my first rodeo.
— I got to a place where I took it to the “Genius” Bar. They ran diags, and were decent…, but/and made comments about if this, and maybe that, and your hard drive…. Quoting between $500-1K. Nahhh. Basically I knew none of this had been happening before battery degradation. I’ve just done the work, Machine booted, and then I tried a reboot immediately. Good to go! Now on it’s 100% + 2hr charge.
Replaced the battery and now my 2017 1708 has renewed life and see how long this battery will last. Guide is good and kudos to the use of a spatula to remove the battery without using the included solvent, plus, carefully removing the remaining glue with a small chisel makes for a nice contact for the new battery. Thanks IFixIt crew and keep up the great work!!
Très bon tuto. Après quelques changements de batteries, quelques détails supplémentaires :
- Il n'est pas indispensable d'enlever le trackpad si vous n'utilisez pas le produit cité dans le tutoriel. En chauffant un peu de l'autre côté de la batterie (de chaque côté du trackpad), il est possible de l'enlever en la décollant avec un spatule
- Si vous enlever le trackpad, attention de bien le centrer en le remettant, pour éviter qu'il ne soit trop proche d'un bord ou le touche
- La nappe du trackpad se retire facilement sans le chauffer
I did this battery replacement last Sunday. It went great and was a lot of fun. Everything seemed normal but now my spacebar is not working properly. It still "works" - I just have to push the key down hard and directly in the middle of the key where the key pressure pad is underneath for it to register. A light or "normal" key click doesn't do this. I took the key off and I cam't seem to find any dust or objects blocking the connection. I cleaned it anyway, no change. I also have to use direct force to the key pressure pad without the physical key being on the keyboard for it to work. In short, it seems like there's some issue where the key isn't making a solid connection so the computer doesn't register it is being pushed. Again, it works consistently with the right pressure and directly pushing the key. Any ideas?
Great guide! Perfect!
I wanted to jump in to note that, the Battery Board Data Cable in steps 10, 11 & 12..... It is IMPERITIVE that this cable is seated all the way in and properly in place, or the computer will not boot (or will boot while plugged in but die as soon as you unplug it.). The cable tells the computer that there s a battery connected. If it's not seated or connected properly, this is also why you cannot see a battery icon in the upper menu bar, and also why you cannot even enable the battery icon on System Settings. Hope this helps.
Oh also, the Battery Board Data Cable that came with my replacement battery did not fit properly. ***I HIGHLY RECOMMEND USING THE Battery Board Data Cable FROM THE OLD BATTERY. That way it's OEM and may fit better.****
Hi,
es war ganz einfach. Ich habe es in zwei Stunden geschafft. Die Batterie wurde von meinem MacBook Pro 2017 13' erkannt. Der schwierigste Teil war die Erkenntnis, dass es mehr als nur "ein paar Tropfen" brauchte (Schritt 28). Ich habe sehr großzügig gegossen und habe noch eine halbe Menge übrig.
Und beim ersten Mal hat es nicht geklappt: Ich sollte das Kabel vorsichtiger anschließen.
Aber ich bin sehr zufrieden, alles funktioniert jetzt, ich schreibe diesen Kommentar gerade von diesem Mac aus.
Danke vielmals
VG Ivan
Hi, habe den Akku an einem 13" 2017 (function keys) A1708 Modell getauscht. Ist gut angelaufen und hat auch auf 100% geladen.
Am nächsten Tag hat er knapp 30 Minuten geladen und dann einfach aufgehört. Das System zeigt den Akku richtig an und ab und zu beginnt er dann dann auch wieder zu laden. Damit hört er dann nach kurzer Zeit aber wieder auf. Ich hab noch kein Muster erkannt warum er manchmal ladet und dann wieder nicht. Laptop bewegt sich währenddessen nicht - also sicher kein Wackler an einer Verbindung.
In der Menubar zeigt er den Akku als ladend und berechnet auch die Zeit bis er komplett geladen ist. Ladezyklen sind derzeit 2 (mit einem geliefert und nach dem ersten Laden auf 2 gegangen)
Hab verschiedene Kabel/Netzteile probiert - machen keinen Unterschied (manchmal laden sie manchmal nicht)
Hat wer ne Idee warum das Laden immer wieder abbricht?
Danke!
EN:
Hi, I have replaced the battery on a 13" 2017 (function keys) A1708 model. Started up well and charged to 100%.
The next day it charged for just under 30 minutes and then just stopped. The system displays the battery correctly and from time to time it starts charging again. However, it then stops charging again after a short time. I have not yet recognized a pattern as to why it sometimes charges and then not again. The laptop doesn't move in the meantime - so it's certainly not a wobble in the connection.
In the menubar it shows the battery as charging and also calculates the time until it is fully charged. Charge cycles are currently 2 (delivered with one and went to 2 after the first charge)
Tried different cables/power adapters - make no difference (sometimes they charge sometimes not)
Anyone have any idea why charging keeps stopping?
Thanks!
Is this step necessary? I can’t perform this step as I am attempting to repair water damage and need to remove logic board & most likely replace the battery.
Macrepair SF - Replica
@mac_medic You definitely don’t want the power coming on while the board is wet. In your case, I think powering on the machine to disable Auto Boot would do more damage than it prevents. I agree, skip this step and be prepared to disconnect the battery quickly if the laptop automatically powers on. Good luck!
Jeff Suovanen -
Thats right! You don't want power running while working on your logic board.
Dan -
This did not work when running High Sierra.
Kyle B - Replica
Tried this on a 2018 MBP 13” Touchbar (there’s no iFixit guide for this model yet). Need to replace a broken screen.
Luckily I managed to connect to an external screen (Cmd-Down Brightness to switch displays) and enter above command. Seems to work, but there’s another problem with this model - it powers up as soon as any key is pressed……. ffs <gnashes teeth>
Cool_Breeze - Replica
I unscrew the battery first and wrap electrical tape over the logic board battery connector before attempting any repairs to the board. Haven’t had any problems yet and I’ve worked on about 10 of these models already. Also when you open the bottom case use a suction cup at the bottom and pull up then run a plastic spudger along the edges to disconnect the clips. Also only use a plastic spudger on the board. Saw a youtube video from a repair shop and he did not disconnect the power and used all metal tools during the entire process of removing the board. His last step was to disconnect the battery terminal.
Brian - Replica
Is this step necessary if my mac can turn on? Battery fully dead(
Nursat b - Replica
BEFORE YOU START: The included torx head stripped off before I was done (and you might need an additional T4) so stop now and go buy a good one. Also they fail to warn you above to get some blue threadlocker ahead of time.
Jason Sherron - Replica
This command did not work for me and I read that sometime in later 2020 Apple stopped this command from working…any ideas on a work around?
Patrick Machacek - Replica
Not able to do that with damaged screen
richardjgreen - Replica
If you have a damaged screen you can still use a converter from thunderbolt (USB 3) to HDMI and plug your Macbook Pro to your TV as monitor display. Just make sure to chose the right Source (HDMI IN) in your TV. I did it and to make it work I unplug and plug again in my Macbook and so I could disable the Auto boot
Roberto Sanchez Bustos -
Hi. This does not work on 2018 13” MacBook Pro with Touch Bar. I did exactly this to disable auto boot. But when I check by using nvram -p it says: auto-boot true. Am I doing something incorrectly? I did everything step by step. Copied and pasted the sudo command, pressed enter and then entered my password. I have Big Sur 11.1 installed. Is there any other way since I need to replace the screen. Thank you. Adrian
Adrian Vizik - Replica
Hi everyone. This is also a little pointless if you can’t see anything on the screen, and you don’t have a display adapter to USB C to display it. I agree with Brian about removing the back and disconnecting the battery cable before you even think about opening the lid of the MacBook. Applying the insulation tape is also a handy little tip that just makes sure there is no way to discharge from either the board or battery.
Roberto Enrieu - Replica
running `nvram -p | grep 'AutoBoot'` in terminal verifies that it was accepted
result: `AutoBoot %00`
Marek Polák - Replica
Running Big Sur 11.6.7 on a 2019 16" MBP, it's "auto-boot". So it's:
nvram -p | grep 'auto-boot'to display the current state, the default istrue- and then to change it,sudo nvram auto-boot=falsewhich turns it off.Ed Mechem -
This step is completely unnecessary if you follow the guide to disconnect the battery properly. Just put some tape between the battery and logic board connection to prevent it from accidentally touching and therefore powering on the laptop.
Grant Ormsby - Replica
It took me a few tries to make this command work, as I was able to copy and paste the command into Terminal, but could not type in my laptop’s password. I finally typed my password into a text document, copied it (command C), and then pasted it into Terminal and it worked.
tommy404 - Replica
I didn’t do this. Mine never auto-booted before I replaced the battery. Now it does.
hatuxka - Replica
BEFORE YOU DO ANYTHING - CHECK THE BATTERY!
I-fixit sent me a bad battery, which I didn’t realize until it was already install. They sent me a new one, but I wasted hours uninstalling and reinstalled.
Get a volt meter and measure the voltage on the output of the battery pack. If it reads 0 V, SEND IT BACK. It should read over 2 V.
bcardanha - Replica
I've just received my replacement battery and it reads 0,042V between the two main connectors. Do you think it's dead?
peter sussex -
When I did this from Terminal.app within Recovery Mode, the “sudo” was not recognized but I could invoke it without the sudo part. It seems to have been accepted when looking at “nvram -p”
johann beda - Replica
When in Recovery Mode, you already have superuser powers. So you don't need to prefix commands with the sudo command to invoke them with root privileges; you already have them. Do a
pwd(print working directory) after opening Terminal in Recovery Mode, and you'll see that you're in the root user's directory.Ed Mechem -
I received the battery kit for my 2018 MacBook Pro and as per the above comment from bcardanha - Oct 12, 2021, I checked the voltage on the pads marked + and - . It was zero volts so I panicked a bit.
I sent a message on the iFixiT Facebook page and I got no reply. I finally found the customer service email for Ifixit Europe and sent them an email voicing my concern as I was not keen to work for couple of hours just to discover that the battery is faulty. I had an almost instant reply on the email (kudos to them) and they adviced me to go ahead and install the new battery as the voltage measured when battery is not connected is not relevant.
I took a leap of faith and after two hours… the new battery showed 50% charge and everything seems to be working just fine. I am happy it worked.
Mircea Comanici - Replica
After removing the old battery and installing the new battery I powered up the MBP before screwing the bottom on. I discovered the my keyboard would not function. It took a few hours of investigation and frustration that I discovered the track pad power ribbon had become partially dislodged from the trackpad. I was able to see that this through the little machined slot where the battery sat. I had to remove the trackpad to reinsert the power ribbon back into the connector in the trackpad. after reassembling and reinstalling the battery etc the keyboard worked. Just food for thought if your run into the keyboard issue.
Ed Mease - Replica
This should be the default. IMO I tell you to power on - not the lid.
G Sena - Replica
Est ce que cela fonctionne sur un macbook pro 2017 sans touchbar ?
maël muzelet - Replica
Bonjour Maël, oui, ce tutoriel concerne "les MacBook Pro 2016 (et plus récents) et les MacBook Retina 12" 2017 (et plus récents)"
Claire Miesch -
Excellent instructions. I was able to follow and install the new screen. I recommend that you get a good set of tools before you begin. I started with an inexpensive repair kit bought online. The Penta and torx bits failed. I bought an IFIXIT kit with quality bits and I was able to do everything I needed.
Tom Markham - Replica
If you're not running an admin account the sudo command won't work (which honestly, you should not be running admin). Rather than logging in to your admin amount via the OS, in the terminal type "login [admin username]," then the password and you'll be able to do the sudo command as described above. Once you're complete, type "logout [admin username]" and you'll be good to go. Obviously replace [admin username] with whatever the account name for your admin user is.
arichard2401 - Replica
For those unable to complete this step because the screen is too damaged I recommend leaving your macbook on until the battery dies.
Nicholas R Licato - Replica
Just replaced my 2018 15" MBP battery. Running Sonoma.
I found no way to disable AutoBoot (The status can be checked in the Power section of system report).
Anyway, i left my battery completely drain before opening the MBP, and had no issues during the process.
Cédric Bontems - Replica
After sending this command in terminal when I checked what happens if I now open the lid, instead the screen lit slightly up (still black) then a battery symbol showing the charging state showed up.
Now, after replacement of the battery, this is all I get to see.
No reset of NVRAM nor PRAM helped.
Currently the new battery charges (58% atm) and it feels like it‘s mocking me.
webrockers - Replica
I suspected the keyboard or TouchID sensor wouldn’t work, so I went on and checked every connector.
I missed connecting the left TouchID sensor from step 31.
webrockers -