Cosa ti serve
-
-
Rimuovi l'etichetta sotto il cavalletto per accedere a due viti da 0,75 mm.
-
Rimuovi la copertura dello slot per la scheda micro SD. Rimuovi la scheda SD (se presente).
-
Usa un cacciavite a croce Phillips per svitare le tre viti da 0,75 mm.
on the Tab 3 plus , the third screw is not under the sd card but a little further over under another sticker and is painted white
-
-
-
Appoggia il dispositivo in modo che lo schermo sia rivolto verso di te.
-
Infila attentamente uno spudger nella fessura tra lo schermo e la copertura posteriore e separa delicatamente la copertura dalla cornice del dispositivo.
-
Continua a separare la copertura posteriore dalla cornice facendo scorrere lo spudger lungo il perimetro del dispositivo.
On some models there is glue pad under the sim/sdcard tray.
Ein Hinweis auf den Federrahmen an der Kamera wäre nützlich. Er ist sehr empfindlich. Ich habe ihn beim Öffnen zerstört und jetzt stellt die Kamera nicht mehr scharf.
Hallo Thomas, tut mir leid, dass deine Kamera nicht mehr schart stellt. Aber die Anleitungen funktionieren wie Wikipedia: Wenn du mehr Infos hast, stelle sie gern allen anderen zur Verfügung!
(at least on the Plus model) the most difficult plastic clips are near the micro-SD/SIM. So it is easier to release the other side, where the camera not is. or pull the casing "down" towards the battery/stand.
-
-
-
-
Svita le 3 viti sulla copertura della porta ausiliaria e solleva il pezzo di plastica.
-
Tira attentamente indietro il modulo ausiliario per farti spazio.
-
Rimuovi il blocco in plastica davanti alla cerniera.
In some versions there is only 2 screws (top left and bottom) and the cover is now integrated with step 3 plastic block as one piece. Australian version.
From where do I buy the battery?
I could not find the right battery for my 3 Plus and ended up buying cells and re-soldering them into a new battery. Bought 3 of Panasonic 18650 Li-ion NCR18650G Japan 3600mAh 3.7V from Orbtronic. Used a process similar to described in this video to rebuild the battery - https://www.youtube.com/watch?v=ZXiMgPBA...
-
-
-
Usa uno spudger per fare leva sul meccanismo di bloccaggio.
as shown in the picture, the kickstand must be closed all the way in order to extract the locking mechanism far enough to remove the battery!
-
-
-
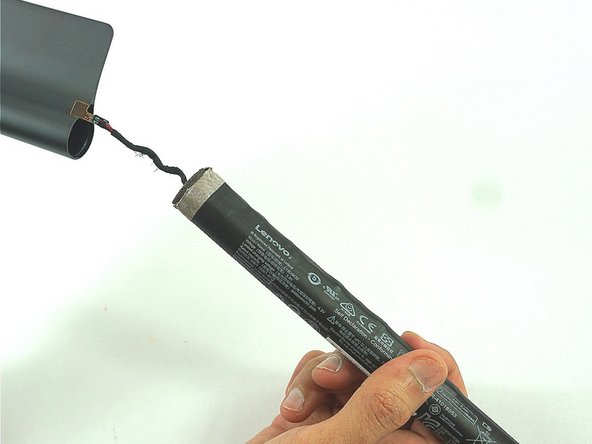
Usa un paio di pinzette per rimuovere il nastro che copre la vite.
Booking to battery
This Instruction is good. Step 5 isnt as easy as described. Its difficult to get the locking mechanism out, also not easy to get it back in again. I am a computer technician and needed 20 Minutes, 5 Minutes as described is way to short.
Hi, how we disconnect the cable from the tablet on the other side ?
-
-
-
Apri la copertura e rimuovi la batteria.
I also had to remove the metal cover on the upper left-hand side of the mainboard (directly under the camera) in order to safely remove the battery cable; it’s also helpful to disengage the camera lock (see “camera replacement” guide) and remove the camera+battery cable guide to make it easier to fiddle the cable out of the housing.
I would love a tutorial on how to remove and replace the power button? Does anyone know a link please..cheers
Die Anleitung ist gut, es fehlt bloß das lösen vom Bateriekonnektor und das lösen der Spange
How hard should it be to remove the battery pack from the hinge?
Mine just won't seem to budge.
Bevor der Akku entfernt werden kann, muss das Kabel vom Mainboard gelöst werden. Das ist ein Mikro-Steckkontakt. Um überhaupt an den Steckkontakt zu kommen muss noch eine Metallabdeckung entfernt werden (2 Schrauben). Dann den Stecker mit einer Pinzette anheben.
Ich musste dann auch noch den Steckkontakt für die Kamera entfernen. Danach konnte ich die metallene Kabelführung neben der Kamera noch lösen (1 Schraube). Nur so konnte ich dann endlich das Kabel des Akkus herausbringen. -


Per rimontare il dispositivo, segui le istruzioni in ordine inverso.
Per rimontare il dispositivo, segui le istruzioni in ordine inverso.
Annulla: non ho completato questa guida.
Altre 39 persone hanno completato questa guida.
Un ringraziamento speciale a questi traduttori:
100%
Daniele Carminati ci sta aiutando ad aggiustare il mondo! Vuoi partecipare?
Inizia a tradurre ›
Team

USF Tampa, Team S3-G2, Sullivan Spring 2017 Membro di USF Tampa, Team S3-G2, Sullivan Spring 2017
USFT-SULLIVAN-S17S3G2
4 Membri
18 Guide realizzate
17 Commenti
Very good. Nice operation. For me it takes 10 minutes for get the battery out the device and 4 minutes to replace all. Thanks!!
Seem to be missing the step where you disconnect the battery. That seemed real important as I'm sitting here with the tablet in bits trying to see how to do that bit.
Matt, I just pulled mine apart and the problem might be that you have a different revision of your tablet. Mine had three screws on the backplate but one of them is next to, not in the sd card slot, and there were only 2 screws on the “aux port" (speaker for me) not three.
If so, I had to remove the camera module to get the battery cabling free, it is threaded through a shared camera/kickstand bracket that looks permanent. Removing the camera was creepy, it takes more force than I like, but doable:
Pull the camera wiring harness from the motherboard, unscrew, I'm my case, everything in that area, I have broken enough stuff because of missed screws. The camera itself has 2 screws holding it down via the same plate that the battery cable snakes through. After that it's just a lift/pry thing until the module pops out.
Wish I could put up some pictures but I don't see a way, hope this helps you or anyone else. This tablet is easier to get into then most, but it would be easy to fubar on this if not careful.
Hi, I have a problem with the battery of lenovo yoga tab 3 10.1 and need a replacement for it. Could any one please let me me know where I can get the battery?
I have the same problem. Where to find the battery for YOGA Tablet 3 PRO 10 YT3-X90F 32GB, ASIN B015MOQP02 on Amazon. Many thanks
@Matt You can get the battery wire out by gently moving the camera cable out of the way and feeding the battery cable through the hole.
hello, and the model with projector?
I've got a b8080-f that won't power on. It shows as zero percent full and sits for hours without taking a charge. Is a new battery likely to resolve this?
If the computer functions while connected to power, yet dies immediately when disconnected and will not hold a charge, a new battery would likely resolve the problem.
Where can I find a battery
Es gibt den Akku nicht zu kaufen, dann könnte ich mir das Ganze sparen
https://www.aliexpress.com/item/32851379... searchweb0_0, searchweb201602_, searchweb201603_
icant see any screws to undo
This needs to include which models this tutorial covers since there are more than 1 version of this tablet.
Hi, have you a trust website to buy a real functional battery?