Introduzione
Stai avendo problemi di ricarica? Può essere arrivato il momento per una nuova batteria. Segui questa guida per sostituire la batteria nel tuo Kindle Paperwhite di 1a generazione.
Cosa ti serve
-
-
Usando uno spudger o uno strumento di apertura in plastica, separa delicatamente la cornice dallo schermo. è più semplice iniziare negli angoli continuare lungo i bordi fella cornice.
-
-
-
-
Gira il telaio intermedio a faccia in giù per trovare la batteria.
-
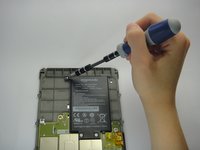
Svita le tre viti a croce Phillips da 3,0 mm che fissano la batteria al telaio intermedio.
-


Per rimontare il tuo dispositivo, segui le istruzioni in ordine inverso.
Per rimontare il tuo dispositivo, segui le istruzioni in ordine inverso.
Annulla: non ho completato questa guida.
Altre 69 persone hanno completato questa guida.
Un ringraziamento speciale a questi traduttori:
100%
Daniele Carminati ci sta aiutando ad aggiustare il mondo! Vuoi partecipare?
Inizia a tradurre ›
Team

Cal Poly, Team 3-33, Amido Winter 2013 Membro di Cal Poly, Team 3-33, Amido Winter 2013
CPSU-AMIDO-W13S3G33
4 Membri
17 Guide realizzate
14 Commenti
You may not need a new battery. I had the issue of the paperwhite re-indexing ALL of my content and getting snagged on a corrupted book toward the end of the process. This looks for all the world like the battery is dying.
Backup your kindle devices folder to a computer.
Delete everything but the book you are reading.
Delete the hidden indexes in the system folder.
Restart the kindle.
Now it should charge to 100% - and last weeks instead of hours.
(search for kindle paperwhite indexing battery re-indexing)
If you have a corrupted book how do you tell which one it is?
The spudger was no help what so ever as it was too thick to get between the edge. I finally had to use a exacto knife. And the #2 screwdriver they recommended was laughably large! I ended up using a screwdriver I got with a kit to tighten your glasses. On the battery (which iFixit doesn't sell but recommended from another seller) the last two digits were different (03 rather than 05) and it didn't work. I don't know if that's why, or if something else is wrong. The only thing that was useful was the video - at least I knew what to do and the order to do it. Too bad none of it worked. Guess I'm getting a new Paperwhite Kindle!
The battery on my Kindle Paperwhite 1st Gen died earlier this month. I ordered a replacement battery online, opened my Paperwhite using the instructions on this page, replaced the battery and yeehaa, it works again. Thank you!!!!
My Kindle Paperwhite (first generation) only has 10 screws rather than 11 as described, i.e. the one in the top middle is missing from the description. So before digging for that extra screw you might want to check whether the midframe lifts out of the case already with the 10 easily accessible screws removed.
I had some trouble first with prying off the bezel using different spudger tools. The Jimmy finally did the trick for me, since it is thin enough to get into the edge around the screen and also flexible enough to cut into the adhesive.