Introduzione
Segui questa guida per sostituire la batteria esausta nel tuo Huawei Mate 20 Pro.
Aprire il Huawei Mate 20 Pro danneggerà il sigillo dell'impermeabilità del dispositivo. Se non lo sostituisci il sigillo adesivo, il tuo telefono funzionerà normalmente, ma perderà la sua protezione contro l'acqua.
Se la tua batteria è gonfia, prendi le precauzioni appropriate. Per la tua sicurezza, scarica la batteria al di sotto del 25% prima di smontare il tuo telefono. Questo riduce il rischio di pericolosi eventi termici se la batteria viene danneggiata accidentalmente durante la riparazione.
Anche se è possibile rimuovere la batteria senza rimuovere il cavo a nastro principale con la porta di carica, ti consigliamo di rimuoverlo per evitare di danneggiare i componenti circostanti.
Ti servirà dell'adesivo di ricambio per riattaccare dei componenti durante il rimontaggio del dispositivo.
Cosa ti serve
-
-
Prima di iniziare, spegni il tuo telefono.
-
Appoggia un iOpener scaldato sul retro del telefono per ammorbidire l'adesivo sotto la copertura posteriore. Lascialo appoggiato per almeno due minuti.
-
-
-
Fai aderire una ventosa alla parte inferiore della copertura posteriore, il più vicino possibile al bordo.
-
Solleva la copertura posteriore con la ventosa per creare una piccola fessura tra la copertura e la cornice.
-
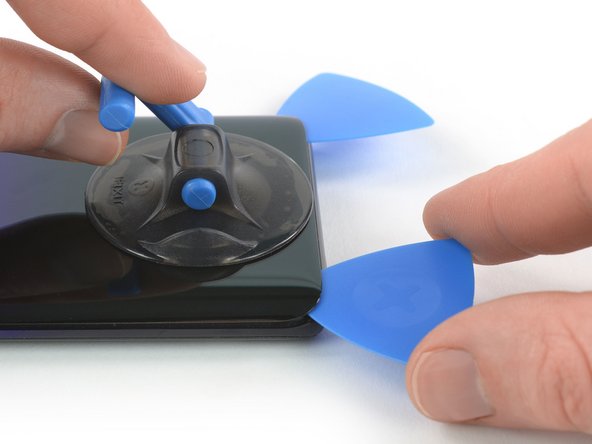
Infila un plettro nella fessura.
-
Fai scorrere il plettro fino all'angolo in basso a destra.
-
-
-
Se l'adesivo diventa difficile da tagliare, probabilmente si è raffreddato. Usa il tuo iOpener per scaldarlo di nuovo.
-
Infila un quarto plettro sotto l'angolo in alto a sinistra della copertura posteriore.
-
Fai scorrere il plettro sotto il bordo superiore del telefono per tagliare l'adesivo.
-
Lascia il plettro infilato sotto l'angolo in alto a destra per evitare che l'adesivo si reincolli.
-
-
-
Svita le otto viti a croce Phillips #00 da 4,3 mm.
Hallo, es sind nur 7 Kreuzschlitzschrauben à 4.3mm. Eine (die zweite von unten links nach rechts) ist massiv kürzer und silbern.Gruss Jörg
-
-
-
-
Usa uno spudger per sollevare e scollegare il connettore della batteria.
-
-
-
Svita le tre viti a croce Phillips #00 da 4,3 mm.
-
Se vuoi rimuovere o sostituire lo speaker principale, la scheda figlia, la batteria o lo schermo OLED, svita le quattro viti a croce Phillips #00 da 4,3 mm che tengono fermo il gruppo dello speaker principale.
-
-
-
Usa uno spudger per sollevare e scollegare il cavo a nastro di interconnessione dalla scheda figlia.
-
-
-
Infila un plettro sotto l'angolo in alto a sinistra della copertura dello speaker principale.
-
Usa il plettro per sollevare il gruppo dello speaker principale e della scheda figlia.
This part is difficult to remove, does not come out easily.
Turns out that you have to remove the 4 orange screws of step 14.
Not sure why there is a IF statement on this step.
-
-
-
Usa uno spudger per sollevare e scollegare il cavo a nastro principale dalla scheda madre.
-
-
-
Separa la striscia adesiva arancione con l'1 dalla batteria. Il nastro adesivo arancione si strapperà lungo una piccola linea perforata.
-


Per rimontare il tuo dispositivo, segui le istruzioni in ordine inverso. Applica del nuovo adesivo dove necessario dopo aver pulito le zone interessate con dell'alcool isopropilico (>90%).
Per prestazioni ottimali, dopo aver completato la procedura, calibra la tua nuova batteria appena installata: Caricala fino al 100% e lasciala sotto carica per almeno altre 2 ore. Poi usa il tuo dispositivo fino a scaricare completamente la batteria. Infine carica la batteria fino al 100%.
Porta i tuoi rifiuti elettronici a un riciclatore certificato R2 o e-Stewards.
La riparazione non è andata come previsto? Prova delle soluzioni di base ai problemi, oppure rivolgiti alla nostra comunità Risposte per trovare aiuto.
Annulla: non ho completato questa guida.
Altre 12 persone hanno completato questa guida.
Un ringraziamento speciale a questi traduttori:
100%

Questi traduttori ci stanno aiutando ad aggiustare il mondo! Vuoi partecipare?
Inizia a tradurre ›


17 Commenti
I have tried this with two new batteries now. I believe the device was water damaged by plugging the charger in while there was moisture in the port. The existing battery works but doesn't fast charge and gets very hot when charging, the battery also drains extremely quickly. Everytime insert a new battery the phone just get stuck in a boot loop, bringing up the Huawei powered by android screen before restarting, I have also replaced the charging port in hopes that may of been damaged and was causing the issue but this didn't work either. Any suggestion?
Excellent Step by step guide thank you
Sorry what do you mean by “reusing the board at the base of the battery body”?
Hi, I had the same issue that the phone did not accept the new battery. Luckily I found a workaround in a German newsgroup: 1) Boot up the device using the original Battery 2) connect an USB charger to the mobile 3) Disconnect the original batery and connect the new one ( you have to be quite fast, if the phone shuts down during the change you have to go back to step 1) 4) charge the phone for about 10 minutes and check if the batteryindicator moves up. 5) restart the phone and double check that the new battery is accepted. I’ve tested this method and it worked for me.
You saved my life, I saw it in the German website but it was not that easy explained
Please show us or explain a bit better how to do this?? I tried it but the phone dies immediately if you remove the battery plug
Oh my gosh! After I tried out every suggestion I found on the internet, this eventually worked for me too! But I put a spin on it. To reduce energy consumption and keep it alive during the switch, I unplugged the screen! Beforehand, my phone died the moment I took off the battery cable. But having the screen not attached, it worked. So happy. By the way, the screen is the yellow/reddish cable that comes from underneath the battery and attaches below the lower-left camera. Having tried out the other methods suggested online, I must say that I also left my phone charging for some hours while it continuously rebooted, and I did a factory reset beforehand. But I don't think that was necessary
axeld.90 -
How did you do it the phone dies
Could you maybe post a link of the original website showing how to do this?
I changed the battery without any problems but the phone gets stuck in bootlooping as I feared... When I let the phone bootlooping while being charged, it eventually starts but it can take a while… And then if I shut down the phone, or let the battery discharged totally, I have to do the whole thing again. Is there a way with a booted phone to change the battery ID so that the phone thinks it’s the old battery inside to prevent bootlooping? Also, can someone elaborate the hardware fix “I solved it by reusing the board at the base of the battery body” ?
Thank you for your help
Yeah I tried and just gave up, old battery still works fine with about 2/3 capacity so I popped it back in. I highly suspect that with the new HarmonyOS the trick they posted about in 2021 is patched. This is a known issue, I guess it's time to change brands for the next phone oh well.
What I tried was following all the steps outlined by the other person, while it seems to work at first the phone refuses to boot after the flashlight is plugged back in and the metal cover plate is installed on top of the motherboard.
More complicated instructions in Chinese, really feel like ifixit needs to put a warning at the top of this tutorial...