Introduzione
Non sai bene come usare tutte le strisce adesive del tuo kit per la cover posteriore? Sei capitato nel posto giusto! Questa guida mostra come usare il kit dell'adesivo della cover posteriore della serie di telefoni Samsung con fondo di vetro (S7 e successivi). Comprende anche istruzioni su come trasferire e installare diversi componenti della stessa cover, come la cornice della fotocamera e il sensore di impronte digitali.
Può darsi che non sia necessario usare tutti gli adesivi compresi nel kit. Se stai trasferendo sulla nuova cover il sensore impronte digitali, ti servirà del nastro biadesivo, come il Tesa.
Per un elenco delle strisce adesive per i telefoni Galaxy S, [[ collegamento alle parti non valide ]].
Nel caso si debbano applicare delle strisce adesive come queste, ecco alcuni suggerimenti generali:
- In generale, le strisce adesive hanno una faccia colorata e una non colorata (di carta o di plastica trasparente). La faccia non colorata indica la superficie della striscia che deve essere applicata per prima.
- Per rendere più facile l'applicazione dell'adesivo, puoi allineare una striscia ancora dotata di protezione nella posizione prevista sul telefono; a questo punto attacca con il nastro alla scocca uno dei bordi per tenere la striscia in posizione. Questo ti permette di staccare i rivestimenti protettivi in plastica e di esporre l'adesivo senza perdere l'allineamento.
Cosa ti serve
-
-
Per installare l'adesivo della batteria, segui questa guida.
-
Per trasferire e installare il sensore impronte digitali con la guarnizione, inizia dal prossimo passo.
-
Per trasferire e installare la cornice posteriore, salta al passo 5.
-
Per installare gli adesivi di supporto della cover posteriore, salta al passo 9.
-
Per installare l'adesivo sul perimetro della cover posteriore, salta al passo 13.
-
-
-
Ricalda un iOpener e applicalo sul sensore impronte digitali per un minuto.
-
Usa uno strumento di apertura per far leva delicatamente sul sensore impronte digitali nel suo bordo più profondo, dove entra in contatto con la cover posteriore.
-
Non far leva sul bordo più in alto, che è la linea di giunzione della guarnizione del sensore impronte digitali.
-
-
-
Usa uno strumento di apertura per staccare la guarnizione dal sensore impronte digitali.
-
Rimuovi la protezione in plastica colorata sulla guarnizione sostitutiva per scoprire l'adesivo.
-
Allinea con cura il sensore impronte digitali e disponilo dalla parte adesiva della guarnizione.
-
Una volta che è allineato, premilo con decisione con il dito per far attaccare bene l'adesivo.
-
-
-
Per attaccare il sensore impronte digitali alla nuova cover posteriore, usa del nastro adesivo pretagliato oppure ricopri il perimetro del sensore con nastro adesivo tipo il Tesa.
-
Allinea il sensore impronte digitali nella cavità della cover posteriore e premilo con decisione con il dito per far aderire bene l'adesivo.
-
-
-
Ricalda un iOpener e applicalo per un minuto alla cornice posteriore.
-
Iniziando dalla parte rivolta all'esterno della cover posteriore, spingi con un dito la cornice verso l'interno per liberare la cornice stessa dalla sua cavità presente nella cover.
-
In alternativa, per liberare dalla cover la cornice puoi far leva lungo il suo perimetro con uno strumento di apertura.
-
-
-
-
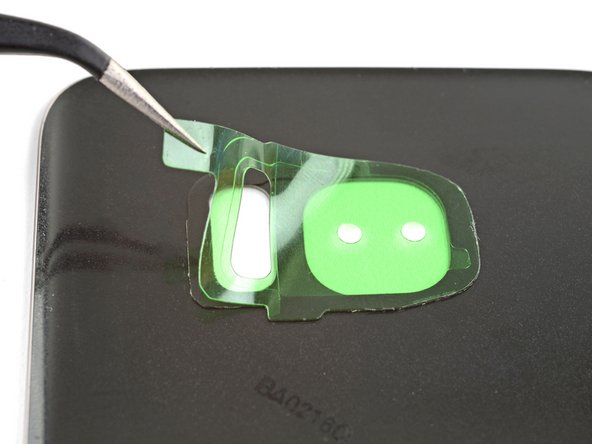
Stacca la protezione in plastica trasparente dalla striscia adesiva della fotocamera per scoprire la parte adesiva.
-
Allinea con cura l'adesivo alla cavità per lacover posteriore.
-
Una volta allineato nella sua posizione, premi l'adesivo con il dito.
-
Stacca la protezione in plastica colorata dall'adesivo per scoprire la sua superficie.
-
-
-
Fatti un'idea di come ogni striscia di supporto si allinea con le superfici confrontando i contorni della striscia adesiva con la colla residua e la scocca del telefono.
-
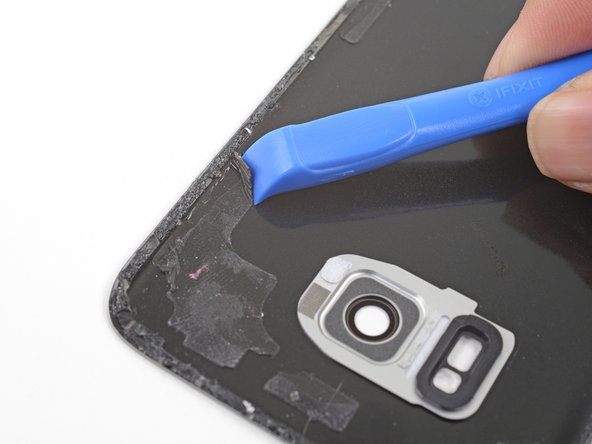
Usa uno strumento di apertura e dell'alcol isopropilico ad alta concentrazione per rimuovere ogni residuo di adesivo dalla scocca del telefono.
-
Se vuoi riutilizzare la cover posteriore, rimuovi ogni parte di adesivo rimasta dalla cover stessa.
For my Galaxy S7, it appeared to me there were some minor placement inconsistencies (a millimeter or two) where the Back Cover Support adhesive pads (support strips) were on the backing sheet versus the actual phone. Difficult to know for sure since it is hard to tell where the original pads were after the back cover is pried off. I removed the clear backing to expose the strips and blocks, but placed the clear backing covering 80% of the phone as I transferred one portion of the unconnected adhesive strips at a time where they best appeared to be needed. This falls in the category of tweaking.
The adhesive sheet for the back cover was 100% accurate.
-
-
-
Stacca la protezione trasparente dalla striscia di supporto adesiva per scoprire la colla.
-
Disponi con cura la striscia con la parte adesiva verso l'alto sulla parte superiore della scocca del telefono, stando attento a non toccare la superficie adesiva.
-
Allinea la striscia adesiva sulla scocca del telefono in modo che i bordi dell'adesivo corrispondano a quelli del telefono.
-
Se disponi di due piccole strisce di supporto, ripeti la procedura per entrambe le strisce.
This process of putting the colored plastic with adhesive onto the phone and then sandwiching the back panel on top seemed counter-intuitive so I decided to remove the colored plastic and place the adhesive + clear plastic onto the back of the phone’s guts.
DON’T BE ME!
Follow the instructions and save yourself close to an hour of hassle. The adhesive loves the colored plastic way more than the clear.
It actually worked!!!
-
-
-
Cala con attenzione la cover posteriore sulle strisce adesive di supporto scoperte. Questa operazione assicura che l'adesivo sia trasferito in posizione corretta sulla cover posteriore.
I found it easier to lower the back cover onto the support strips using a suction cup. I felt like this gave me more control over placement and my fingers didn't get in the way on the edges.
-
-
-
Usa uno strumento di apertura e alcol isopropilico ad alta concentrazione per rimuovere tutti i residui di colla rimasti sulla scocca del telefono.
-
Se vuoi riutilizzare la cover posteriore, rimuovi ogni residuo di adesivo dalla cover stessa.
Scrape and peel the adhesive, using goo gone only after systematically scraping the adhesive as much as possible. The goo gone should only be used to clean up residue once manual scraping has been completed, otherwise the adhesive will become tacky and only scrape off in microscopic layers at a time, which takes forever to remove.
-
-
-
Stacca la protezione trasparente dalla striscia perimetrale per scoprire l'adesivo.
-
Tieni la striscia dalle sue linguette e allinea con cura uno dei lati lunghi dell'adesivo al corrispondente bordo della cover posteriore.
-
Disponi l'adesivo sulla cover posteriore e premilo con le dita sulla cover stessa.
-
Stacca la protezione colorata dalla striscia perimetrale per scoprire l'adesivo.
(Galaxy S7 kit): I peeled away the clear liner (Step 1), aligned it to the cover edge (Step 2) and pressed it down (Step 3).
When I peeled off the tabbed "coloured" liner (Step 4), it turned out to be two layers: a clear, tabbed one that came away and a green one consisting of a central part and a thin, outer strip that still covered the adhesive.
This thin strip had been partially lifted by the removal of the clear tabbed layer, so I started to remove it all. As I slowly and carefully pulled it, it tried to lift the adhesive strip itself off the cover so I held that down with the tweezer points. That still left the main green part in the centre of the case, but that was easily removed.
However, when I turned the back cover over I saw that where the adhesive strip had lifted slightly it had detached some of the cover's coloured film, leaving it buckled and a bit of a mess.
When I tried to pull away the cover strip, the adhesive stuck to it. I also have no idea why the clear liner and green liner are attached to each other.
The pictures don’t match what is received for the Galaxy S8+. It’s also not clear where to attach the perimeter adhesive. On the lip of the back cover or just inside the well area. In addition, after exposing the adhesive (after removing the clear side), no matter how weel you pre-align the position, you can’t count on the adhesive to stick to whichever method questioned above, without some of it not releasing cleanly from the colored backing. Yes. firm pressure was applied before moving a little further down. At times the adhesive stuck so strongly to the colored backing, it stretched the adhesive out of shape.
I have repaired hundreds of laptops and all in ones, so I understand there are subtleties in a repair, and I found it quite confusing replacing the battery and fingerprint sensor and other necessary parts related to doing that repair with the either inaccurate, outdated, or lack of detail provided (but much needed) in this guide.
If you're like most people and the original back glass (S8) cracked upon removal, and you've ordered and received a plastic replacement from iFixit, remove the adhesive that comes on the replacement plastic back panel, and use the adhesive in this kit. The back panel adhesive in this kit is THICC and seems like it would create a much better seal than what comes preinstalled on the replacement back panel.
-


Annulla: non ho completato questa guida.
Altre 124 persone hanno completato questa guida.
Un ringraziamento speciale a questi traduttori:
100%


Questi traduttori ci stanno aiutando ad aggiustare il mondo! Vuoi partecipare?
Inizia a tradurre ›


14 Commenti
The flex cable for the fingerprint sensor is so short and delicate that it’s fiendishly difficult to locate and snap in. You only have a very narrow gap between the back cover and the phone, it wants to jump out of position if you misalign at all, and you can’t reach under there with normal size fingers. Not only that, it’s done with the rear cover adhesive in place so if that touches, it sticks.
I got it snapped on, and the flex cable broke at the same moment. So, no fingerprint sensor for me. Also, the new back cover arrived broken. If it was usable, the way to do it IMHO is to attach the flex cable first, then push the fingerprint sensor assembly on to the new back cover adhesive (it goes on from behind), then close the back cover.
Hey William,
If you bought the back cover from iFixit, please contact our support team here and we will get a replacement sorted out for you!
P.S. I got the battery and cover because the old cover was warped and separated, figured may as well replace the battery in a 2-year-old phone. Turns out, the battery was swollen and huge and it had pushed the back cover open. Not a good situation. So if your back cover is coming off, suspect that battery.
P.P.S. The fingerprint sensor flex cable connector probably could be manipulated into position with the tweezers from the tool kit and pressed down into place with the plastic screwdriver thingy, Just hover the back cover over it with your third hand (or a helper).
Will the phone still be water-resistant after this repair?
Hi Shai,
The phone won’t be as water resistant compared to when it is brand new. However, this is true even if you didn’t repair the phone—adhesive seals break down and lose water resistance over time.
Do you have custom-cut adhesive strips for Samsung galaxy s9+? Can’t find it in store.
Hi Michael,
We are currently in the process of sourcing the adhesive. Please check back in the future!
where i can buy the adhesive
It’s a little confusing going through the battery removal for the Samsung S10+ and then being sent to the Samsung S10 installation process instead of the Samsung S10+ install. Although moderately intuitive, it would be nice to have a specific article for a specific phone that identifies the actual process with the physical parts involved since The S10 and the S10+ are not the same back covers and the same parts involved.
Additionally, the inner wireless connector plate NEEDS to be connected to validate a connection otherwise the battery will not power the phone. This is a Requirement on the S10+.
I need to do the front gasket...is there an article for the front, I'm replacing my screen. Also, my child lost the earpiece mesh, is there something else I can use? Thanks
I got the S9 battery kit and all of the precut adhesive pieces had been cut backwards. The stiff green/blue plastic was on the wrong side. I had to remove the adhesive pieces entirely and try to use the clear plastic backing as the transfer agent instead of the stiffer, cut plastic pieces. I eventually did get it installed but it took a lot longer than planned.