Introduzione
Questa guida mostra come sostituire il SuperDrive del tuo portatile (richiede un SuperDrive SATA).
Cosa ti serve
-
-
Con il case chiuso, posizionare l'Unibody capovolto su una superficie piatta.
-
Premere il lato scanalato della chiusura di sgancio dello sportello di accesso, affinché sia possibile prendere l'estremità libera con le mani. Sollevare la chiusura di sgancio finché non è in posizione verticale.
-
-
-
Afferra la linguetta di plastica trasparente e tira la batteria verso l'alto per rimuoverla dall'Unibody.
-
Premendo la chiusura, questa bloccherà la batteria in posizione.
Do I need to wait for the battery to charge completely before using the computer (while plugged in)?
No. You do not need to charge it completely before removing it.
-
-
-
Rimuovere le otto viti seguenti, che fissano il case inferiore al case:
-
Una vite con testa a croce da 5,4 mm.
-
Tre viti con testa a croce da 14 mm.
-
Quattro viti con testa a croce da 3,5 mm.
Hi, My name is Jess I need help asap I accidentally dropped my macbook Pro and i cant find the silver screw for the top left back side, Does any one know if I can replace it with an eye glass screw?? If you can help at all Please e-mail me at Chambliss_jess@yahoo.com thx please help me my bf is going off... ;(
The fixit PH00 is the wrong screw driver for this entire job. It did not fit in the screws, it was too pointy and caused screws to be rounded off.
-
-
-
Con entrambe le mani, sollevare il case inferiore da quello superiore.
About midway along each edge is a snap. To release each snap, gently slide the flat edge of a Spudger under the lower case, then lift the lower case away.
-
-
-
-
Scollega il cavo della fotocamera estraendo il terminale maschio dalla sua presa.
You have to be EXTREMELY careful when detaching and reattaching this cable!!! It carries your Bluetooth, iSight camera, and Wifi connections!! I was being very careful when reattaching it and ending up either messing up the connector on the logic board or the cable itself- both cases are equally as bad. The cable doesn't snap back in or have guides, and it is therefore difficult to know if it's in as far as it needs to be, etc. If you mess up the connector on the logic board (that's what it's connecting to), you have to replace the entire logic board, and if you mess up the cable itself (it has very small, delicate metal connectors), you have to replace your entire display!! Each costs around $500/ea! I did a ton of research before embarking on this procedure and really wish someone had made a note of this prior- learn from my mistake!
I had some difficulty getting the 'isight' cable back on. Pay close attention when you remove it as you will need to reattach the cable at an angle to get the small protrusion on the right side of the connector passed the little black plastic block that is glued onto the system board. It looks like this little block is there to keep the cable from slipping out... so it makes it tricky getting it back in.
Personally I would avoid disconnecting the cable from the socket as advised in this step, one should be able to proceed simply by carefully lifting the cable free from the adhesive holding it on to the optical drive.
Like others here, I followed Step 6 as per the guide and ended up with no Bluetooth or iSight camera, due to somehow damaging the connector and/or socket, despite taking the utmost care. It is possible to carefully slip the old drive out, and a new drive in, with the cable connector in situ (at least that was the case on my Late 2008 MacBook Pro).
You can remove the small smooth block that is blocking this plug pretty easy. Once you connect the plug then you can stick that block back in place, it's just glued down.
Looking at the cable socket towards the DVD drive - to the left of the cable socket there is a small rectangular, transparent plastic piece glued to the print board. Its function is to apply pressure to the left of the plug, so that it stays in the socket. Even if you can relatively easy unplug the plug from the socket, this piece of plastic makes it impossible to re-enter the plug into the socket. So, if you can do your thing without un-plugging this cable, you are more safe.
-
Also, IF you decide to take the plastic piece off and glue it back on, face your tool away from the resistors and towards the DVD-drive. I did not and sheared off 3 resistors from the motherboard. Result = Dead machine. Costwise I cannot defend having it repaired, so am shipping it off in parts, as everthing else works.
-
But the 2 GPUs DOES make it a nifty little machine - even past Apple and general progress killing off El Capitan.
BUT I found a guy, who soldered 3 resistors on for next to nothing, and now I have High Sierra running quite well on it with DosDude1's patches. Only thing is a bit choppy vid at 1080 HD watching youtube, when vid restarts after commercials, for some reason. And the speakers are crackling, but easy to fix with rubber cement, perfect.
ok, this step ruined my machine. should have lokked at the comment before removing the cable
-
-
-
Rimuovere le tre viti con testa a croce seguenti, che fissano l'unità ottica al case superiore:
-
Una vite con testa a croce da 3,5 mm.
-
Due viti con testa a croce da 2,5 mm.
I can't remove one of the Two 2.5 mm Phillips screw, the one on the top of the picture.
It seems to be very tight and I am using a newertechnology PH00 from my Mac repair tool kit.
I am afraid to damage the head of the screw. What do you suggest to do?
Thanks
You most likely need a jewelers screwdriver to remove the two 2.5 mm screws. they are very tiny and very tight
ph 000 will do the trick
I ruined the head of the 3.5 mm Phillips screw. What kind of screw is this (M1, M1.2, ...?)?
I know this is a little late, but I found a part number from another guide. It says that all three of those screws are the same. Here is the part number for that screw: 922-8662, and here is a link to what I found on that screw: https://www.impactcomputers.com/922-8662...
Under the "specifications" tab, it says that they are M2.
The top screw was locked tight for me also and I eventually stripped the phillips screw head. The only thing I could do is drill it out. Since I replaced the optical drive with an SSD, I didn't need the screw after all.
-
-
-
Scollegare il cavo dell'unità ottica estraendolo direttamente dall'unità stessa.
-
-
-
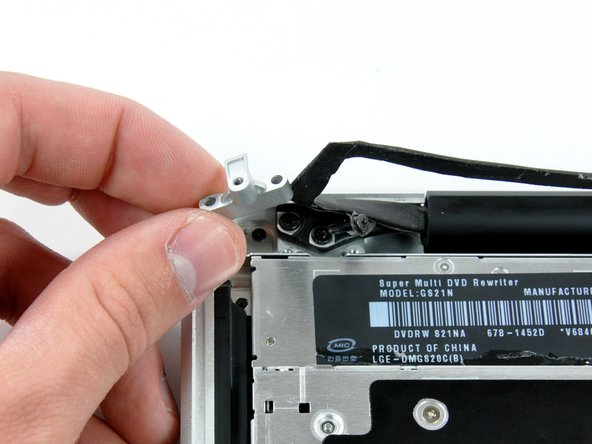
Rimuovi le due viti nere a croce Phillips #0 che fissano la piccola staffa metallica di montaggio. Trasferisci questa staffa sul tuo nuovo lettore ottico o sul case dell'hard drive.
-


Per rimontare il tuo portatile, segui le istruzioni in ordine inverso.
Per rimontare il tuo portatile, segui le istruzioni in ordine inverso.
Annulla: non ho completato questa guida.
Altre 73 persone hanno completato questa guida.
Un ringraziamento speciale a questi traduttori:
100%


Questi traduttori ci stanno aiutando ad aggiustare il mondo! Vuoi partecipare?
Inizia a tradurre ›

4 Commenti
Be extremely careful removing the drive retainer bracket screws. Stop immediately if they resist. These were extremely tight in my case, and I (carelessly) ended up stripping two, even using the correct screwdriver. Keep your extractor handy. (Apple technicians suggest the Alden Grabit-Micro.)
This was super easy. I just took mine apart and found a piece of tape lodged in it. Works great now. Thanks.
The A1286 has no Access Door.!!
I actually can see no sign of the battery!...
aguib - Replica
I assume you have the newer model, with the built-in battery. It's still removable with tools, but these are the wrong instructions for that model.
lgc90 - Replica
when will there be a guide for the other unibody macbook pro. that does not have an access door?
irishking - Replica
Is there a manual to show, how disasembly the display, i mean, after step 5, to check the display between lcd and aluminiun back case?
Max
Max - Replica
On other guides you state the height of the HD that can be supported, e.g. MacBook Pro 15" Core 2 Duo Model A1211 Hard Drive Replacement , I have read ( but have not confirmed ) that the uni-body MacBook Pro can be fitted with the 750GB and 1TB 12mm drive from Western Digital.
Can you confirm this?
Many thanks in advance.
ahothabeth - Replica
My display and aluminum casing has separated.
I don't know if it just snaps back together or does it need to be glued.
I dropped mine on the carpeted stairs and the display still works.
I'm hoping I can just snap it back together and that no plastic pieces or teeth of the snapping
portion have been broken........
SHerwood Ball - Replica
When you say "left fan" is this "left when looking at the logic board after turning the computer over and looking it up opening it up" or "left when sitting at the computer keyboard and typing on it"?
thvv - Replica
We always use left and right in reference to the computer when you're using it.
Andrew Optimus Goldheart -
Directions were great and the worn dc in board was replaced. The hardest part of the procedure is disconnecting the data display cable. A better description of step 21 is to slide the connector parallel to the circuit board towards the outside corner. Reconnecting correctly took several tries.
I used the tip of the spudger to nudge the corners a little at a time to seat the connector.
The ribbon connector for the keyboard has to be inserted all the way before seating the retaining cap. It took me three tries . First try power button did not work second try numbers keys did not work.
Thanks for the directions ...could not have done it with out them!!!
landryd - Replica
Hola. Poseo un MacBook Pro Late 2008 y debo cambiarle las cornetas. Me sirve unas cornetas de un MBP Late 2011?
jegonzalez80 - Replica
Please read the instructions about removing the bluetooth cable - you CAN work around it, and NOT take off the plug.
kenneth krabat - Replica