Introduzione
Usa questa guida per sostituire l'intero gruppo display del tuo MacBook Pro per poter sistemare uno schermo rotto o malfunzionante. Questo insieme include anche i cavi a nastro integrati noti per guastarsi nell'ambito del difetto congenito noto come “FlexGate”; quindi la sostituzione risolverà anche il problema dell'effetto "stage light" (luci di scena) e altri guai derivanti dai danni ai cavi piatti.
Per la tua sicurezza, scarica la batteria del tuo MacBook Pro sotto il 25% prima di iniziare. Se forata inavvertitamente, una batteria al litio-ioni può dar luogo a un incendio pericoloso incontrollabile.
Cosa ti serve
-
-
Accendi il tuo Mac e apri Terminal.
-
Copia e incolla il seguente comando (oppure digitalo esattamente) in Terminal:
-
sudo nvram AutoBoot=%00
-
Premi [return]. Se richiesta, inserisci la tua password di amministratore e premi di nuovo [return]. Nota: il tuo tasto return può essere etichettato anche come ⏎ o "enter."
-
sudo nvram AutoBoot=%03
-
-
-
Richiudi il display e ribalta il laptop mettendolo a faccia in giù.
-
Usa un cacciavite pentalobe P5 per rimuovere le sei viti che fissano la cover inferiore, delle seguenti lunghezze:
-
Quattro viti da 4,7 mm
-
Due viti da 6,6 mm
So this need to replace each and every screw in its exact former position explains exactly the excruciating difficulty I am having in getting the set of four shorter screws screws back in after everything else having gone successfully. Wanna scream at the top of my lungs. Maybe this point needed to be made in all ALL CAPS and BOLD for me. So can I still just start over trying each screw in each hole or have I messed up the threads in trying to screw in screws mismatched to their holes?
The front screws are at a slight angle, pay attention when putting them back!
I did not have the magnetic project mat, but instead I stuck loops of blue painter's tape on the table, wrote the step number on them in sharpie, and stuck the screws/covers for the corresponding step on them.
-
-
-
Posiziona e quindi premi una ventosa vicino al bordo anteriore della cover inferiore, tra i fori delle viti.
-
Tira la ventosa giusto quanto basta per aprire una piccola fessura sotto la cover inferiore.
-
-
-
Tira la cover inferiore con decisione verso la parte anteriore del MacBook (allontanandola dal lato con le cerniere) per separare l'ultima delle clip che trattiene il case.
-
Tira prima da un angolo e poi dall'altro.
I found it easier to insert a screwdriver through the hole (not too far down), and use that to pull sideways, as it was hard to get a strong grip with my fingers.
If you have a black stick, or a nylon probe tool, you can insert it at the back at the point closest to the screw holes, and use that to push the lower case forward. I’ve seen this help me quite a few times, and it makes it quite easier.
I like adrianbrown's suggestion. Spot on!
Its difficult if the side catches arent released properly, check them again if it seems too much.
I snapped one of the spring loaded logic board grounding pins. Take your time. Leverage from the back in order to push it out versus pulling on it.
Take the opening pick and stick the edge down behind the hinge all the way to one side, so it is perpendicular to the case, and give it a twist. That end should pop free. Do the same on the other side and there you go.
This step requires a lot of force to slide the back cover away. Make sure you get a good grip of the mac body and of the back panel.
I literally cut myself with the bottom case, when it finally got freed from the upper case. I have opened a lot of macs, phones, and other items in my life, this was a first. Some light duty cloth gloves next time.
I didn’t understand some suggestions above. Tried Indawg Wetrust but didn’t really get it. Now looking back, it means use the pick just on the tiny lip of the cover, close to the hinge. Not on the antenna, but just on th slip of metal I believe. If that can help others.
-
-
-
Rimuovi la cover inferiore.
-
Disponilo in posizione e allinea le clip a scorrimento vicino alla cerniera del display. Premi verso il basso e fai scorrere la cover verso la cerniera. Lo scorrimento si dovrebbe arrestare non appena le clip si agganciano.
-
Quando le clip a scorrimento sono perfettamente agganciate e la cover sembra correttamente allineata, premi con decisione la cover stessa per agganciare le quattro clip nascoste. Dovresti sentire lo scatto quando le clip si bloccano.
I am doing a battery replacement for a client on this model. The battery has swollen more than I have ever seen before on a Mac! Roughly a ½” higher, once cover removed. Cover was so tight that one screw stripped and had to drill out one screw after trying everything else! Fortunately, I’m an exmechanic/machinist and I own a full size drill press! None of the screw extraction tools sold by ifixit worked or were applicable until I finally got the cover off. Then the small screw pliers from Japan were easier to use than anything else I own. My tools are mostly for larger nuts, bolts and screw extraction. Possibly a mini hammer driver screwdriver would work if one could be made small enough for tiny screws! Ross
-
-
-
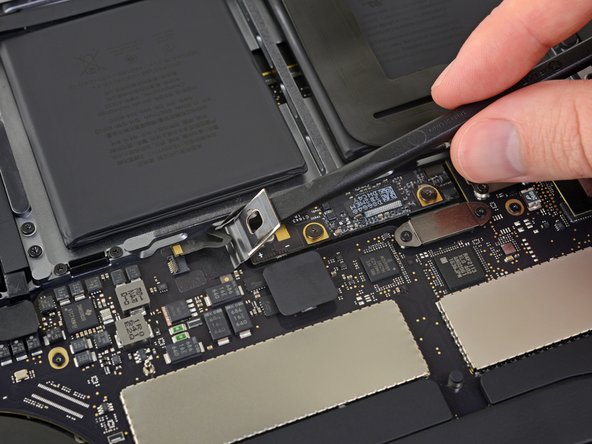
Solleva e rimuovi la grande cover rettangolare della scheda della batteria, sul bordo della scheda logica dalla parte più vicina alla batteria.
-
Se la cover non si stacca facilmente, applica una modesta quantità di calore con un iOpener, un asciugacapelli o una pistola termica per ammorbidire l'adesivo sottostante e prova di nuovo.
What is the though behind this step? I have replace my trackpad before, and I did not do this step. At the time, there was no guide. As a result, I’m wondering how this changes/or if it is necessary for the repair process.
It’s necessary in order to disconnect the battery. Always disconnect the battery before making repairs.
I found my one of my fan making some noise, when open the bottom of my Mac I see this piece floating over the fan. Trying to put it back where it goes but don’t seem to stick anymore and move around. Does this piece is really necessary or I can simply remove it or order a new one from you?
It should be pretty easy to reattach. Put a dab of rubber cement or a bit of double-sided tape on top of each of the screws underneath the cover, press the cover down, and close up your MacBook. It should stay put. Don’t use superglue or anything else that will harden over the screw heads and make it impossible to fit a driver in there later.
Do you know if this piece is necessary. I lost mine.
My Macbook doesn’t appear to even have this piece.
This cover is not attached to anything critical underneath, so do not be afraid that you can break anything like pulling anything from the mainboard. Just pull it out. To reattach, I removed the old double side adhesive tape and replaced with fresh one.
-
-
-
Stacca il nastro adesivo che copre il connettore del cavo dati della scheda della batteria.
The replacement battery did not come with the “tape” in this cable so it was very difficult to reinsert the cable into the zif socket. Now I can’t get the replacement battery to charge.
I have the same issue, My battery is not charging. Did you figure out how to get your battery to charge?
In my case, the original replacement was faulty. iFixIt sent an RMA without hesitation, and I am happy to report that the new one works fine. But also recheck this step and steps 13/14.
J D -
Note that the tape covering that comes on the OEM battery is not included in the battery sent from iFixIt. I removed it from the old and attached it to the new, but it does not “re-stick” very well, so it’s rather difficult to re-insert. Be careful, the ribbon is fragile.
I broke the locking flap! Also, my original tape lost its stickiness as well. I cut out a small piece of electrical tape to keep the cable snug in place. Also will work to keep it secure since I broke the locking flap.
I was able to reinsert the cable easily a number of times with the nice Ifixit angled tweezers as the ziff connectors tiny latch came off! I ended up using a bit of Pliobond 25, contact cement to mke sure the data cable doesn’t move. A future repair will just pull off or at most need an xacato blade knife to slit the rubbery cement. Ross
REALLY important. You need to really pull this back in snug for things to work when you reassemble.
I didn’t seem to have any tape covering it, I just proceeded to the next step
My battery board connecter is broken. Let me know where can I get these cables.?
I recommend to just lift a little the right end (end of the cable side), then keep the socket in place with a spudger while removing this adhesive tape, to avoid any accident like ripping off your socket. With a little care, it is safe and easy to remove completely.
-
-
-
Usa uno spudger per alzare delicatamente la linguetta di bloccaggio del connettore ZIF del cavo dati della scheda della batteria.
Mein Sicherungsbügel ist abgebrochen, oder zumindest nicht mehr auf dem ZIF-Stecker. Ist dieser Sicherungsbügel sehr wichtig, oder kann ich das Kabel dennoch zurück stecken?
Hallo Fabio, wahrscheinlich wird das Kabel ohne den Bügel nicht mehr halten. Das Zurückstecken geht, aber es bleibt nur sehr fragil drin.
My zif connector was already open. It apparently never got closed during manufacture. Being so tiny this made it difficult to see why there was nothing to pry up with the spudger. Once I put my finger on top of it I realized the flap was already verticle.
I had no issue here but I recommend to use a second spudger to keep the rest of the socket in place while GENTLY lifting the lock. It should lift without effort.
When putting it back, be careful, there might be a little piece of transparent adhesive foil on top of the socket, gently lift it up on the side of the cable. The cable should slide in easily, but do not force it. About 0.5mm of the cable contacts will be VISIBLE on the left side, when the cable is fully it, do not force it more than that.
コネクタのプラスチックが割れたのですが、代替品を教えてもらえませんか?
-
-
-
-
Scollega il cavo dati della scheda della batteria facendolo scorrere fuori dal suo zoccolo.
-
Tira rimanendo parallelo alla scheda logica, in direzione del cavo.
If this breaks, what’s the risk to the computer?
I tried powering mine on after my zif connector socket broke. It made bad electrical noises. I had water damage at one point and cleaned the unit very well but never replaced the battery. Through excesive, a hot and bad battery, or water damaged weakening the area mine came right off with the tape when i peeled it up. Im working on finding the part and will attempt to solder it back. Of course i still need a battery which ours was swollen. After water damage it worked great for over a year though.
Mine broke and now the Macbook will not power on, this was after a battery replacement, the Macbook powered up afterwards, but after transporting it, it would not power up. I removed the back cover and noticed the battery board cover was missing and the zif gate for the battery data connector was half off.
Same here, I broke the cable which was soldered on the mainboard. I tried to hold it on place with a tape, but I couldn‘t charge my macbook though. Then I tried to solder it and I also failed. I wish I had read the comments before :/
I couldn‘t find the fpc 6 pin connector with 0,5 mm grid. However I managed to connect the flex cable directly on the mother board with 0,3 mm isolation filament! It was tough but I‘m so happy that it works again :)
Would you be able to give a little instruction on how you were able to make this work? I’m super curious and need a solution to the same issue.
Tim -
Surprised by the tolerance of this little connector to my mistake of not flipping up the not very noticeable clamping element on side opposite to where the contact tip is inserted. The contact tip pulled right out without having done that. Saw in a video I should have done that before pulling the contact tip out. Remembered when reinstalling it.
The cable is stuck on the board underneath with adhesive, so it is best to first work it a little from left under (as the picture is oriented) in order to break the adhesive, and then pull it sideways. At all times, I kept the socket safe with a spudger to avoid ripping it off the board. The cable will come out with a little effort. Remember, it is the socket you need to take care of, not the cable (the cable will be thrown away with the old battery).
I had issues in reassembly - the lever for the ZIF socket was missing. I think it came off with the tape. I found the lever, but it was way too small for me to reattach (I couldn't hold it well enough with the tweezers and wasn't sure where the hinge pins went).
The computer did not recognize the battery or recognized it with errors (if I got the cable just right) without the lever.
My solution was to cut a tiny bit of electrical tape and put it on the back of the ribbon cable to make it thicker. This gave it enough traction to stay in the socket and pushed the ribbon onto the contacts.
-
-
-
Usa un cacciavite Torx T5 per rimuovere la vite a testa piana che fissa il connettore di alimentazione della batteria.
-
-
-
Usa uno spudger per sollevare delicatamente il connettore dell'alimentazione della batteria, scollegando la batteria stessa.
wondering if i didn’t heed this warning close enough. mac not powering on. only black screen with battery and lightning bolt beneath it. What happens if this connector makes contact?
im in the exact same boat right now.
Was everything okay in your case?
Same here until I realized that I never reconnected the tiny power button/Touch ID connector in step 31! It’s underneath the headphone cable jack from step 30. Mine was hiding under the board and I carefully fished it out with a tweezers.
ajm0824 -
I have the same issue. Followed Instructions to theT. Battery is connected properly as it fully charged however, it will not power on. If i disconnect the battery and connect the power adaptor, it powers on. How did you resolve your issue?
Ian Duff -
Hi, did you manage to fix this? Ive got the same issue sadly.
Same problem, any solution?
Lifting up to about 75 degrees is more that enough and safe, and I did also use some electrical tape to block the contact. When this goes back, there is no socket in place, it is just the screw that keeps it there.
-
-
-
Usa un cacciavite Torx T3 per rimuovere le due viti da 3,5 mm che fissano la cover disposta sopra il cavo flessibile della scheda del display.
-
Rimuovi la cover del cavo flessibile della scheda del display.
Its a t4! Not a t3!
Which one is the back light? Anybody know?
-
-
-
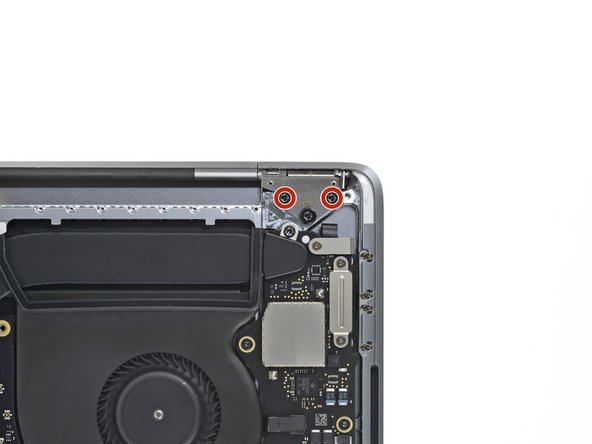
Usa un cacciavite Torx T3 per rimuovere le due viti da 1,7 mm che bloccano la staffa del connettore del cavo della scheda del display.
-
Rimuovi la staffa dal connettore del cavo del display.
I had a problem with the display and I managed to solve it by disconnecting the display board flex cable and connecting it back. It worked for a while, until the first restart of the laptop, again display became inoperable.
When I tried to do the same thing, I realized that this bracket is missing. Most likely I lost it when I first worked on it.
Could be this piece the reason why the display stopped working after the restart?
I ask because I try to eliminate every step in finding the source that is causing this problem at the moment.
Thank you!
******* WARNING ******* T4 not T3!!!!
-
-
-
Usa un cacciavite Torx T3 per rimuovere le due viti da 2,0 mm che fissano ciascuna delle due cerniere della cover (quattro viti in totale).
Thanks for sharing. Emus4u app is the best app, I love this app. Emus4u easy to download all game chats app and emulators apps. This app has advantages to download the free cost of app and quality and quantity apps. Emus4u apps design for PC, ISO devices, and Android. All the apps including the paid ones that you see in the official app stores are available for free using Emus4u. There is a lot to explore in the app store. I really enjoy this app Click more information Emus4u
It’s actually a T4
-
-
-
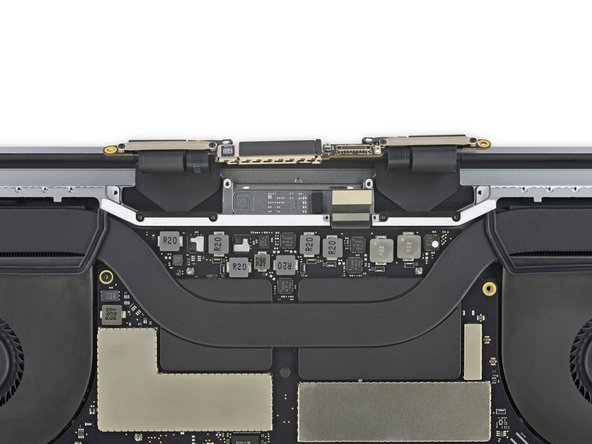
Usa un cacciavite Torx T5 per rimuovere le quattro viti da 3,3 mm che bloccano la scheda del display.
-
Accertati che il cavo flessibile del display resti sopra la scheda, non intrappolato al di sotto di essa.
My model uses T3 screws here, not T5. FYI if this is a typo. Thanks for the great guide!
IF when you are putting your new screen in, and it looks different than this picture, make sure you routed the cable properly, with respect to the antenna you just reinstalled. Its very easy to route the display cable around the antenna the wrong way and have a bit of extra cable flapping around when you are done. It should look nice and tight like this pic shows.
Make sure you pay attention to which screws you remove here! I removed the 2 next to these 2 that hold in that metal plate and then couldn’t figure out why my antenna would not come out!
-
-
-
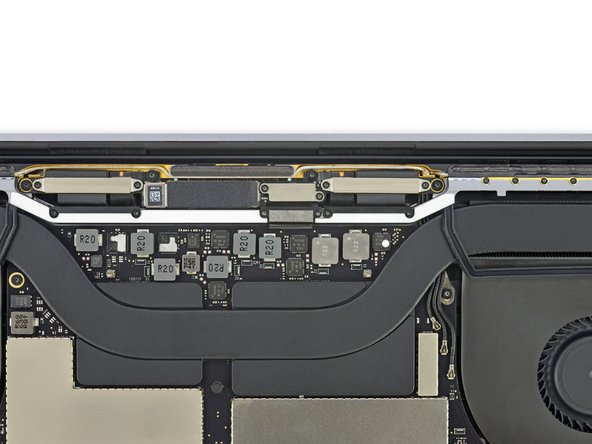
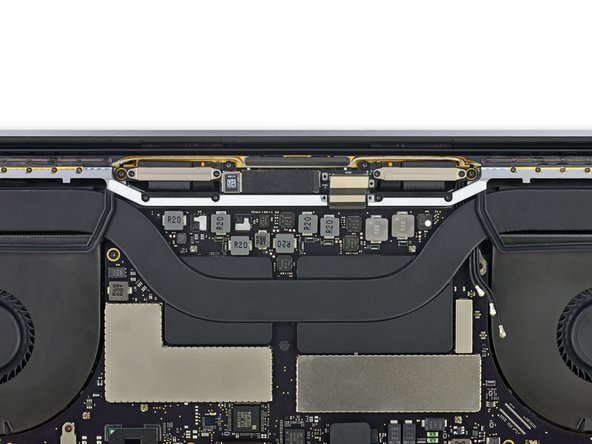
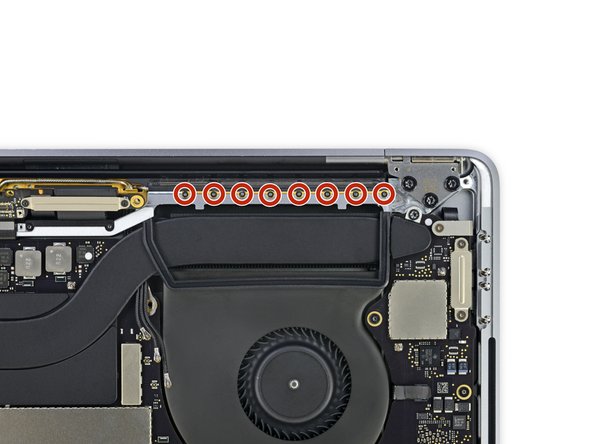
Usa un cacciavite pentalobe P2 per rimuovere le sedici viti da 1,5 mm che fissano il gruppo dell'antenna.
Same problem. All but the very last one. Which now makes me think I should’ve left a few of the other ones in and taking it out first. Maybe it’s causing too much torque on that last screw. ?
I had to be VERY careful with these. More than any other screws. The first 4 wanted to strip out on my. Started to be WAY more careful, and apply way more pressure and was able to get them all out. A combination of not being careful enough on the first ones and having a cheap toolkit almost got me in big trouble!
The secret to these is to lightly twist the P2 to make sure it’s fully engaged. Once it is, then push straight down (very very) firmly on the screw as you turn it counter clockwise and it will come right out.
Do the same but clockwise when you reinstall and you won’t strip a thing.
The secret to this is, don’t buy the iFixIt toolkit. Most of it’s alright but the P2 bit is too brittle and stripped itself after removing only two screws. Borrowed my brother’s Tekton set and had ZERO issues.
Sorry to hear this—for whatever it’s worth, this is the exception rather than the rule! iFixit bits carry a lifetime warranty. Reach out to customer service and they can ship you a replacement bit, free of charge. I’ve done hundreds of repairs with the same set of bits; haven’t yet had any of them strip or break. Better luck on your next repair!
I had a problem using the ifixit tool kit to remove the 16 antenna screws (striped one badly) so i ordered the Wiha drivers from Germany and found the ONLY bit that would fit and thus remove (press down firmly while rotating driver) the pentalobe screws was the 1PLx40 driver, not the 2PL as many have said here. 2PL was just too big to even fit in the screw head.
Robert DiIorio
I had some real issues with these screws. It was because the P2 bit was stripped somehow. iFixit was super helpful!!! They replaced the bit and the new bit worked perfectly. Only stripped one screw. Thanks iFixit!
Oops — deleted my old thread. Posting to leave this link to replacement P2 Vent/Antenna screws: https://beetstech.com/product/vent-anten...
Used the IFIXIT toolkit and applied significant pressure, as recommended in the comments. However, the P2 bit was too weak to move the screws, and ended up twisting itself (how?!) before stripping itself and the screws. Repair is on halt until my order of a different P2 bit arrives (praying that the screws aren’t too stripped…)
Ah! You need a bit of heat and/or solvent to loosen the sealed screw.
Dan -
I know well the effective technique to remove these, but occasionally that’s not enough. I found myself in this situation recently. While I do plan to avail myself of iFixit’s lifetime warranty, I also purchased a small set of Wiha pentalobe screwdrivers. The 1PL is the equivalent and the fit is glove-perfect; if you look at the tip under a microscope you’ll understand why. As happy as I’ve generally been with iFixit parts/tools, their P2 *never* fit like Wiha’s 1PL, and you don’t need to push down on these screws to release them with very little effort.
Same problem here. 13 screws came right out, 3 were stuck. I tried WD40 and a little heat with increasing levels of force. My iFixit P2 bit was a good fit for the screws but it eventually twisted and the tip broke off (thanks iFixit team for already sending a free replacement). I bought a Wiha 1PL screwdriver (model 26761, same tip as P2) for $9 on Amazon and that worked like a charm. Back on my way to dealing with the real problem: Flexgate.
I had the 2nd screw from the end on the right(looking at logic board) to strip on me with a kit I use from Kobalt. I spend a deal of time looking for P2 screwdrivers I received with replacing phone screens but they didn’t work. So I proceeded on to see if I could work around it…..WHICH YOU CAN!!! If the screw(s) you have issues with are outer screws you may be able to manuver the hinge cable and display cable around out of/into place. I was successful doing this, you just have to becareful but it can be done without removing the WIFI antennae.
-
-
-
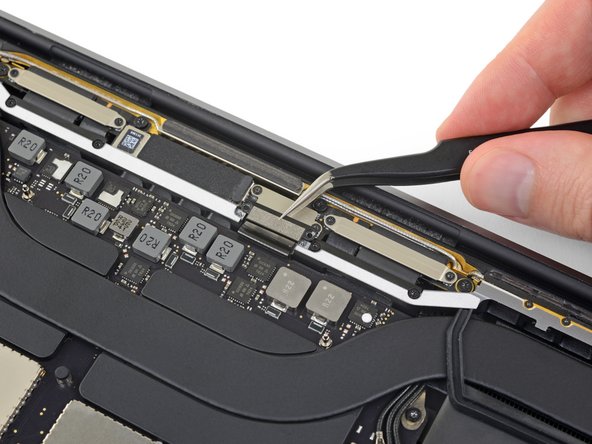
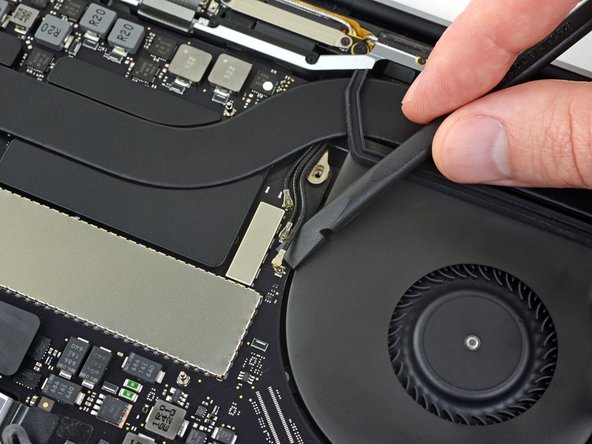
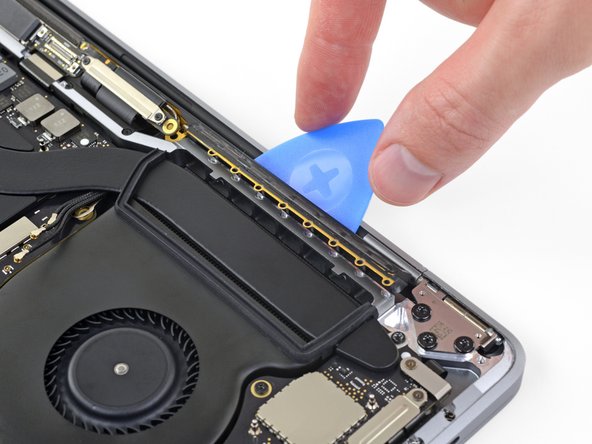
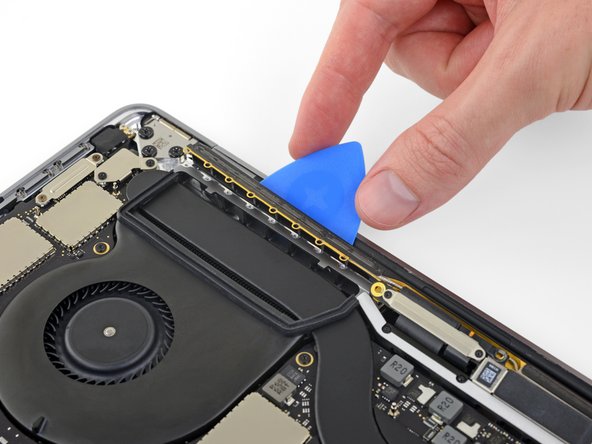
Usa un plettro di apertura per staccare il gruppo dell'antenna e separarlo dal MacBook Pro.
This did not need much prying for me. Could almost lift it out by hand once all the proper screws were removed. Make sure to remove the correct 4 middle screws from step 22 or you will be prying trying to figure out why it wont come out!
-
-
-
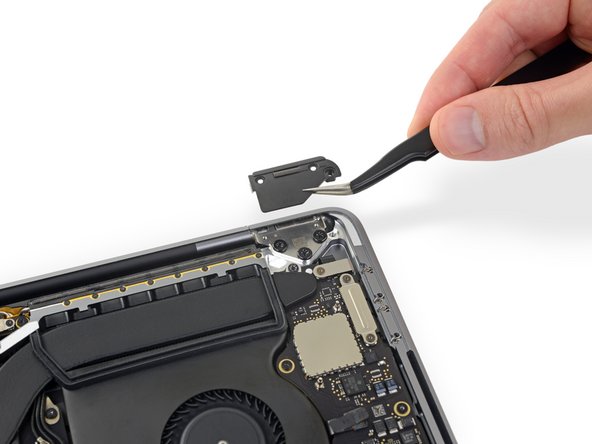
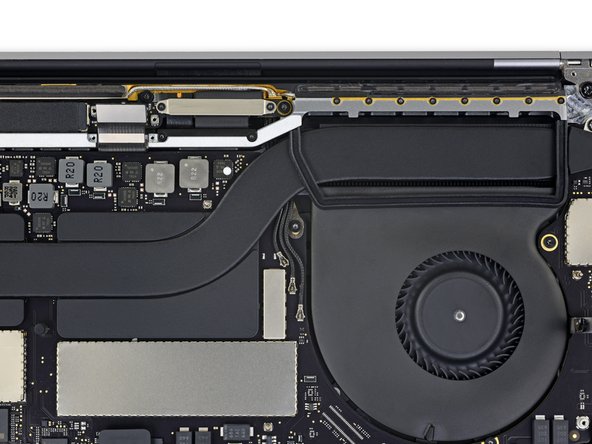
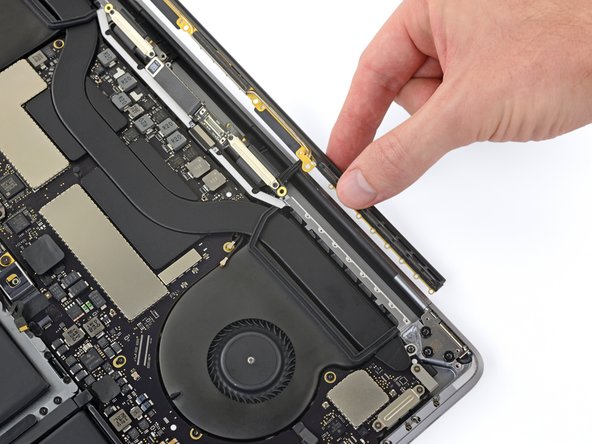
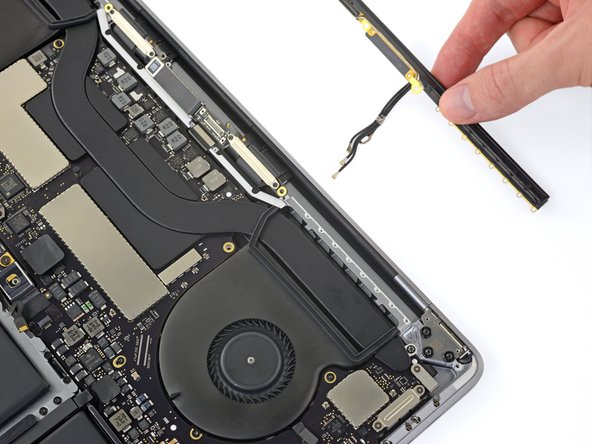
Rimuovi con cautela il gruppo dell'antenna, mentre al tempo stesso fai passare fuori l'insieme dei cavi dell'antenna da sotto il dissipatore di calore.
I took a short piece of scotch tape and “bundled” the 3 cables together. I kept The screw loop out of the taped bundle. I was able to push the bundle thru the hole including the loop. Using tweezers helped grab the bunch and pull them thru.
Watch out when re-assembling to get the ribbon cables back under the antenna.
PLEASE Consider Tonygreenfield’s comment. I ended up having to take the whole computer a part because I reassembled the laptop with cables on the wrong side of the antenna!
-
-
-
Usa un cacciavite Torx T3 per rimuovere le quattro viti da 3,9 mm che fissano le molle della cover del cavo del display.
Take care to replace these correctly. It is easy to put the film over the top of the black hinge holder.
-
-
-
Se prevedi di riutilizzare lo schermo, aprilo e applica un pezzo di nastro adesivo sul vetro direttamente in corrispondenza di ciascuna cerniera. Questa precauzione aiuterà a proteggere il vetro da rigature nel corso del passo successivo.
-
Apri lo schermo in posizione di lavoro e disponi il tuo MacBook Pro su un fianco.
-
-
-
Usa un cacciavite Torx T8 per rimuovere le due viti da 4,9 mm rimaste nella cerniere (una per ciascuna cerniera).
-
Rimuovi per ultima la vite che resta in alto, usando una mano per stabilizzare le due metà del MacBook Pro e fare in modo che non possano separarsi e cadere accidentalmente.
Make sure you have it a very similar angle to the picture, as I had it 90degrees and it was a total ball ache to get the screen off/on! After my donor was at a 125/30 degree angle is popped on and off like a dream :)
-
-
-
Rimuovi lo schermo.
Hi, great guide! I followed along to replace the screen assembly on my orange stained MBP!
Only one minor correction, on step 16, the screws inside my unit (owned since new) were T4, not T3.
Thanks!
Swapping out the lid outer shell as well as the uppercase is really not possible as the display and TouchBar are glued in (liked damaged in the process). In the end it’s just easier replacing the full assembly.
Dan -
È possibile cambiare solo la scocca in alluminio?
Se è come gli altri MacBook Pro della simile generazione, cambiare la sola scocca significa “scollare” il pannello LCD dalla scocca.
Buona fortuna…
-


Confronta il pezzo sostituito con quello originale, potresti dover trasferire componenti rimasti sulla vecchia parte o rimuovere adesivi sul retro del componente nuovo prima di installarlo.
Per rimontare il dispositivo, segui queste istruzioni in ordine inverso.
Porta i tuoi rifiuti elettronici a un riciclatore certificato R2 o e-Stewards.
La riparazione non è andata secondo i piani? Vai sulla nostra comunità Risposte per trovare aiuto nella risoluzione dei problemi.
Annulla: non ho completato questa guida.
Altre 45 persone hanno completato questa guida.
Un ringraziamento speciale a questi traduttori:
100%

albertob ci sta aiutando ad aggiustare il mondo! Vuoi partecipare?
Inizia a tradurre ›


18 Commenti
Many thanks for this excellent guide, Jeff.
I completed this two months ago and it went very well - fitted a new screen to replace a smashed one and it worked perfectly… until this week. Now I need some advice please!
The new screen has developed strange ghosting and freezing and vertical lines. It started gradually and has become unusable now. I know the installation was good because it worked. I’ve checked the connections and ribbon cables - all is well, undamaged and correctly-routed. The video chip & logic board seem good because an exrternal monitor displays fine and allows me to carry on working even when the MacBook screen is frozen.
Anyone ever come across this before? I suspect it’s a faulty screen, but the sypmtoms are strange so before sending it back and finding the replacement does the same thing, I want to explore any avenues I may have missed.
Many thanks,
Mousematt
Ouch! Your troubleshooting steps sound right to me—bad display would be my guess as well. Best of luck getting it sorted out!
Thanks for sharing. Emus4u app is the best app, I love this app. Emus4u easy to download all game chats app and emulators apps. This app has advantages to download the free cost of app and quality and quantity apps. Emus4u apps design for PC, ISO devices, and Android. All the apps including the paid ones that you see in the official app stores are available for free using Emus4u. There is a lot to explore in the app store. I really enjoy this app Click more information
Great Guide! Thanks!!!
I completed the replacement by following this amazing guide about two months ago. The new display has been working great since then. However, last week I realised that my keyboard doesn’t have backlight anymore! Trying to adjust the backlight brightness gives the icon that there is no backlight.
Is there any possibility I disconnected something relating to the keyboard backlight during this display replacement?
Thanks!
A breeze until you get to the display cables and sliding them through the tiny hole that leads the cables under the heat sink and onto the logic board. We gently pry the heat sink up (be careful not to bend too far as it could cause heat sink issues) then use iFixit tweezers to pull the 3 cables through the tiny hole and onto the logic board.
Thanks for this excellent guide. I would never have believed I could do something this complicated, but your clear pictures and instructions guided me through it. There was just one problem - I had to stop and send off for a T3 screwdriver in the middle of the job. I should have checked the list of tools against what I had more carefully!
I just replace on 2016 15” screen from another MBP 2016 with motherboard damage, the computer starts well but after introducing a password ask for an update on software, and it will not finish the update and it will not start up completely. if I reattach the old one the computer starts normally. I have talked to apple and nothing. I have installed the system form cero, I have done all the pram, etc. I have started from an external hard drive and still the same ask me for internet connection and it will try to download something but without any luck.
I have to reattach the old one and stay with the broken screen.
I believe it is the serial number of the screen, so I am going to actively read the serial number and paste it on the other screen. I am waiting for the device to do it.
if anyone has any insight let me know.
Thank you so much for this excellent guide. It feels like I have a brand new laptop now. Buying the iFixit Pro tool kit was worth every penny too.
Great guide; thanks Jeff.
I have not yet begun the replacement of the screen for my MBP as I would like to explore other options than the “nuclear'“ one.
In my case the hinges on my MBP are loose and the screen won’t stay upright unless I use a foreign object to keep it in place.
Recently Apple replaced the faulty keyboard on my MBP. While they did so, I asked them to look at the hinges and tighten them if possible. When I got the MBP back, Apple told me that the hinges were tightened but defective because of wear and tear.
So here my question: do you know if it is possible to replace the screen hinges only or is the only option to replace the entire screen? Do you know of (or can you think of) any other ‘elegant’ solution to provide resistance to the screen for it to remain in place when open?
Any and all insight/ guidance is much appreciated.
- G
Thank you so very much for the guide! You guys are Awesome! I would ask that you mention something about those 16 1mm P2 screws ahead of step 23. My P2 bit was stripped and it stopped me dead in my tracks for the repair. Thank you again!
Thank you! Thank you! Thank you! And to anyone who's wondering if they can do it - you can! These instructions made it so easy and saved me several hundred dollars!
Sorry, you can’t ;-{
Apple doesn’t offer it as a replaceable part. Apples direction on many parts spares is focused at an assembly level. So here the full display assembly would need to be replaced. Some people have managed to find a broken system to salvage a needed part vs replacing the full assembly. The rubber gasket is especially hard to even get out without damaging things.
Dan -
Thanks, this guide was very helpful!
My computer had classic Flexgate symptoms. I repaired it using iFixit flex cables (Item # IF123-139-1) and Master Liu's repair method on Youtube (https://www.youtube.com/watch?v=5nBiN8Uu...). At first I wasn't sure which flex cable failed as they were both kinked. When I examined the cables with a microscope I found a crack that went all the way through the cable, so I repaired that one. If you try Liu's method, try to borrow a microscope or a 10x lens because the copper traces you have to expose and solder are very fine. It looks like a flat iron tip would be helpful for removing excess solder before combining the old and new cables (but I didn't have one).
Thank you so much for this guide! The display on my wife's 2016 15" Macbook Pro A1707 began shutting off when the lid was opened more than ~40°. I watched a Louis Rossman FlexGate video, ordered the iFixIt Pro Tech toolkit, and opened it up today. Sure enough, when I opened the lid all the way, I could see the backlight cable was bent sharply with a crack of exposed wire.
Thinking I had nothing to lose, I did several things:
• Disconnected the cable and used an X-Acto knife to file back the edge of the circuit board underneath, where the cable wraps around. Just 1-2 mm, to give the cable a bit more room.
• Bent the cable downwards with tweezers between the connector and the cracked area, to make the bend less sharp.
• Plugged in the cable, closed the lid so it wasn't bent, and applied a bit of super glue to the cracked area to try to stiffen that point.
Imagine my surprise when I reassembled everything, turned it on, and it worked! Even with the lid past 90°! We'll see if it lasts for more than a day. :)
Update: after like the third time opening it, it's broken again. Worse than before I attempted a fix. Looks like we'll be using it with an external monitor.
dope! so many screws but worth saving this old unit and to give it an extra couple of years.
Is this step necessary? I can’t perform this step as I am attempting to repair water damage and need to remove logic board & most likely replace the battery.
Macrepair SF - Replica
@mac_medic You definitely don’t want the power coming on while the board is wet. In your case, I think powering on the machine to disable Auto Boot would do more damage than it prevents. I agree, skip this step and be prepared to disconnect the battery quickly if the laptop automatically powers on. Good luck!
Jeff Suovanen -
Thats right! You don't want power running while working on your logic board.
Dan -
This did not work when running High Sierra.
Kyle B - Replica
Tried this on a 2018 MBP 13” Touchbar (there’s no iFixit guide for this model yet). Need to replace a broken screen.
Luckily I managed to connect to an external screen (Cmd-Down Brightness to switch displays) and enter above command. Seems to work, but there’s another problem with this model - it powers up as soon as any key is pressed……. ffs <gnashes teeth>
Cool_Breeze - Replica
I unscrew the battery first and wrap electrical tape over the logic board battery connector before attempting any repairs to the board. Haven’t had any problems yet and I’ve worked on about 10 of these models already. Also when you open the bottom case use a suction cup at the bottom and pull up then run a plastic spudger along the edges to disconnect the clips. Also only use a plastic spudger on the board. Saw a youtube video from a repair shop and he did not disconnect the power and used all metal tools during the entire process of removing the board. His last step was to disconnect the battery terminal.
Brian - Replica
Is this step necessary if my mac can turn on? Battery fully dead(
Nursat b - Replica
BEFORE YOU START: The included torx head stripped off before I was done (and you might need an additional T4) so stop now and go buy a good one. Also they fail to warn you above to get some blue threadlocker ahead of time.
Jason Sherron - Replica
This command did not work for me and I read that sometime in later 2020 Apple stopped this command from working…any ideas on a work around?
Patrick Machacek - Replica
Not able to do that with damaged screen
richardjgreen - Replica
If you have a damaged screen you can still use a converter from thunderbolt (USB 3) to HDMI and plug your Macbook Pro to your TV as monitor display. Just make sure to chose the right Source (HDMI IN) in your TV. I did it and to make it work I unplug and plug again in my Macbook and so I could disable the Auto boot
Roberto Sanchez Bustos -
Hi. This does not work on 2018 13” MacBook Pro with Touch Bar. I did exactly this to disable auto boot. But when I check by using nvram -p it says: auto-boot true. Am I doing something incorrectly? I did everything step by step. Copied and pasted the sudo command, pressed enter and then entered my password. I have Big Sur 11.1 installed. Is there any other way since I need to replace the screen. Thank you. Adrian
Adrian Vizik - Replica
Hi everyone. This is also a little pointless if you can’t see anything on the screen, and you don’t have a display adapter to USB C to display it. I agree with Brian about removing the back and disconnecting the battery cable before you even think about opening the lid of the MacBook. Applying the insulation tape is also a handy little tip that just makes sure there is no way to discharge from either the board or battery.
Roberto Enrieu - Replica
running `nvram -p | grep 'AutoBoot'` in terminal verifies that it was accepted
result: `AutoBoot %00`
Marek Polák - Replica
Running Big Sur 11.6.7 on a 2019 16" MBP, it's "auto-boot". So it's:
nvram -p | grep 'auto-boot'to display the current state, the default istrue- and then to change it,sudo nvram auto-boot=falsewhich turns it off.Ed Mechem -
This step is completely unnecessary if you follow the guide to disconnect the battery properly. Just put some tape between the battery and logic board connection to prevent it from accidentally touching and therefore powering on the laptop.
Grant Ormsby - Replica
It took me a few tries to make this command work, as I was able to copy and paste the command into Terminal, but could not type in my laptop’s password. I finally typed my password into a text document, copied it (command C), and then pasted it into Terminal and it worked.
tommy404 - Replica
I didn’t do this. Mine never auto-booted before I replaced the battery. Now it does.
hatuxka - Replica
BEFORE YOU DO ANYTHING - CHECK THE BATTERY!
I-fixit sent me a bad battery, which I didn’t realize until it was already install. They sent me a new one, but I wasted hours uninstalling and reinstalled.
Get a volt meter and measure the voltage on the output of the battery pack. If it reads 0 V, SEND IT BACK. It should read over 2 V.
bcardanha - Replica
I've just received my replacement battery and it reads 0,042V between the two main connectors. Do you think it's dead?
peter sussex -
When I did this from Terminal.app within Recovery Mode, the “sudo” was not recognized but I could invoke it without the sudo part. It seems to have been accepted when looking at “nvram -p”
johann beda - Replica
When in Recovery Mode, you already have superuser powers. So you don't need to prefix commands with the sudo command to invoke them with root privileges; you already have them. Do a
pwd(print working directory) after opening Terminal in Recovery Mode, and you'll see that you're in the root user's directory.Ed Mechem -
I received the battery kit for my 2018 MacBook Pro and as per the above comment from bcardanha - Oct 12, 2021, I checked the voltage on the pads marked + and - . It was zero volts so I panicked a bit.
I sent a message on the iFixiT Facebook page and I got no reply. I finally found the customer service email for Ifixit Europe and sent them an email voicing my concern as I was not keen to work for couple of hours just to discover that the battery is faulty. I had an almost instant reply on the email (kudos to them) and they adviced me to go ahead and install the new battery as the voltage measured when battery is not connected is not relevant.
I took a leap of faith and after two hours… the new battery showed 50% charge and everything seems to be working just fine. I am happy it worked.
Mircea Comanici - Replica
After removing the old battery and installing the new battery I powered up the MBP before screwing the bottom on. I discovered the my keyboard would not function. It took a few hours of investigation and frustration that I discovered the track pad power ribbon had become partially dislodged from the trackpad. I was able to see that this through the little machined slot where the battery sat. I had to remove the trackpad to reinsert the power ribbon back into the connector in the trackpad. after reassembling and reinstalling the battery etc the keyboard worked. Just food for thought if your run into the keyboard issue.
Ed Mease - Replica
This should be the default. IMO I tell you to power on - not the lid.
G Sena - Replica
Est ce que cela fonctionne sur un macbook pro 2017 sans touchbar ?
maël muzelet - Replica
Bonjour Maël, oui, ce tutoriel concerne "les MacBook Pro 2016 (et plus récents) et les MacBook Retina 12" 2017 (et plus récents)"
Claire Miesch -
Excellent instructions. I was able to follow and install the new screen. I recommend that you get a good set of tools before you begin. I started with an inexpensive repair kit bought online. The Penta and torx bits failed. I bought an IFIXIT kit with quality bits and I was able to do everything I needed.
Tom Markham - Replica
If you're not running an admin account the sudo command won't work (which honestly, you should not be running admin). Rather than logging in to your admin amount via the OS, in the terminal type "login [admin username]," then the password and you'll be able to do the sudo command as described above. Once you're complete, type "logout [admin username]" and you'll be good to go. Obviously replace [admin username] with whatever the account name for your admin user is.
arichard2401 - Replica
For those unable to complete this step because the screen is too damaged I recommend leaving your macbook on until the battery dies.
Nicholas R Licato - Replica
Just replaced my 2018 15" MBP battery. Running Sonoma.
I found no way to disable AutoBoot (The status can be checked in the Power section of system report).
Anyway, i left my battery completely drain before opening the MBP, and had no issues during the process.
Cédric Bontems - Replica
After sending this command in terminal when I checked what happens if I now open the lid, instead the screen lit slightly up (still black) then a battery symbol showing the charging state showed up.
Now, after replacement of the battery, this is all I get to see.
No reset of NVRAM nor PRAM helped.
Currently the new battery charges (58% atm) and it feels like it‘s mocking me.
webrockers - Replica
I suspected the keyboard or TouchID sensor wouldn’t work, so I went on and checked every connector.
I missed connecting the left TouchID sensor from step 31.
webrockers -