Introduzione
Anche se queste luci hanno una garanzia di tre anni, è più economico ripararle da soli che pagare le spese di spedizione per rispedire le luci. Ho comprato i LED T1 3/4 (5 mm) da Digikey, cercando qualcosa nella gamma da 800 mcd in su dei colori necessari. La scelta è ricaduta su:
404-1096-ND (rosso)
404-1097-ND (arancione)
C503B-BCS-CV0Z0461-ND (blu)
C503B-GCN-CY0C0791-ND (verde)
404-1092-ND (giallo)
I LED sono collegati in serie in gruppi - tre gruppi - a un filo. Se un LED nel gruppo è guasto, nessuno in quel gruppo si accenderà. Il trucco è scoprire quale (o quali) è difettoso.
È più facile se disponi di un filo anche parzialmente funzionante. In tal caso, rimuovi un LED dal filo buono e usa quella presa per testare ogni LED, uno alla volta, dal filo difettoso. Se il LED non funziona nel filo buono, sostituisci il LED secondo le indicazioni che seguono. Potrebbe essercene più di uno guasto, quindi dopo averlo sostituito, se il filo difettoso non si accende ancora, passa al LED successivo.
Se non hai un filo buono da usare per il test e non hai un altro modo per testare i LED, allora rimuovi ogni LED, uno alla volta, dal filo difettoso, e controlla i cavi per assicurarti che non siano rotti. Se sono rotti, sostituiscili, altrimenti rimetti il LED e passa al successivo.
Cosa ti serve
-
-
Togliere i "bulbi" sfaccettati. Le coperture delle lampade colorate si staccano a scatto, alcune sono piuttosto rigide, ma escono fuori. Non si svitano.
-
-
-
-
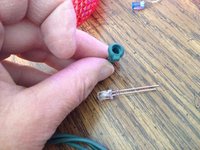
Rimuovi il LED difettoso dalla presa, in modo da poterla riutilizzare. Nota che il nuovo LED ha una gamba più lunga dell'altra.
-
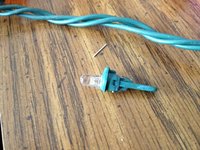
Il terminale lungo va nel lato della presa con la tacca come mostrato in figura.
-
La lampadina del LED potrebbe non posizionarsi perfettamente, ma non fa niente, resterà sotto il coperchio della lampadina sfaccettata in plastica.
-
Piega i terminali e tagliali.
-
Prova la lampadina nel filo "buono" se ne hai uno. Se funziona, inseriscila nel filo difettoso e vedi se questo ha risolto il problema. Se non funziona, sai che il LED è buono ora, quindi passa al prossimo.
-


Per rimontare il dispositivo, segui queste istruzioni in ordine inverso.
Per rimontare il dispositivo, segui queste istruzioni in ordine inverso.
Annulla: non ho completato questa guida.
Altre 9 persone hanno completato questa guida.
Un ringraziamento speciale a questi traduttori:
100%

Simone ci sta aiutando ad aggiustare il mondo! Vuoi partecipare?
Inizia a tradurre ›
13 Commenti
Hi! Can you tell me the difference between the two types of light bases you show above? The situation I have is I bought a set of the clear LEDs figuring we could get replacements since my husband prefers the colored ones. But, once we started pulling them apart, we found the different sized bases and the only replacement ones I could find had the short stubby base. Are they interchangeable if we pull the bulb out of the base? Do you have any suggestions for us? Thanks for any help!
The reason for the two different size sockets is that if you look at your strand, every so many lights three wire come into the socket instead of two. I think (and this is only a hypothesis) than the shorter sockets are to allow room for the connection of the third wire. Why they didn't just use short sockets for everything I don't know. But it seems likely to me that the short one would work everywhere. I have not tried it.
Thanks so much for posting this guide! My outdoor light strings are far from waterproof and I live in a rainy climate (yes, even in December), so my original LEDs corroded badly and the strings stopped working.
I ordered a whack of replacement LEDs using the reference numbers you provided. Replacement was simple. The results were spectacular -- better than I had dared hope. For $10 and a few minutes work, I kept $200 worth of strings from getting tossed. Thanks a bunch!