Introduzione
Segui questa guida per sostituire la batteria esausta o deteriorata posizionata nella parte dello schermo del Microsoft Surface Book.
Per minimizzare il rischio di danneggiarlo, spegni il tuo Surface Book prima di iniziare questa procedura. Se la tua batteria è gonfia, prendi le precauzioni appropriate.
La porzione inferiore/tastiera ha la sua batteria separata, e sostituirla richiede ulteriori istruzioni.
Cosa ti serve
-
-
Tieni premuto il tasto di scollegamento sulla tastiera.
-
Altrimenti, premi l'icona di scollegamento a destra sulla barra di stato di Windows 10.
-
Rimuovi lo schermo.
-
-
-
Apri lo schermo alla massima estensione.
-
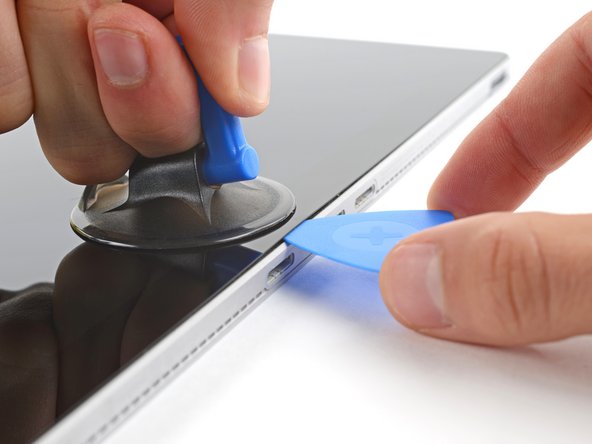
Solleva il dispositivo ed appoggialo di fianco, con lo schermo rivolto lontano da te e la porta SurfaceConnect rivolta verso l'alto.
-
-
-
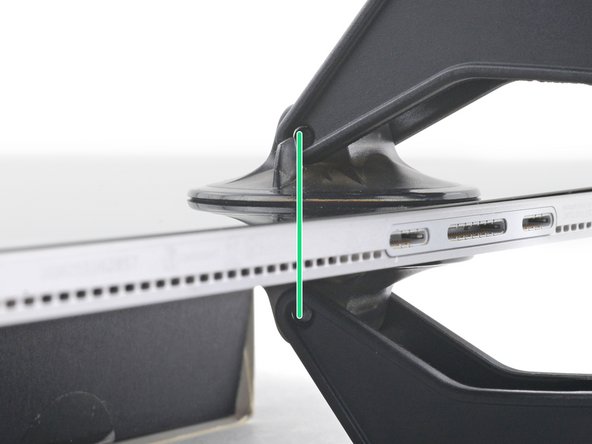
Infila l'estremità raddrizzata della graffetta ad un angolo di 45° nel sesto foro da sinistra.
-
-
-
Spingi con decisione la graffetta nel foro.
-
Tira via la base dallo schermo per scollegarlo.
You should feel slight resistance when pressing against the internal lever arm. If you don’t feel the resistance after about half an inch, back out and try again. Be careful not to push the paper clip too far, as it can scratch the screen bezel from the inside, leaving a visible mark.
This doesn't work on mine... there's a 90° metal support bracket that covers the entire corner (goes up to about the 8-9th hole on the side) and blocks any & all access to the screen release mechanism. After seeing this "solution" online so many times, I never understood how this worked for anyone else...
I could detach mine following these instructions. When inserting the paper clip you will feel a resistance like pushing a spring. In my case, pushing the paper clip in about 5 millimeters and holding it when I hear a "click" sound. Be sure to grab the tablet when you see it separating (or have at hand a plastic spudger or opening pick to avoid snapping into place again due to the very strong magnets present).
-
-
-
Dopo aver scollegato un lato, tira con decisione per ruotare lo schermo e scollegare l'altro lato.
-
-
-
Passo 8 Schermo
Attenzione: i passaggi 8-15 provengono da una guida contrassegnata come in corso.
-
Scalda e applica un iOpener sul bordo inferiore dello schermo, in modo tale da ammorbidire l'adesivo che lo tiene fermo.
Once you insert an opening pick, you can use a few drops of Acetone around the edge to loosen the glue. I found this much easier than keep reheating the iOpener and possibly cracked the display.
Bad idea to use acetone with these types of devices because of the plastic parts that can become either damaged or outright melted by the solvent. (Especially the ribbon cables and connections) You are better off using isopropyl alcohol or nothing. Easy enough just to avoid this idea completely. Not to mention that it is possible to cause the display to shatter due to thermal shock when you apply the solvent to a heated surface. Good luck to those that try anyway.
The iOpener did nothing to loosen up the glue. Had to use a hair dryer for almost 40 minutes to get it softened up enough to open.
my screen is 25% off
Be EXTRA careful when running the opening pick around the bottom right portion of the screen. This is where the touch controller attaches to the display, and the ribbon cable is only about a quarter inch away from the edge and is easy to rip out.
Very important hint!
Andreas -
Having recently been inside a Surface Book I purchased via Facebook marketplace, consider the screen a “cost” of replacing the battery and the pressure is off of you. I tried VERY hard not to break the glass, but…still happened. With that out of the way, I successfully replaced the screen, battery, and also battery in the base. Microsoft should be ashamed of this device. All that engineering effort built into their crappy hinge, only to have the batteries fail prematurely. Also, the mechanism to release the screen from the base sucks real bad. Mine doesn’t work, I carry a paper clip with me to unleash the tablet mode. Pathetic. Thank GOD I picked this up second hand for a few hundred bucks. Pity the folks that paid two grand or more for this turd.
after I did reassemble back the screen, before applying the new tapes I did test it for one day and I did find out the right release mechanism was not working anymore. Accidentally I did disconnect the control wire coming from the main board. Easy to put it back in position. No need to dismantle all again. So, you can give a try and check the connectors. Both the connectors did disconnect while removing the mainboard. Just be careful and check them before gluing all back! Hope it helps.
I just tried for over an hour and a half with heat packs and a dyson hair dryer, and got absolutely nowhere… I even bought the iSclack and had ifixit openers at the ready. I guess I’ll try a heat gun next (after I buy one). If anyone has any other suggestions, it would really be appreciated… I’m so disappointed in Microsoft right now.
If you use a heat gun make sure to keep it moving along the edge and use your hand to shield the rest of the screen from getting hit with heat. You only want it to be hot to the touch and no further. You take a big risk of discoloring the screen if you overheat a part. Heat gun did make life much easier but you have to be very very careful and concentrated while using it.
I got my computer open after completely abandoning the “step 1” instructions here. The hot pack (iOPener) and suction cups (iSclack) were completely worthless for me, and did absolutely nothing. Instead, simply get yourself a tool with a very thin metal knife, such as the “Jimmy” sold here on iFixit.
Use a heat gun to get a section of the screen nice and hot (I went with ~160 degrees Fahrenheit) then insert the Jimmy vertically in between the screen and the metal frame (a tiny gap.) Then, carefully flip it horizontally to get between the tape and the screen. After this, carefully slide the knife along the edge while using a heat gun to hover right over the place the knife will next be (I used gloves to prevent burning my hands.) Do NOT insert the knife more than a half an inch into the gap, or you might damage your screen (stay within the black bezel range.)
This will QUICKLY, EASILY, and SAFELY get the screen off.
I broke my screen too, but I blame myself for being impatient. Once I took my time heating with a hair dryer and getting the opening pick in there, with enough heat I could just slide the pick down the edges. Next time I’ll know better!
I tried the heated iOpener. I had some success but then used too much force and cracked the screen. My advice is to take you time and use the iOpener often on the very edge of the screen. Use the suction cups or iSclack as your primary tools to separate the glass form the frame. And a second set of hands is very helpful to hold the metal part of the screen onto your table. The glass will come off with patience and perseverance.
Use heat, be patience don’t rush, go slow to prevent breaking screen like I did. I also damage the antenna to the wireless onboard adapter. The antenna is glued between the screen and the enclosure and is easy to damage. I didn’t realize this until after the repair was complete and my surface book no longer recognized its WiFi device. I have to use a usb/Bluetooth adapter. Good luck.
This is vital information - I also destroyed the antenna in the process, because the pick does not discriminate between layers of adhesive. . Microsoft did a horrible design job on this.
Manuka -
The WiFi antenna is not physically connected to anything. It has a capacitive interaction with a small brick below the plastic so you can build it by yourself with a 0.2mm foil of copper or aluminum, cut the same geometry and tape it . It works. iFixit guide is pretty incomplete about that point, without mentioning all the screws forgotten to mark.
Best place of entry for the pick is by the speaker on the right and left side. Heat up that area and then get the pick through there. I found that pretty easy and sliding the pick around the bottom (where the tablet attaches to keyboard). Unfortunately, I broke the screen up top where the webcam is. Not sure if that area is more brittle than the others due to webcam, but word of advice is to be careful there. Using a hair dryer worked best and getting this very toasty; the iOpener was useless.
Both sides of the central block “camera-Mic” there are three FSP antennas. They are easy to cut off while using an opener tool because a part can stick to the LCD and a part on the shell. So pay attention! I did cut one! You can clearly see the three antennas position in the first picture of the step 11.
-
-
-
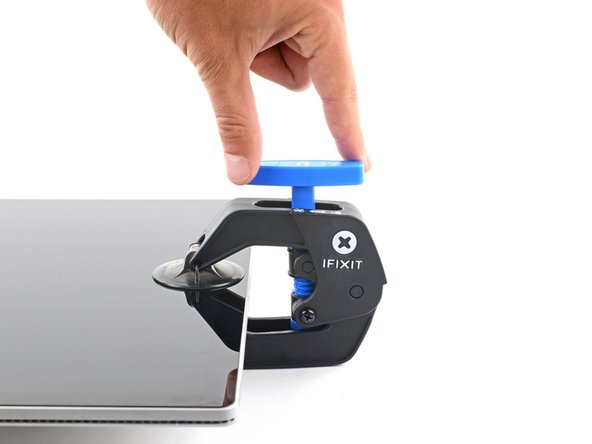
Tira indietro la maniglia blu per sbloccare i bracci dell'Anti-Clamp.
-
Posiziona un oggetto sotto il tuo Surface Book in modo che poggi in piano tra le ventose.
-
Posiziona le ventose vicino al centro del bordo inferiore: una sulla parte anteriore e una sulla parte posteriore.
-
Tieni ferma la parte inferiore dell'Anti-Clamp e premi saldamente sulla ventosa superiore per farle fare presa.
-
-
-
Tira indietro la maniglia blu per bloccare i bracci.
-
Gira la maniglia in senso orario di 360 gradi o fino a quando le ventose iniziano a distendersi.
-
Assicurati che le ventose rimangano allineate tra loro. Se iniziano a scivolare fuori allineamento, allenta leggermente le ventose e riallinea i bracci.
-
-
-
Aspetta un minuto per dare all'adesivo la possibilità di ammorbidirsi e creare uno spazio di apertura.
-
Se lo schermo non si sta riscaldando abbastanza, puoi utilizzare un asciugacapelli per riscaldare lungo il bordo inferiore.
-
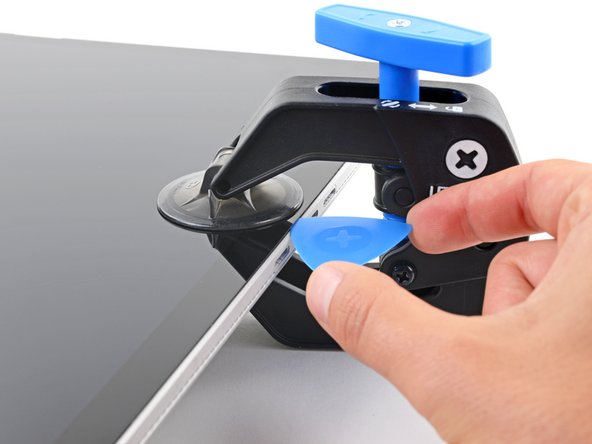
Inserisci un plettro di apertura sotto lo schermo quando l'Anti-Clamp crea uno spazio sufficientemente grande.
-
Salta il prossimo passaggio.
Didn't worked for me. And the top suction cup is now broken where the anti-clamp and the suction cup unites. Even though, it was extermely difficult to keep the anti-clamp in place. The top suction cup will begin to move around and the anti-clamp will not stay vertical, going sideways or tilted. I ended up using a standard suction cup and finally could move forward. Also the anti-clamp gets very hot when used with a hair dryer, and touching it is almost impossible.
-
-
-
Applica una maniglia a ventosa allo schermo, il più vicino possibile al centro del bordo inferiore.
-
Tira verso l'alto sulla ventosa con una forza forte e costante per creare uno spazio tra lo schermo e la cornice.
-
Inserisci lo strumento di apertura nello spazio creatosi.
The glass is extremely brittle, so do not keep applying too much upward force while clearing the adhesive, or it will shatter and make you yell at your dog!
-
-
-
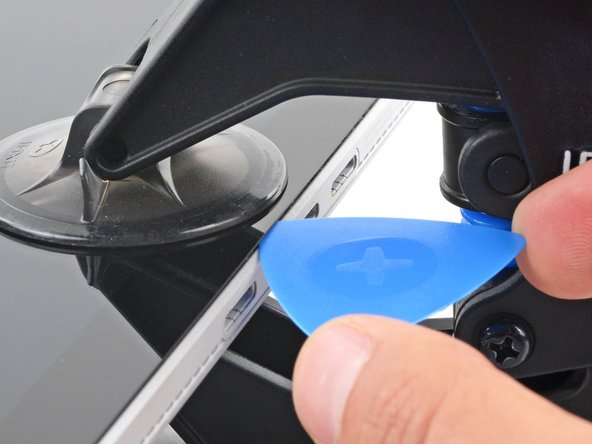
Usa lo strumento di apertura per tagliare la colla passandolo lungo tutto il perimetro dello schermo.
-
Delicatamente alza lo schermo, ma non cercare di staccarlo del tutto finché i cavi sottostanti non saranno scollegati.
Be carful around the power switch and volume buttons when separating as the WiFi Arial is attached to the casing under the adhesive strip, second Arial is located further along the case about the same distance away from edge of cases as the power and volume button .
This^^^
Use heat, be patience don’t rush, go slow to prevent breaking screen like I did. I also damage the antenna to the wireless onboard adapter. The antenna is glued between the screen and the plastic strip protecting camera and is easy to damage. I didn’t realize this until after the repair was complete and my surface book no longer recognized its WiFi device. I have to use a usb/Bluetooth adapter. Good luck.
how to remove WiFi antenna im stucked at this step.
Not just only around the power switch and volume button, but the whole top. There are three antennas in the left, middle and right top of the display
Not just only around the power switch and volume button, but the whole top. There are three antennas in the left, middle and right top of the display
Don't just be careful around the power switch and volume button, but the whole top. There are three antennas in the left, middle and right top of the display
There are three antennas in the left, middle and right top of the display.
You can use the replacement adhesive strips as a guide to how deep to go with your pick (you did get replacement adhesive strips, right? - iFixit store IF412-035-1).
Be careful when removing the old glue from the back side of the screen. The black color is on that surface, and if you scrape it, you'll scrape through the paint leaving unsightly scratches that will show through the bezel when you're done.
-
-
-
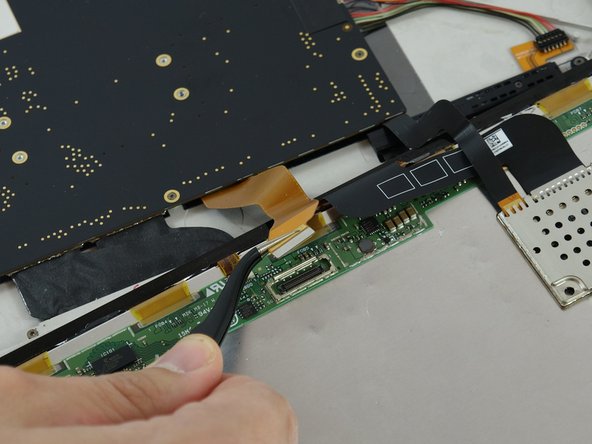
Comincia scollegando il cavo sulla destra. Con le pinzette curvate , rimuovi con attenzione la staffa in metallo per esporre l'estremità finale del cavo e rimuovilo.
I used a blue tool with small scoop on the side opposite the tines to leverage the bracket off. Easily popped off that way, after a few attempts with the curved tweezers filed.
This blue tool seemed to work best for me, as well as knowing the pry point is opposite of the tines.
mavzerb -
-
-
-
Rimuovi poi la schermatura metallica che copre il cavo. Dopo aver fatto ciò rimuovi il cavo piatto.
-
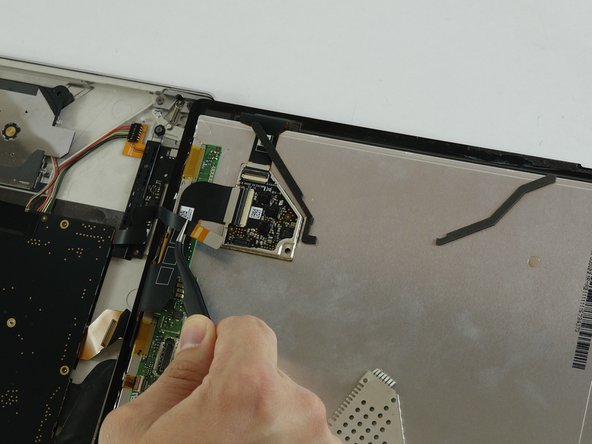
Rimuovi lo schermo
Remove only the plug to the far right leave the ribbon cables and the clips alone What was confusing in this photo it looked like he removed the large ribbon clip, he did not. I did and busted the clip that secured the cable. I had to buy a new touch sensor board.
Don’t make this mistake, look carefully before you do. Stop before going to far.
I managed to bust my connector as well, despite trying like !&&* not to - awful design on microsoft's part, but the instructions really need to call out just how exactly one needs to remove these without destroying other components
Manuka -
James Foley, I've just done the same: busted the clip on the wide connector (had to detach the ribbon cables to replace a broken screen with a new one). Where and how did you find a replacement board?
I assume your talking about step 8. I removed all 3 ribbons easily. 2 had latches that need to be opened. I had the whole sensor out and seperated.
I think I could have done this in less than 30 minutes since the computer back was bulging with the batteries swelling. To my surprise, the batteries were stuck to the back with black adhesive so the connector popped loose. Fearing that I had screwed up the connector, I plugged the computer into the new battery pack and found everything was working and the battery showed a full charge. TaDa. With my wife’s help holding the back, I used a hair dryer and wooden spatula to remove the old battery pack. Rather than trying to apply more adhesive to the edges of the back I used black electrical tape to keep it in place.
I did the screen and battery. Battery swelled and cracked the screen. Scariest part was heating the battery. Reading all the labels about possibility of fire. I heated the back and the old battery slipped right out. adhesive was still good so I put the new battery right in on top of it.
-
-
-
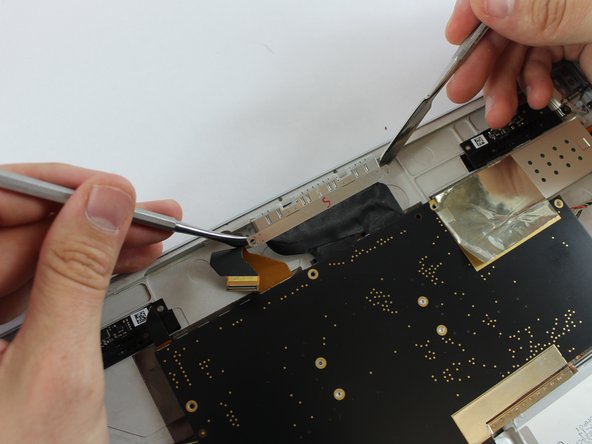
Usa un cacciavite Torx T3 per rimuovere le 24 viti.
Missed a couple tiny screws on either end of the plastic bar at the bottom of the picture. Also, I don’t think this step is even necessary.
Why do you say this step is not necessary? Is it possible to remove and replace the battery without lifting the motherboard?
Which screws go where they are not all the same size
Still missing a circled screw (you can see the empty hole in the image) — there are four along the motherboard under the battery cells. One at each inner corner of the battery, and one towards the middle of the cell inside copper tracing. The photo does not have the right-side one circled; additionally, this one is initially hidden under a piece of foam strip, so be sure not to miss this one!
The fan seems to not have screws holding it down, although it has 2 screw holes. Just foam isolators. Was the omission to not transfer vibrations elsewhere, or am I missing 2 screws?
-
-
-
Scollega poi il cavo piatto dalla porta di ricarica utilizzando uno spudger metallico.
Etape non nécessaire et faiblement recommandée, très risqué !! Faites-le uniquement si votre batterie est trop gonflée pour passer sous la carte mère même en la soulevant légèrement. Cependant si vous ne faites pas cette étape, faites attention en faisant glisser la batterie aux trous pour les vis qui ressortent.
This is only necessary if your battery is very swollen and you cannot slide it out to the side of the tablet by slightly lifting the motherboard. IF you have to lift the motherboard higher to remove an extremely swollen battery then you need to remove the keyboard ribbon. Use extreme caution while doing this AND remove the small metal plate glued to the exterior of the tablet keyboard connector before attempting to pull it out. If you don’t you will likely remove the bracket from the pins on the keyboard connector cable….which is very hard to replace without ruining the pins.
-
-
-
Rimuovi la striscia di plastica nera.
-
Usa poi uno spudger di metallo per rimuovere il cavo piatto sotto la striscia nera.
The gold rectangle being held at right is the forward facing camera. Remove the plug to the ribbon wire, the gold rectangle to the left only. There is no need to mess with the camera. The only reason I can see for removing the plug at all as it hides the last screw that holds the motherboard down. Be gentle if you insist on removing the forward facing camera like the picture, the back can come off and you have more trouble. This battery fix is plenty enough trouble.
It is easiest to just remove the forward-facing camera board by taking out its two screws, after unplugging the ribbon cable. Trying to hold back the ribbon cable out of the way enough to lever up the motherboard later risks damage to said ribbon cable, and makes moving that corner of the motherboard more difficult.
Be very careful before removing that ribbon cable. You can’t see it in the pictures but there is a screw holding that down and without removing that you can bust the camera on the back of the unit (On the side with the Windows logo). Ended up tossing due diligence out the window and went for it causing the rear camera to bust. Not an expensive part but for sure an annoyance.
-
-
-
Alza delicatamente di un po' la scheda madre.
-
Usa uno spudger di plastica per sollevare delicatamente la batteria. La batteria scorre sotto la scheda madre. Estraila dal lato destro.
How do you glue the screen back on? Right now i’m imagining you just heat the glue back up as was done in the disassembly and then let it cool after placing the screen back where it should be.
Please advise
You can buy a replacement for few buck. If you cannot I suggest to use a 3M double tape and place over the old tape. The problem is, the old tape got damaged and his shape is not flat anymore. I did remove it all and apply a new one.
Sometimes that’s enough! I haven’t tried with this particular device. If needed, clean all the old glue off the display and chassis carefully, and clean the areas underneath with 90% or higher isopropyl alcohol. Then apply a strong double-sided tape such as Tesa 61395 to re-assemble.
How can we get the small black pieces back into it? They are so tiny. This is frustrating!
Used glue tape made for this kind of thing https://www.amazon.com/gp/product/B00K4V... . Doesn’t stick anywhere as well as the original glue, but that could be a good thing. Makes opening up the machine easier the next time.
Be prepared for spending a long time getting the battery loose from the unreasonably strong glue holding it on.
Amen! And we chose to loosen it before undoing EVERY screw from the camera strip region, in the hopes of being able to avoid taking apart more stuff. With 2 people, we could slide out a ‘puffy’ battery after removing what I think was most, but not all, screws.
We loosened it with heat (a hair dryer from the back side) and a credit card (which we broke - use an old one!).
What if u cut the battery between the two halves and rewire one side after installation?
That may be faster…. and u risk only a battery….
If the battery is discharged this may work. Otherwise a short circuit may occur.
Andreas -
This takes much less time if you gently warm the back of the case. Then using a couple of old credit cards with raised letters and numbers pry, pull and then isolate the glue, numbers down, the numbers limit the amount of sticky the credit cards have to the old battery glue. My new battery had a removable piece of plastic over new adhesive. Your going to want to pre cut the plastic (NOT THE BATTERY FOR GOD SAKE) in half, removing the center section. After you position the battery and are ready to stick it down. Remove the plastic covering the Adhesive on one side, remove the credit card, stick it down and do the other side.
The heat gun is key to this step. This step took me less than 5 minutes.
The screws along the top edge of the screen can be left along with the top plastic strip securing the cameras. The motherboard will flex enough to remove the batteries.
Use popsicle sticks to keep the new batteries from sticking until they are in position. No need for a heat gun to remove the batteries. Use a large flat blade screwdriver to separate the old batteries.
Careful of the fan mount as the rubber grommets are sticky.
How can I submit photos?
I would caution against EVER using a metal tool around the Li Ion batteries for any reason due to risk of puncturing the battery and causing a fire…! I replaced the performance base batteries in the keyboard section which had similar adhesive, and the flat plastic cards that come in the iOpener kit (much like credit cards but much stiffer) worked great for separating the back sides of the batteries from the black adhesive. The key is to keep the heat levels up as you separate from the glue.
N’utilisez surtout pas de spatule métallique, au risque de percer la batterie. La colle à l’arrière est très collante pour le coup, utilisez un sèche-cheveux et chauffez l’arrière de l’écran. Ensuite à l’aide d’une carte essayer de passer en dessous de la batterie, veillez à faire en sorte que la colle soit bien chaude, ça se décollera plus simplement, si vous avez les petites spatules bleus d’IfixIt, faire levier sous la carte pour décoller la batterie. Faire pareil des 2 côtés.
My screen is already half off due to the bulging battery. I still use it with an external monitor and it still gets hot so, think I will just turn it off and separate the rest of the screen.
Anyone know if it will work without the battery when plugged in with the power cord?
Not sure if it will work without battery, my screen was the same bulging with gap so decided to change battery and it went like clockwork following the instructions although I did keep the connecting cable to screen connected and just propped the screen up.
took about 2hrs to complete and now battery life is about 6 hrs :)
Be careful of the skinny ribbon cable on the left (connects the motherboard to the 3.5mm audio jack board). It doesn’t have a lot of slack and is hidden under a piece of foam strip, and if you lever the motherboard too high when trying to pull the battery out, you could damage it or the ZIF connector.
I’m having a very weird issue in comparison. My screen was unsticking so I searched for problems and everything pointed to a battery issue.
Now I opened the thing and the battery looks absolutely perfect.
In my case it seems the fan was pushing the screen slightly up and the glue couldn’t hold it anymore. Now I’m trying to find a glue to put it back together.
Be very careful on this step. Once you have the battery free of the glue, be especially careful when you slide it out the side. There is a protruding connector with pins on the backside of the motherboard that presses into the battery. If you don't have the motherboard lifted up far enough, the battery can scrape across that and damage the pins, and that is next to impossible to repair.
If you have a bulging battery or are having trouble with the glue, I would actually recommend completely removing the motherboard. You should already have all the screws out. The only thing holding it down now is the two cameras. These are glued in place - use the spudger to gently pry them up, and they'll lift straight out. Disconnect the four cables for the speakers and lock actuators, and carefully fold the motherboard all the way over (you can leave the ribbon connected to the headphone jack, or pop up the white back tab and gently pull out the ribbon to completely separate them).
-


Confronta la tua parte di ricambio con quella originale: potrebbe essere necessario il trasferimento di alcuni componenti o la rimozione di protezioni adesive dalla nuova parte prima di installarla.
Per rimontare il tuo dispositivo, segui le istruzioni in ordine inverso.
Porta i tuoi rifiuti elettronici a un riciclatore certificato R2 o e-Stewards.
La riparazione non è andata come previsto? Rivolgiti alla nostra comunità Risposte per trovare aiuto.
Annulla: non ho completato questa guida.
Altre 67 persone hanno completato questa guida.
Un ringraziamento speciale a questi traduttori:
100%


Questi traduttori ci stanno aiutando ad aggiustare il mondo! Vuoi partecipare?
Inizia a tradurre ›
Team

USF Tampa, Team 1-6, Sullivan Spring 2017 Membro di USF Tampa, Team 1-6, Sullivan Spring 2017
USFT-SULLIVAN-S17S1G6
3 Membri
14 Guide realizzate
84 Commenti
Good day, Where would you purchase the batteries. Both are swollen and need changing.
I got mine off ebay, just do a search, it was like 20 bucks.
First thing’s first, MS will send you a new SurfaceBook Pro if your battery is swollen. They just replaced my 3yo SBP; I did not have an extended warranty and was definitely out of warranty support. Contact them before you attempt the repair on your own.
They only replace machine under 3yo. They want 600USD after that
Hello I am overseas how do I contact MS
Hello Francis, I’m in France and I used this support page: https://support.microsoft.com/fr-fr/hub/...
I had the Surface Book replaced for free (1 month before the 3 years support for this issue)
Unfortunately, I'm living in Saudi Arabia and MS said that because there is no replacement center in Saudi Arabia, they can't replace it :(
What a shame
Sari -
Just had my Surface Book replaced by Microsoft, upgraded to Surface Book 2 within a week. My device was out of warranty and they originally quoted £455 to replace, but it has been replaced without charge
Hey I are you, I've contacted them and they told me that I have to pay 500 $. What did you do to get it for free?
ROMY -
The motherboard screws are a star pattern, not a hex, and definitely much, much smaller than 3mm. Anyone know what size tool, and what toolhead pattern? Torx maybe?
I used a T03 Torx bit. However, I had to remove far more than 18 screws.
I recommend updating this to clarify that it refers to replacement of the battery in the screen, and not the one in the keyboard/base.
Yep. The base is a piece of cake compared to this.
HALDi -
First timer here.
So i got a Surfacebook 2 with battery issue. Got a replacement from ebay and should get started on replacing the same.
Going to remove the screen with Hair dryer. Question is, how is it going to stick back? Just re-heating and pressing into its place works? Or should i buy any specific glue? Please let me know. Any suggestion is going to be helpful!
Answering for my self. I need to buy something similar to Tesa 2mm tape or glue.
“First thing’s first, MS will send you a new SurfaceBook Pro if your battery is swollen. They just replaced my 3yo SBP; I did not have an extended warranty and was definitely out of warranty support. Contact them before you attempt the repair on your own.”
Not true at all. I tried MS support and was told to throw away the device or pay them $599 to repair it.
I too got my replacement. though its out of warranty. True
Which time of glue can I use to put the parts back?
i used this: https://www.aliexpress.com/item/40000707...
HALDi -
Managed to replace both screen and battery with spare parts purchased from Aliexpress.
Thank you Wesley!
I got the battery from here: https://www.aliexpress.com/item/32849305...
HALDi -
Just replaced my swollen battery using this guide. The author misses 6 screws and one is circled in the wrong place, but use common sense and you'll get them all. Also, I found no use for a torx T5 bit at any point - nor does the guide mention where this is needed, despite listing it as a requirement. After the repair I just placed the screen back in place and the old tape/glue was plenty strong enough to hold it in place. I bought my replacement battery from amazon US for $25. Didn't face any issues using a freight forwarder to ship it into the middle east. Like others have mentioned, Microsoft only offers to replace free of charge if it's 3 years old or less, once it's over that then they'll ask you for $600 and you have to send your damaged laptop back first.
I got the battery from here: https://www.aliexpress.com/item/32849305...
Btw: Be REALLY careful when detaching the top of the screen, left and right of the camera. the wifi antennas stuck to the screen and i ended ripping them of. Had to order replacements - another 25$ down the drain.
Do you need new adhesive when reassembling? If so, what replacement adhesive do you use?
Any suggestion on where to buy a new screen if that happens to break? asking for a friend…
ebay, amazon, alibaba
Froz -
I am overseas how do I contact MS
Vielen Dank für die gute Anleitung. Konnte den defekten Akku (aufgebläht und Bildschirm hat sich schon oben gelöst) hinter meinem Bildschirm problemlos ersetzen dank der Anleitung. Ja die Schraubenanzahl stimmt nicht, T3 und T4 benötigt. Bildschirm vorsichtig heiß machen und dann Stück für Stück lösen. Oben neben der Kamera sitzen die Antennen für das WLan. Die klebten bei mir dann am Bildschirm. Ich habe sie dann wieder vom Kleber gelöst und wieder auf der Leiste angebracht. Dadurch ist auch mein Empfang deutlich besser geworden.
Die Pins der Ladebuchse hätte ich nicht ziehen müssen, da sich das Motherboard bei mir auch nicht so hoch anheben lies. War vielleicht zu vorsichtig oder irgendwo war noch mehr verklebt. Ein Magnet für die Stifthalterung war mir rausgefallen. Hab den leider falsch herum wieder eingesetzt. Jetzt hängt der Stift schief. Aber dafür öffne ich das Ding nicht wieder. Also Achtung sollte euch das auch passieren. Verklebt mit M3 3mm doppelseitigem Klebeband.
I used this: https://www.amazon.com/gp/product/B00K4V.... You might want to shop around, though. This one doesn’t stick very well (but that might be a good thing if you need to open the machine again).
Whatever you do, DO NOT DO STEP 6! You do NOT need to remove that part to replace the battery. The consequences for removing that are the destruction of your Surface Book. If you pull it out, you will pull out the charging port pins, if they don’t line back up exactly you will bend them and you will no longer be able to charge your Surface Book.
The guide is also missing some additional screws on the top the of the device that need to be removed that are hidden under foam tape.
In addition, glue covers the entire bottom of both halves of the batteries that is VERY strong. You’ll need to heat the back to get it free. Be very careful, especially if you have the swollen battery problem. The glue is strong enough to rip the packaging of the battery. Also, when you slide it out, the swollen battery will catch on the screw holes and also rip the battery packaging.
The MODERATE label is not accurate on this fix. It should be hard, to very hard since it is very easy to make a catastrophic mistake.
%#*!^@! I wish I had read this comment before doing the work! Now the tablet is not recognizing the base! I also agree that the instruction for removing the battery with a splunger is a bad idea. I actually ruptured the battery and the gas escaped. No explosion, though.
good call, thanks for the heads up!
Did they fix it now? Step 6 is to remove the keyboard right now. I don't see how that would be bad.
Gus M -
Brenton, I am confused...are you suggesting NOT to remove the base/keyboard for this repair?
John Doe -
This guide covers like every third step…
The instructions missed a few screws. Step 7 is unnecessary. And as Brentin Klik commented, absolutely do not do step 6! The tablet now does not recognize the base because of it.
Hi! I got the swollen battery issue. I couldn’t lift the glass using the iOpener to soften the adhesive. For those who we’re successful, did you use a heat gun?
Also, was it difficult to unglue the battery?
thank you!
your hair dryer is enough if you heat it up gradually, ideally heat it up to the limit that you can still touch it, only heat up the edge of the screen and take it easy. check you the youtube videos for help :)
Froz -
I got it with a heat gun set at 200F.
Joe Hby -
Hi everyone, I am in the process of trying to claim after 3 year warranty using European 6 year electrical guarantee. This is not a sure thing and I will have to see how it goes. I do not feel comfortable taking mine apart but I am hoping that as it is a fault on their own hardware, and no fault of my own for swollen batteries, they should replace it. I am going to trading standards and financial ombudsman should they still not agree to fix or replace free of charge. I am using a surface book 1, what is everyone else using? I would only pay £600 if they replaced my surface 1 with a surface 3, and that is begrudgingly. as the replacement for both is the same price. Cant believe their flag ship computer only lasts 3 years, £technically £800 a year if buying the top of the raneg model (like I did), when a mac can easily go 6,7,8 years no problem. VERY tempted to get rid of all microsoft stuff eg xbox, desktop computer and use PlayStation and Mac products.
Any updates Scott? Am very interested in how you are getting on
To follow… Same problem with my Surface Book 1 in France.
I wish this would have said something about the wifi antennae that you can't see until you lift up the glass, by which point it's too late
Where is it???
John Doe -
Thank you for the introduction. I have removed the display battery. Can I use the SurfaceBook without the display battery?
Hello I’m also wondering if we can make it work without a battery in the display, do you manage to make it work ? Thank you
I know this is late to the party, but it's probably more relevant now these are older. I couldn't justify a new battery, so just removed to swollen batteries and it works fine without the screen battery. Obviously needs to be either directly attached to a charger or the run off the keyboard battery. Can't remove the screen from the keyboard without using the manual eject method because you can't remove the screen with the eject button when it doesn't have charge. Happy with the outcome, getting the screen off is clearly the hardest part of this process. Be really careful of the ribbons on the bottom right of the screen, they are really easy to damage.
Hello, I’ve had the swollen battery syndrom of my Surface Book … i’ve reached out to microsoft, they told me you are 2 months after your 3 years, you have to pay 600$ for extended warranty…..
i want to attempt removing the battery, is there a way i can use the surface without a battery? like a desktop, straight power?
I’ve repaired dozen of laptops, phones and tablets in my life, and I would definitely consider this a Hard to Impossible level of repair. Out of the two devices attempted, these are just some of the issues encountered: 2 cracked screens; touchscreen cable torn; screen scratched; 2 WIFI antennas ripped, multiple connectors damaged, chassis parts bent, scratched, etc. Basically every single step is full of little gotchas which if you miss will result in more parts needed to be ordered, or cosmetic damage to the device. If you’re doing this for a good deal because you think, as I did, that you can fix it - be prepared for a nearly $200 screen replacement in addition to the battery. If you’re doing this, as I almost did, for a client - be warned: even if you do manage to replace the battery without breaking anything, chances of causing cosmetic damage are high.
So what recommendations do you have to avoid mistakes??? 🤔
John Doe -
Guide is missing some fairly important information. It also shows images that are not going to fully reflect what the person opening one up is going to see such as the wires being taped down and connected to various connectors. Additional steps for handling that while in the process of removing screws from motherboard would be beneficial. This guide takes the “perfect scenario” route not recognizing that most everyone following this is going to be people with bloated batteries that have no choice but to open or toss the unit. In the event of a bloated battery your likely not going to just slide it out the side and will need to loosen up wires and connectors enough to lift the motherboard bottom (charger port side) up enough to pull the battery off adhesive and slide it forward and out. All in all the guide gives just enough information for a confident DIYer to be dangerous and likely bust a device. If your going to follow it you’ll likely have to get creative.
What recommendations do you have to avoid mistakes??? 🤔
John Doe -
Thanks to all who contributed here! The COMMENTS (at end & after each step) are CRITICAL. So glad I read them FIRST (along with watching a couple of YouTube videos).
I was replacing a swollen battery and was able to complete this repair in about 2 hours with the help of my teenager. It definitely helped to have a second set of hands and some young eyes and nimble fingers. There are lots of tiny screws. I found that they were all T3 - which is unfortunately NOT a driver size that comes in the basic iFixIt toolkit I also bought with my new battery :(
This definitely requires a lot of patience and some sort of credit card (you’re willing to break) to detach the old battery. It has a ridiculous amount of tape holding it down. Loosening it with heat and prying is not fun when there’s a risk of puncturing the puffy metal bag and risking fire.
I feel like the biggest unmentioned challenge is in the motherboard’s cables coming lose on both sides, without you even noticing it. They don’t have a very secure connection.
Hi, i have the same issue , replaced the batter, I can see the new batter is 49% but not charging. Do you fixed your battery?
nedi -
Hello,
I was able to run through the steps w/o an issue, however, after replacing the battery, the Tablet portion by itself won’t turn on. The surface book works only if is attached to the base. Detaching the hinges and plugging the power shuts down the computer (I’m guessing battery power switch between base and tablet).
Anyways, I ran the BIOS, nothing there, explored the Control Panel —> Device Manager (removed the battery 1 and re-added it) and checked the Windows Logs (no critical or error hardware events). Still the battery won’t work.
Running the command c:\Powercfg \batteryreport, I see that the battery is somewhat recognized, it displays the charge and manufaturer, but it doesn’t display serial number, name or cycle count. On the task bar, it display the charge left, but it doesn’t take charge when plugged in.
Display works (tactile and pen response, motherboard works, fan works, speakers as well).
Any suggestions?, Thank you.
Hi Yvan,
Did you find a solution to this non-ID of the battery? I have the same exact issues... updated driver etc.
Regards,
Todd
Any update??
John Doe -
I purchased my 13.5” i7 16GB RAM, 512 SSD SB1 in Oct2015 in the US.
In Nov2018 MS replaced it with a new one as battery swell extends the warranty to 3 years.
In Sep2021 my second SB1 again had swell issues. After providing a video of the S/N and swelled screen, MS replaced it with a 15” i7 16GB RAM 512GB SSD SB2 (Windows 11 compatible too).
The first replacement was organized via MS chat in Oct2018 for pickup at a MS store while I was traveling in the US as the SB1 was not sold in Thailand.
The second one was shipped to me to my home in NE Thailand. MS chat rep told me the old one would not be supported any longer and to take it to an eWaste facility of my choice because shipping the old one from Thailand was not possible. From chat to the new one arriving was about 8 days.
I cannot fault MS customer service, only the crappy glue everywhere design with faulty batteries.
I bought the tablet battery and will try to repair the SB1. If that goes well, I’ll get the base battery too as it also is swelling.
Several notes from me:
* You do not need to remove the connector to the keyboards. When I tried to remove it, the shield came out and I was afraid that I broke it. I think the better option is to just leave the connector in and flip the motherboard and remove the connections on the motherboards side.
* You do not need to remove the camera facing the outside of the laptop, just remove the connector that hooks it up to the motherboard and you can leave the camera in place.
* You’ll need to remove one of the speakers, the one on the left in the pictures so you can remove the headphone jack.
And yeah, even though it took me one hour and I heated the screen every 1/2 inch I still managed to crack the screen and break its touchpad
anyone can give me the part number for the battery?
mine is a 2016 and i’m in south america, battery has swollen A LOT, i don’t know how the screen hasn’t broke yet
i don’t think MS will cover me over here
Your writing is really informative, especially because it's so meaningful and updated. Thanks for sharing this wonderful post!
Your writing is really great. I’m so glad I read it. It kept me hooked the whole way through.
Thanks for this information. I really appreciate the information that you have provided.
The battery meter does not work after installing a new battery. Anyone know how to fix this?
New battery not recognized so device will only work while plugged in. Does anyone know the solution for this? Also, even when I reinstall the old battery it is not recognized now either.
Any update on this?
John Doe -
Excellent guide! It helped me in replacing the keyboard battery of my Surface Book. I decided to make my own tutorial video on how to do it making a Spanish version with captions in English so others can also benefit from the experience. This is the link of the video I did: https://youtu.be/4U2qcK9oR3s Thank you!
Hallo, ich habe eine Frage, und zwar möchte ich bei meinem Surface Book 2 den Akku tauschen. Dieser lädt nicht mehr. Zunächst einmal die Frage, das Gerät hat ja im Display den Akku, ist bei diesem Modell auch unter der Tastatur ein Akku? Wenn ja, dieser wird ja kaum dafür verantwortlich sein, dass das Gerät ohne Netzteil nicht mehr läuft, oder? Mein Gerät hat aber keine Belüftlungsschlitze an den Seiten wie das Gerät oben. Seriennumer ist: 013988674457. System-UUID ist CCAA38F0-CA22-D965-3DA7-E209FAA9F0FD
Würde dieser Akku --> Akku
für hinter das Display passen? Falls das Display beschädigt wird, würde dieses passen --> https://www.ebay.de/itm/133088283689?var...
Ich bitte um Rückmeldung. DANKE!!!
Can I just replace the battery for the screen or do I need to replace for both the screen and the keyboard? Does it matter?
I was able to use a heat gun and remove the screen without any issues (ex: No screen cracks or wifi antenna detachment etc). Then I was able to lift motherboard and replace the battery. However, after putting everything back, the right latch fails to open up. If I manually open it, then it works once or twice with the eject button, then again it fails to open up. Any suggestions would be greatly appreciated!
Pretty decent guide. Some more info on removing the shields for the display cable and touch panel would be really nice. I ended up skipping that part. Also you drastically underrepresented the tenacity of the display adhesive and the battery adhesive. I thought I was going to start a lithium fire trying to get that out.
Took a replacemt battery from ifixit last week (2023). They sendet me a battery from 2018 with a load of 28%
But this battery still isn't loading!!
(I have the performance base).
In microsoft tech community someone spoke of reverse connection between computer and battery, but i don't know how you would change a reversed connection...?
Im looking for surface book 3 screen battery 15"
This guide was fantastic, but in my experience, a corner is a better place to start prying the screen from the frame, than the middle.
I followed the instructions and purchased the battery directly from this website, but the replaced battery won’t charge past 74% ☹️