Introduzione
Questa guida ti mostrerà come rimuovere e sostituire la batteria del Lenovo ThinkPad X1 Carbon 6th Gen. Questo può risultare necessario se la batteria è danneggiata o semplicemente se troppo vecchia. Le batterie dei Laptop perdono parte della loro capacità quando vengono usati. Le batterie più comuni durano circa un pario d'anni. Se hai problemi col tuo computer, e sospetti che sia un problema della batteria, consulta la nostra pagina per la risoluzione di problemi prima di provare a sostituire la batteria. Tieni presente che un alimentatore può causare problemi simili. Prima di cominciare, assicurati di spegnere completamente il laptop e scollegalo dalla presa di corrente. Presta molta attenzione quando maneggi la batteri e smaltiscila adeguatamente.
Cosa ti serve
-
-
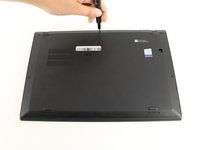
Usa un cacciavite Phillips #0 per rimuovere le quattro viti che tengono in posizione la cover posteriore del laptop.
-
-
-
-
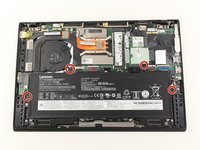
Usa un cacciavite Phillips #0 per rimuovere le quattro viti da 5 mm che tengono ferma la batteria al frame del laptop.
-


Per riassemblare il dispositivo, segui le istruzioni nell'ordine inverso.
Per riassemblare il dispositivo, segui le istruzioni nell'ordine inverso.
Annulla: non ho completato questa guida.
Altre 21 persone hanno completato questa guida.
Un ringraziamento speciale a questi traduttori:
100%


Questi traduttori ci stanno aiutando ad aggiustare il mondo! Vuoi partecipare?
Inizia a tradurre ›

Team

Cal Poly, Team S19-G4, White Winter 2020 Membro di Cal Poly, Team S19-G4, White Winter 2020
CPSU-WHITE-W20S19G4
3 Membri
23 Guide realizzate
9 Commenti
Does it require to switch off battery in BIOS first?
My work wanted to e-waste my 3 year-old ThinkPad. Bought the replacement battery here, followed the instructions—it works fine now. Thanks a lot.
danke )) ))
Great guide, and what an easy laptop to work on!!!
Step 4 is wrong.
You cannot pull the battery out on bottom edge because of the grey plastic arresting aids which you can see in the picture of step 3.
You first have to slide the battery as far as possible to the bottom edge into these grey parts so that the plug connection on top gets lose slightly and then carefully pull it out on side of the mainboard connector.
Also you do not need that Jimmy in step 2. After removing the screws just pull and lift the base cover with your fingers from the area where the hinges are located and then it easily slips out at the front.